
Night sky photography opens up a world of awe and wonder, allowing photographers to capture the celestial beauty that often goes unnoticed. Among the various subjects in night sky photography, the moon stands as a captivating focal point, brimming with detail and splendor. Capturing the moon’s craters, phases, and brilliance can be an incredibly rewarding experience, enhancing your photographic skills and fostering a deeper appreciation for the night sky.
If you are a beginner, don’t be intimidated by the prospect of night sky photography. With the right equipment, techniques, and a bit of patience, you too can create stunning images of the moon. So, let’s embark on this journey together and unlock the secrets to capturing breathtaking moon shots.
Essential Equipment
Cameras: DSLR vs. Mirrorless
When it comes to moon photography, both DSLR and mirrorless cameras have their advantages. DSLRs are renowned for their optical viewfinders, robust battery life, and extensive range of compatible lenses. On the other hand, mirrorless cameras boast a compact design, and electronic viewfinders, and often feature advanced technological innovations. Ultimately, the choice between DSLR and mirrorless will depend on your personal preferences and budget, but either will serve you well for capturing stunning moon images.
Lenses: Telephoto, Wide-angle
Choosing the right lens is crucial for moon photography. Telephoto lenses, which typically range from 200mm to 600mm, allow you to get up close and capture detailed shots of the moon’s surface and craters. If you want to include surrounding scenery to create a dramatic context, a wide-angle lens can be quite effective. These lenses not only capture the moon but also integrate elements of the night sky and landscape, adding depth and interest to your compositions.
Tripods for Stability
Stability is key in night sky photography, and a sturdy tripod is a must-have to avoid any blurring caused by camera shake. Look for a tripod that is durable yet lightweight enough to be easily carried to your shooting location. Adjustable legs and a rotating head can further enhance flexibility, allowing you to set up on uneven terrain and achieve the perfect angle.
Remote Shutter Release
A remote shutter release is another handy tool that helps minimize camera shake. Whether you opt for a wired or wireless option, this device allows you to take a photo without physically pressing the camera’s shutter button. This is especially useful for long-exposure shots, where even the slightest movement can ruin an otherwise perfect shot.
Optional Accessories: Star Trackers
For those looking to take their night sky photography to the next level, investing in a star tracker can be immensely beneficial. Star trackers are devices that counteract the Earth’s rotation, allowing for longer exposure times without star trails appearing in your images. This can be especially useful if you wish to capture not just the moon but also the detailed beauty of surrounding stars and celestial objects.

Camera Settings for Moon Photography
ISO Settings
When photographing the moon, setting the right ISO is crucial to achieving a sharp and clear image. A lower ISO setting, typically between 100 and 400, is ideal as it reduces the digital noise in your photographs. Since the moon is relatively bright, even at night, there is usually no need to bump up the ISO too high. Keeping the ISO low ensures that the detail and clarity of the moon’s surface are well-preserved.


Aperture Recommendations
Choosing the correct aperture setting can make a significant difference in moon photography. An aperture in the range of f/8 to f/16 is generally recommended. This range provides a good depth of field and ensures the entire moon is in focus, capturing its intricate details effectively. A smaller aperture (larger f-number) will also help in reducing the amount of light entering the lens, which is beneficial since the moon’s brightness can sometimes lead to overexposure.
Shutter Speed Tips
Shutter speed is another critical factor for capturing the moon. A fast shutter speed, around 1/125th to 1/250th of a second, is typically suitable for moon shots. This helps in freezing the moon’s motion and minimizing any potential blurring, particularly useful when the moon is high in the sky and moving faster relative to your camera’s frame. However, you may need to experiment with slightly slower speeds if your shots are underexposed.
Manual vs. Auto Focus
When it comes to focusing on the moon, manual focus is often the better choice. Autofocus systems can struggle in low light conditions and may not lock onto the moon accurately. By switching to manual focus, you gain full control over the sharpness of your image. Most cameras have a focus magnification feature in manual mode, allowing you to zoom in on the moon and adjust the focus ring until the details are crisp.
White Balance Adjustments
Though often overlooked, setting the correct white balance can enhance the natural color and appearance of the moon in your photos. Using the daylight white balance setting can accurately capture the moon’s hue, as it mimics the lighting conditions during the day when the moon reflects sunlight.
For more creative control, you can also customize the white balance to match the mood or color tone you prefer, such as a cooler blue tone for a more dramatic night-time effect. Whichever setting you choose, ensure it complements the natural look of your composition.

Techniques for Stunning Moon Shots
Composition Tips
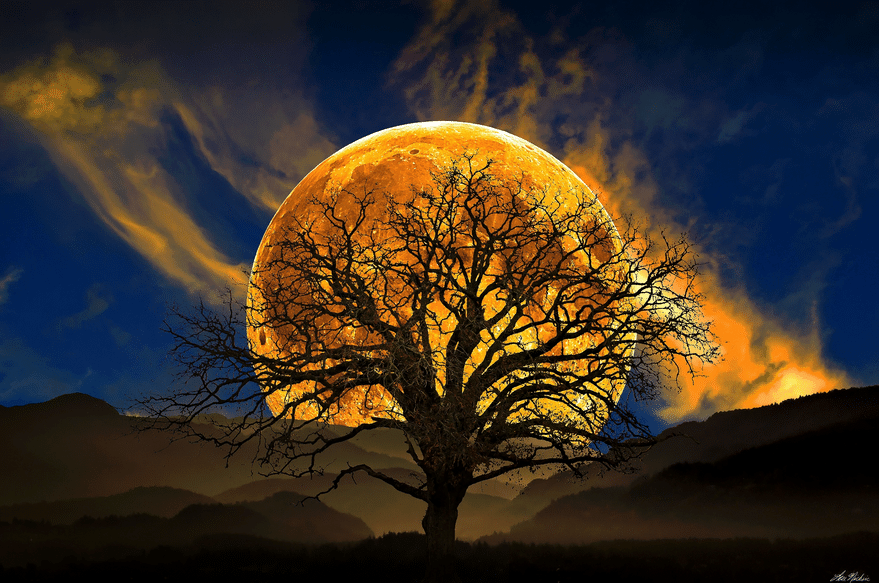
Creating a captivating composition is pivotal in moon photography. Start by following the rule of thirds: imagine your frame divided into nine equal segments by two equally spaced horizontal lines and two equally spaced vertical lines. Place the moon along these lines or at their intersections to create a balanced and visually appealing shot. Additionally, consider the moon’s position relative to the horizon or other elements in your frame. Aim to include some foreground interest, such as treetops, mountains, or buildings, to add context and scale to your images.

Dealing with Light Pollution
Light pollution poses a significant challenge for night sky photography, including moon shots. To mitigate its effects, try to shoot from a location far away from city lights and urban areas. National parks, rural landscapes, or remote beaches can be ideal for moon photography.
If complete escape from light pollution is not possible, use light pollution filters that can reduce the unwanted glare and enhance the contrast in your photos. Another useful technique is to shoot during the moonrise or moonset when the moon is closer to the horizon and the sky is naturally darker.

Long Exposure Photography
Long exposure photography can reveal intricate details of the moon and the night sky. To achieve this, set your camera on a stable tripod and use a remote shutter release to avoid camera shake. Start with an exposure time of a few seconds and adjust according to the moon’s brightness and composition. Remember to keep the ISO low and the aperture around f/8 to f/16 to maintain clarity. Long exposure can also bring out the subtle hues and textures of the moon’s surface, making your images more dynamic and detailed.
Using Natural Elements for Framing
Incorporating natural elements to frame the moon can create stunning compositions that are both unique and visually rich. Trees, cliffs, and silhouettes of landscapes can act as intriguing borders that draw the viewer’s attention to the moon while adding depth and context. Experiment with different angles and distances to see how these elements interact with the moon. Capturing reflections of the moon on water bodies, like lakes or oceans, can also add a dramatic effect, enhancing the overall storytelling of your image.

Post-Processing Tips
Post-processing is an essential step to polish your moon photos and bring out their best qualities. Start by adjusting the exposure to ensure the moon is well-lit but not overexposed. Fine-tune the contrast to highlight the details and textures on the moon’s surface. Use sharpening tools to enhance the clarity of the craters and edges.
Color adjustments can help in achieving a true-to-life representation or a more artistic rendition, depending on your creative vision. Finally, cropping and straightening can improve the composition and focus attention on the moon as the central subject. Remember, subtle adjustments often yield the best results, making your moon shots look natural and spectacular.
Best Times and Locations for Moon Photography
Choosing the best time and location is crucial for capturing stunning moon photos. Several key factors influence this, including the lunar phase, the darkness of the sky, weather conditions, and seasonal changes. Understanding and planning around these factors can significantly enhance the quality of your moon photography.

Optimal Lunar Phases for Photography
The different phases of the moon offer unique opportunities for photographers. While a full moon is the most popular phase due to its brightness and prominence, other phases can provide equally compelling shots. The waxing and waning crescent phases, for instance, reveal more of the moon’s surface details and create a striking contrast between the light and shadowed areas.
The first and last quarters can also be ideal for capturing the moon’s texture and depth due to the side lighting from the sun. Plan your shoots around the lunar calendar to capture the moon in its various phases.
Finding Dark Sky Locations
Finding a dark sky location is essential for minimizing light pollution and capturing the moon’s true beauty. Look for areas far from city lights and urban sprawl, such as national parks, rural landscapes, or remote coastlines. Various online tools and apps, like the Dark Sky Finder and Light Pollution Map, can help you identify the best locations for night photography.
Consider joining local astronomy or photography clubs that often organize trips to dark sky sites, providing not only ideal shooting conditions but also opportunities to learn and share with fellow enthusiasts.

How Weather Affects Moon Photography
Weather conditions play a significant role in moon photography. Clear skies are essential for unobstructed views of the moon; however, some cloud cover can add drama and interest to your images. Check local weather forecasts and satellite imagery to plan your shoots on nights with minimal cloud coverage.
Humidity can also affect the clarity of your shots, with drier conditions generally producing sharper images. Be prepared to adapt your plans, as weather can change rapidly, and being flexible will increase your chances of capturing the perfect shot.
Seasonal Considerations
Each season offers unique opportunities and challenges for moon photography. In autumn and winter, longer nights provide more time for shooting, and the crisp, cold air can result in sharper images due to lower atmospheric distortion. Spring and summer, with their milder temperatures, can be more comfortable for extended shoots, although shorter nights may limit shooting time.
Additionally, the seasonal position of the moon relative to the horizon can affect your compositions, with the moon appearing higher in the sky during winter and lower during the summer. Embrace these seasonal changes to capture a diverse portfolio of moon images throughout the year.

Overcoming Common Challenges
Blurring and How to Avoid It
Blurring is a common issue in moon photography, often caused by camera shake or movement. To minimize blurring, always use a sturdy tripod to keep your camera stable. A remote shutter release or the timer function on your camera can also help by allowing you to take the shot without physically pressing the shutter button, which could create vibrations. Additionally, ensure your lens and camera settings are correct; using a faster shutter speed can reduce the chances of motion blur, especially if shooting handheld.

Dealing with Overexposure
Overexposure occurs when too much light hits the camera sensor, resulting in a washed-out image. The brightness of the moon can easily lead to this issue. To avoid overexposure, start by reducing your ISO to a low value, such as ISO 100 or 200. Next, use a smaller aperture (higher f-number) to limit the amount of light entering the lens.
Adjusting your shutter speed to a faster setting will also help. Some cameras have built-in settings to highlight overexposed areas; use this feature to fine-tune your exposure levels.
Focusing on Issues and Solutions
Achieving a sharp focus in moon photography can be challenging. Start by switching your camera to manual focus mode, which provides greater control. Use the camera’s live view mode to zoom in on the moon and adjust the focus until the details are crisp. Autofocus can struggle in low-light conditions, so avoid relying on it for night shots. If available, employ focus peaking, a feature that highlights in-focus areas, to help you achieve better accuracy.

Adjusting Settings for a Clear Sky
For the clearest shots of the moon, adjusting your camera settings is crucial. Begin with a low ISO setting to reduce noise and maintain detail. Experiment with your aperture; an f-stop around f/8 to f/11 is typically ideal for moon photography.
Depending on the brightness of the moon and the clarity of the sky, adjust your shutter speed to capture the right amount of light without overexposing the image. Also, consider using a lens with a longer focal length to capture more detail. Regularly check your histogram to ensure a balanced exposure, and make the necessary tweaks to your settings accordingly.

Beautiful Moon Clicks with Mobile
Believe it or not, capturing beautiful moon shots is entirely possible with your mobile phone. With advancements in smartphone camera technology, you can achieve remarkable photos without the need for specialized equipment. Here are some tips to help you get started:
Use a Tripod
Achieving a clear and sharp image of the moon can be challenging without stability, particularly when using a mobile device. A tripod ensures that your phone remains steady, significantly reducing camera shake and resulting in sharper images. Compact and portable phone tripods are widely available and easy to set up, making them an essential accessory for moon photography.

Enable Pro Mode
Most modern smartphones come equipped with a Pro Mode or manual mode. Enabling this mode gives you greater control over camera settings such as ISO, shutter speed, and white balance. By manually adjusting these settings, you can optimize your mobile for moon photography, allowing for more precise exposures and sharper details.
Adjust Exposure
Finding the right exposure is critical to capturing the moon without overexposing it. Start by lowering your ISO to around 100 or 200 to minimize noise. Then, adjust your shutter speed to ensure the moon isn’t too bright or washed out. Experiment with these settings to find the perfect balance that reveals the moon’s intricate surface details.
Zoom Carefully
Digital zoom on mobile devices can degrade image quality, resulting in blurry or pixelated photos. Instead of relying solely on digital zoom, position yourself as close to the subject as possible. Gradually use the zoom feature, if needed, but be mindful of preserving image clarity. Some devices offer optical zoom, which provides better results compared to digital zoom.
Use a Telephoto Lens Attachment
A telephoto lens attachment can enhance your mobile moon photography by providing better magnification and preserving image quality. These attachments are often designed to fit over your phone’s camera lens and can significantly improve the level of detail captured. Investing in a good-quality lens attachment can make a substantial difference in your photos.
Focus Manually
Auto-focus might struggle with low-light conditions typically encountered in moon photography. Switch to manual focus to have complete control over the sharpness of your image. Most smartphones with a manual mode will allow you to adjust the focus manually, ensuring that the moon appears crisp and detailed.
Edit with Apps
Post-processing can elevate your moon photographs by enhancing details and adjusting elements that were difficult to capture perfectly in the camera. Use photo editing apps like Adobe Lightroom, Snapseed, or your phone’s built-in editor to tweak exposure, contrast, and sharpness. Subtle adjustments can bring out the moon’s textures and make your shots stand out.
By following these simple guidelines, you can start capturing stunning moon photos with your mobile device. Don’t hesitate to experiment and have fun exploring the night sky!

Monetizing Your Moon Photography
Turning your passion for moon photography into a source of income is a rewarding and achievable goal. Here are some avenues to explore:
- Stock Photography Websites: Platforms like Shutterstock, Adobe Stock, and Getty Images allow you to upload and sell your moon photos. High-quality, unique images often attract multiple downloads, providing a steady income stream.
- Print Sales: Create prints of your best moon photos and sell them through online marketplaces like Etsy or Fine Art America. You can offer a variety of formats, including framed prints, canvases, and posters.
- Photography Contests: Participating in photography contests can not only earn you prize money but also gain you recognition and exposure. Look for contests specifically targeting astrophotography or general photography.
- Social Media and Online Presence: Build a strong online presence through platforms like Instagram, where stunning visuals of the night sky can attract a large following. Partner with brands or offer paid tutorials and workshops.
- Freelance Projects: Offer your services to clients looking for specific night sky photos. This could include magazine editors, website designers, or even private collectors who are interested in unique moon shots.
By leveraging these opportunities, you can transform your hobby into a profitable venture while sharing your love for moon photography with a broader audience.
Inspiration and Continuing Learning
Moon photography is not just about the technical details; it’s also a journey of creativity and inspiration. Many photographers have captured breathtaking images of the moon, each with its unique perspective and artistic flair.
Viewing these photos can serve as a great source of inspiration and motivation. Explore platforms like Instagram, Flickr, and photography forums where enthusiasts share their best moon shots. Some of these images will leave you in awe and might spark new ideas for your own photography projects.
Showcase of Amazing Moon Photos
To showcase some incredible examples, look for renowned photographers who specialize in astrophotography. For instance, the works of photographers like Thierry Legault and Michael Shainblum offer exquisite lunar images that set the bar high. Seeing their compositions, use of light, and creativity can provide valuable insights and help you improve your own techniques.

Additionally, search for photo galleries curated by space agencies like NASA, which often feature some of the most stunning celestial images ever captured.
Resources for Learning More
For those eager to continue learning, there are abundant resources available:
- Books: Titles like “Night Photography and Light Painting: Finding Your Way in the Dark” by Lance Keimig or “The Astrophotography Manual: A Practical and Scientific Approach to Deep Sky Imaging” by Chris Woodhouse covers advanced techniques and offer practical advice.
- Online Tutorials: Websites like YouTube host a plethora of tutorials that range from beginner instructions to advanced techniques. Channels like AstroBackyard and Lonely Speck are excellent starting points.
- Communities: Joining online communities such as Reddit’s r/astrophotography, dedicated Facebook groups, and local photography clubs can be immensely beneficial. These platforms offer a space to ask questions, share your work, and receive constructive feedback from seasoned photographers.
Encouragement to Share Photos and Join Photography Groups
Don’t underestimate the power of community in your photography journey. Sharing your moon photos on social media and in photography groups not only allows you to receive feedback but also connects you to a supportive network of like-minded individuals. Participate in challenges, attend workshops, and collaborate with other photographers to continuously sharpen your skills and stay motivated.
Embrace the wonder of moon photography and let your passion for capturing the night sky lead you to new heights. Keep experimenting, stay curious, and most importantly, have fun with every click of the shutter. Happy shooting!
Conclusion
Capturing stunning moon photos with your mobile device is entirely achievable by following a few key steps. Start by using manual mode to have greater control over camera settings, adjust exposure carefully, and zoom in a way that maintains image clarity. Enhancing your setup with a telephoto lens attachment and focusing manually can further improve your results. Don’t forget the power of post-processing to fine-tune your photos and bring out the moon’s intricate details.
Exploring the artistic side of moon photography by seeking inspiration from renowned photographers and sharing your work in communities can deepen your appreciation and skill. Utilize books, online tutorials, and photography groups to continuously learn and grow in this craft.
Remember, every snapshot is a step in your journey as a moon photographer. Keep experimenting, stay curious, and embrace the endless possibilities that night sky photography offers. We encourage you to share your moon photos and experiences in the comments below. Your stories and images can inspire and motivate others to embark on their own moon photography adventures. Happy shooting!


