
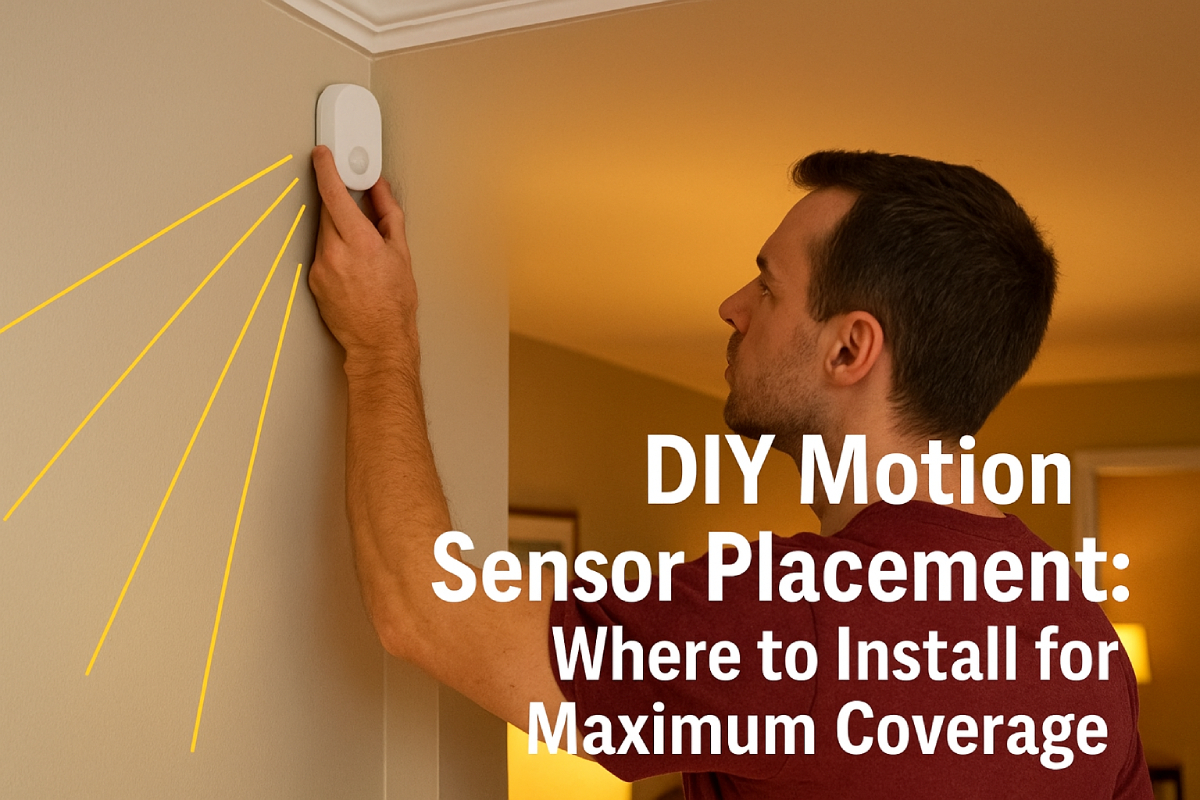
Correct DIY motion sensor placement is critical for robust home security and smart-lighting efficiency: mounting sensors in room corners at an optimal height of 6–8 feet ensures a broad, obstruction-free field of view, covering key entry and high-traffic zones with minimal units required.
Strategic positioning also cuts false alarms by keeping sensors away from heat sources, vents, and direct sunlight, ensuring reliable detection when it matters most.
By only activating lights upon genuine motion, homeowners can slash energy consumption and costs—studies report up to 50% savings
How Motion Sensors Work
PIR (Passive Infrared) sensors detect motion by sensing changes in infrared radiation, making them an affordable choice for indoor security, but they’re limited to about 30 ft of range, require direct line of sight, and struggle with very slow-moving objects or extreme temperatures.
Microwave sensors use low-power radio waves and Doppler shifts to “see” through non-metallic barriers, offering 50–100 ft detection distances but a higher susceptibility to false alarms around HVAC ducts or metal surfaces.

Dual-technology units blend PIR and microwave elements, requiring both to trigger before an alarm, which cuts false positives and boosts reliability.
Most motion sensors feature 90°–180° fields of view with ranges up to 30 ft, while ceiling-mount models can achieve 360° coverage across a 30–36 ft diameter for full-room monitoring (amazon.com).
Sensor Technologies
Passive Infrared (PIR)
PIR sensors contain two pyroelectric elements that detect the infrared energy emitted by warm bodies. When a heat source moves across these elements, the differential signal triggers an alarm.

They’re popular because they’re low-cost, low-power, and easy to install, but they have notable limitations:
- Range: Typically up to 30 ft, depending on lens design.
- Field of View: Between 90° and 180°, determined by the Fresnel lens.
- Line-of-Sight: Cannot detect motion through walls or glass; any obstruction blocks detection.
- Environmental Sensitivity: Performance drops above 35 °C and under very slow movements.
Microwave and Dual-Tech Comparisons
- Microwave Sensors emit continuous radio waves and measure the Doppler shift when an object moves, allowing them to detect motion through drywall, wood, and thin plastic.
- Range: Up to 100 ft, ideal for large indoor or outdoor spaces.
- Field of View: Often 360° for ceiling mounts or adjustable beams for wall installations.
- False Alarms: More prone around metal fans, HVAC vents, and rolling objects.
- Dual-Technology Sensors integrate both PIR and microwave modules in one housing. By requiring both sensors to trip simultaneously, they significantly reduce false positives while maintaining wide coverage.
| Technology | Detection Principle | Range | Field of View | Barrier Penetration | False Alarm Rate | Relative Cost |
|---|---|---|---|---|---|---|
| PIR | Infrared differential | Up to 30 ft | 90°–180° | No | Low–Medium | Low |
| Microwave | Doppler radar | 50–100 ft | 360°/adjustable | Yes | Medium–High | Medium |
| Dual-Tech | PIR + Microwave | Up to 50 ft | 90°–360° | Conditional | Low | High |
Coverage Patterns
Most wall-mount sensors project a triangular or teardrop detection zone, while ceiling-mount units offer omnidirectional coverage. Coverage details include:
- Wall-Mount:
- Field of View: 90°–180° (amazon.com)
- Range: Up to 30 ft (amazon.com)
- Ceiling-Mount:
- Field of View: 360°
- Coverage Diameter: 30–36 ft
- Corner-Mount:
- Field of View: ~120°–180°
- Range: Up to 30 ft
| Mount Type | Field of View | Range |
|---|---|---|
| Wall-Mount | 90°–180° (amazon.com) | Up to 30 ft (amazon.com) |
| Ceiling-Mount | 360° | 30–36 ft diameter |
| Corner-Mount | 120°–180° | Up to 30 ft |
By understanding each technology’s strengths and coverage geometry, homeowners can strategically place sensors to ensure maximum detection with minimal blind spots.
Core Placement Principles
Optimal motion sensor placement hinges on four key principles—mounting height, corner positioning, sensor overlap, and avoiding obstructions—to ensure reliable detection, minimal false alarms, and energy-efficient smart lighting. Mounting sensors at 6–8 feet (ideally around 7 feet) on interior walls delivers the broadest coverage while staying above most pets and below ceiling fixtures.
Placing sensors in room corners that face entry points dramatically widens their field of view and cuts blind spots compared to wall-center installations.
Designing overlap—where adjacent sensors’ detection zones intersect—eliminates coverage gaps, guaranteeing every square foot is monitored.

Finally, keeping sensors clear of bulky furniture, HVAC vents, and direct sunlight prevents errant triggers by maintaining unobstructed sightlines and stable thermal environments.
Optimal Mounting Height
Mounting height is the foundation of effective DIY motion sensor placement. Here’s why the 6–8 foot range works best:
- Balanced Detection: At 6–8 feet, sensors capture human-sized heat signatures across the entire room without “looking” too far overhead or too low under furniture.
- Pet Immunity: Positioning above 6 feet helps many PIR sensors ignore pets under 40 lbs, reducing false alarms.
- Angle Optimization: Slightly angling the sensor downward from 7 feet ensures motion along the floor plane and mid-body level is reliably detected.
| Height | Advantage | Notes |
|---|---|---|
| 6 feet | Ideal for pet-immune models | Follow manufacturer guidelines; ensure test button faces upward |
| 7 feet | “Sweet spot” for balanced range and angle | Check specific sensor manual—some recommend exactly 7 feet |
| 8 feet | Extends maximum coverage slightly higher | Avoid ceiling mounting unless 360° coverage is supported |
Corner vs. Wall-Center Installation
Where you aim your sensor can be as important as its height. Corners offer distinct advantages:
- Wider Field of View: In a corner, most sensors sweep out 120°–180°, covering two adjoining walls in a single sensor footprint.
- Entry-Point Focus: Corners facing doors or hallways force intruders to cross the detection zone immediately upon entry, boosting security efficacy.
- Reduced Blind Spots: Wall-center mounts typically leave dead zones on both sides; corner mounts overlap these gaps naturally.
Overlap and Zone Coverage
Even the best-placed sensor can leave gaps if used in isolation. Overlapping detection zones ensures zero blind spots:
- 2-Sensor Strategy: In medium rooms, place two sensors on adjacent walls so their 30 ft ranges intersect by at least 5 ft, creating redundant coverage in trigger-critical areas.
- Large/Open Areas: For open-plan spaces, deploy a grid of sensors (e.g., four in a square) ensuring each covers an overlapping quadrant.
- Heat-Map Testing: Perform a walk-test and mark weak spots; adjust sensor positions until the entire zone registers movement consistently.
Avoiding Obstructions & False Triggers
Sensors must “see” freely to work reliably. Common pitfalls include:
- Large Furniture: Couches, bookshelves, and cabinets block infrared lines of sight—never place sensors behind or directly above bulky pieces.
- HVAC Vents: Sudden bursts of hot/cold air create thermal noise that mimics human motion; keep sensors at least 3–4 feet away from vents.
- Direct Sunlight & Windows: Sunlight heats the sensor lens unevenly, causing spurious alarms; install sensors out of direct sun paths or use shades to diffuse light.
By applying these core principles, you’ll maximize coverage, minimize false alarms, and ensure energy-saving smart-light activations—turning your DIY motion sensor placement into a professional-grade home security solution.
Room-by-Room Placement Guide
Before diving into room-specific tips, here’s a quick overview of the placement logic you’ll see below: sensors belong where an intruder must pass (entryways, hallways), corners maximize range in open living areas, bedrooms demand a balance between security and personal privacy, kitchens and utility rooms need “thermal hygiene” to prevent false alarms, basements and garages require strategies for low-light detection, and outdoor perimeters perform best with downward-angled sensors paired with motion-activated lighting.
Entryways & Hallways
Motion sensors should be installed so they funnel intruders through predictable, high-traffic routes. Corners that face doors or stairways catch anyone entering or moving between zones immediately upon crossing their field of view.
Placing a sensor about 6–8 feet high in the corner of an entryway means a burglar can’t sneak past without triggering it—and you’ll need fewer sensors overall.
Living Rooms & Open Areas
Living rooms often have furniture clusters, rugs, and décor that can block PIR sensors. Aim sensors at doorways and open sightlines, not at the middle of a sofa or beyond coffee tables—this ensures nothing in the clutter obstructs detection.
Installing sensors in diagonally opposing corners of a large, open-plan living area guarantees their 90°–180° beams overlap, eliminating blind spots and balancing coverage.
Bedrooms & Private Spaces
Bedrooms require mindful placement to respect privacy while still monitoring access. Mount sensors near the door, angled inward so they trigger on anyone entering but never directly at the bed—this protects personal space and avoids constant “housekeeping” alerts.
If you use smart-home automations, consider arming these sensors only when you’re away to prevent disturbances.
Kitchens & Utility Rooms
Heat sources and moving appliances can confuse PIR sensors. Keep them at least 3–4 feet from ovens, stoves, radiators, and HVAC vents to reduce false alarms.
Aim sensors toward the main traffic path—often from the adjacent dining area or hallway—rather than at counters or sinks, so appliances won’t trip them.
Basements & Garages
Basements and garages tend to be dim and expansive. Direct sensors toward doors and ground-level windows, since intruders often try these low-profile entries.
For low-light areas, choose PIR models rated for cold or damp environments and combine them with auxiliary LED lighting triggered by motion for reliable coverage.
Outdoor Perimeters
Outdoor sensors belong 8–10 feet high on eaves or poles, aimed slightly downward to catch ground-level movement without blind spots.
Space multiple units roughly 8–10 feet apart along fence lines or around a property’s perimeter and pair them with motion-activated LED floodlights—this layered approach ensures wraparound detection and instant illumination for both security and safety.
Specialized Scenarios
Before tackling niche challenges, here’s what to remember: tailoring sensor setup for pets, vaulted ceilings, or hidden valuables ensures you don’t compromise on detection accuracy or convenience.
Adjusting height, angle, and technology type lets sensors ignore non-threats, cover unusual geometries, or discreetly monitor high-value items without alerting would-be thieves.
Pet-Friendly Installations
Creating a pet-immune setup means keeping your furry friends from setting off alarms while still catching intruders.
- Mount Height & Angle: Install PIR sensors at 7.5–8 ft high and angle them slightly downward so pets under 3 ft tall stay below the main detection zone.
- Sensitivity Settings: Many systems let you dial sensitivity down to ignore small heat signatures; start at the lowest setting that still reliably spots a person walking.
- Beam Blockers & Masking: Use adjustable wedges or plastic masks to block lower beams—this DIY trick prevents cats and small dogs from entering the detection “sweet spot” while keeping upper beams active.
| Pet Height | Mount Height | Angle Adjustment | Notes |
|---|---|---|---|
| Under 3 ft | 7.5–8 ft | 5°–10° downward tilt | Pets remain under the beam; humans cross it easily |
| Over 3 ft | 8 ft+ | 10°–15° downward | Consider beam blockers if pet can reach higher |
High Ceilings & Vaulted Spaces
Tall or angled ceilings require specialized mounts to maintain coverage without false dead zones.
- Ceiling-Mount PIRs: For ceilings 10 ft+, choose sensors designed for high-bay use; they project an 8 m (26 ft) diameter pattern at 3 m (10 ft) height.
- Adjustable-Angle Wall Mounts: In vaulted rooms under 10 ft, use wall mounts with adjustable brackets—aim them parallel to the floor to catch motion across the plane rather than directly toward the sensor.
- Coverage Diameter: Standard ceiling models cover 30–36 ft across; double-check manufacturer specs and overlap zones when ceilings vary in height.
| Ceiling Height | Recommended Sensor | Coverage | Installation Tip |
|---|---|---|---|
| 8–10 ft | Adjustable-angle wall mount | 90°–180°, 30 ft range | Angle downward to sweep room |
| 10–15 ft | High-bay PIR ceiling sensor | 360°, 26–30 ft diameter | Center above entry points |
| Vaulted (>15 ft) | Dual-tech ceiling sensor | Up to 50 ft | Consider microwave + PIR for extended range |
Protecting Valuables
Discreet sensors behind décor can silently alert you when prized items are moved.
- Diversion Safes & Housings: Embed micro-motion sensors inside diversion safes or hollowed-out books—common objects that thieves won’t suspect.
- Birdhouse & Décor Concealment: Outdoor or indoor birdhouse enclosures protect sensors from weather and view, while letting them monitor doorways or display cases.
- Targeted Zone Alerts: Aim a small sensor behind valuables (jewelry boxes, art) so it only trips when the item’s moved, not on general room activity.
- Specialty Sensor Modules: Commercial “valuable item” sensors feature narrow beams and built-in tamper alerts—pair these with your alarm panel for granular control.
| Concealment Method | Sensor Type | Use Case | Key Benefit |
|---|---|---|---|
| Diversion Safe | Micro-motion module | Cash, documents | Invisible until opened |
| Birdhouse Enclosure | Standard PIR | Patio doors, display windows | Weather-proof + camouflaged |
| Hollow Book Mount | Slimline motion sensor | Shelves, home office | Blends with décor |
| Jewelry Tray Sensor | Narrow-beam detector | Jewelry boxes | Triggers on tray removal only |
By fine-tuning placement and technology choices for these specialized scenarios, you’ll achieve pro-level security without sacrificing convenience, aesthetics, or peace of mind.
Common Mistakes & Troubleshooting
Even the best DIY motion sensor setup can fall short if you overlook blind spots, environmental triggers, and proper mounting angles. Blind spots often occur near corners, door jambs, or under furniture, compromising coverage without obvious warning.
Environmental factors such as direct sunlight, HVAC drafts, and small pets are responsible for a large share of false alarms, leading to unnecessary disruptions and eroding confidence in your system.
Sensors mounted too high, too low, or misaligned can significantly shrink the effective detection zone, allowing breaches or triggering on harmless movement.
Addressing these common pitfalls with targeted adjustments and strategic placements ensures reliable security coverage and seamless smart-light integration.
Blind Spots & Coverage Gaps
To identify coverage gaps—also known as blind spots—start with a simple walk-test: walk the perimeter of the sensor’s field of view and note areas where motion fails to trigger an alert.
Use colored tape or smartphone apps that display motion detection zones to map out the sensor coverage, marking areas of no response.
Common culprits include furniture blocking line of sight, doorjambs interrupting beams, and structural corners outside the sensor’s optimal cone.
To plug these gaps, reposition the sensor for a clearer arc, adjust its angle to cover low-traffic zones, or add secondary sensors for overlapping coverage
| Blind Spot Cause | Solution |
|---|---|
| Furniture & Shelving | Relocate sensor away from fixed objects; aim over top of furniture |
| Corners outside detection arc | Move sensor to a corner facing entry or install dual-sensor setup for overlap |
| Door Jambs & Window Frames | Adjust sensor height or angle to avoid beam interruption |
False Alarms
False alarms undermine system reliability and often stem from pets under the sensor’s detection threshold, sudden thermal shifts from vents, or direct sunlight heating the lens.
Evaluate each potential trigger by temporarily blocking suspected sources—if the alarm stops, you’ve located the culprit.
For pets, mount sensors at least 6–8 feet high or choose pet-immune models; for vents, position sensors a minimum of 3–4 feet away; for sunlight, install away from windows or use shields to diffuse rays.
| False Alarm Cause | Typical Impact | Mitigation |
|---|---|---|
| Pets & Small Animals | Frequent, random triggers | Mount >6 ft high; lower sensitivity or use pet-immune sensors |
| HVAC Vents & Fans | Intermittent alarms on heating/cooling cycles | Relocate sensor 3–4 ft away; adjust tilt away from vents |
| Direct Sunlight | Alarms at specific times of day | Install shade or reorient sensor; avoid pointing at windows |
Incorrect Heights & Angles
Improper mounting height or angle can drastically reduce a motion sensor’s effectiveness. If the sensor fails to detect movement at ankle level but picks up overhead motion, it’s likely mounted too high; conversely, if it misses mid-body movement but senses floor-level activity, it’s too low.
Signs of misalignment include dead spots directly under the sensor or streak-shaped detection zones limited to narrow beams.
To correct this, follow the manufacturer’s height guidelines—usually 6–8 feet for wall mounts—and ensure the lens is parallel to the average midline of human movement.
| Mounting Error | Symptom | Adjustment |
|---|---|---|
| Too High (>8 ft) | No detection under sensor | Lower to 6–8 ft; angle downward 5°–10° |
| Too Low (<6 ft) | Detects floor-only; misses upper body motion | Raise to 6–8 ft; level sensor vertically |
| Misaligned Angle | Narrow or streaked detection zone | Re-angle per manual; perform walk-test |
Testing & Fine-Tuning
Before diving into the details, remember that thorough testing and fine-tuning are the final steps to professional-grade DIY motion sensor installation. A proper walk-test verifies coverage without triggering alarms, sensitivity adjustments ensure the sensor only reacts to real threats, and heat-map tools reveal hidden blind spots—together, these steps guarantee reliable security and energy-efficient smart lighting.
Walk-Test Procedures
A walk-test simulates real movement to confirm each sensor’s detection zone without alarming your central station. Follow these steps:
| Step | Action |
|---|---|
| 1 | Enter Walk-Test Mode on your alarm panel or sensor (often via system menu or walk-test switch) |
| 2 | Walk Slowly through the entire room, including corners, doorways, and potential hiding spots |
| 3 | Observe Indicator—sensors typically flash an LED or report on the panel when motion is detected |
| 4 | Map Gaps by marking areas that do not trigger the sensor with tape or a mobile app overlay |
| 5 | Adjust Position/Angle and repeat the walk-test until every desired zone triggers consistently |
Sensitivity & Range Adjustments
Calibrating your sensor’s trigger threshold and range knob prevents false alarms and ensures intruders aren’t missed. Most PIR and dual-tech sensors include a sensitivity dial and a range adjustment.
| Control | Function | Recommended Setting |
|---|---|---|
| Sensitivity Dial/Switch | Adjusts heat-signature threshold | Start at medium, lower if pets/vent drafts cause false alarms |
| Range Adjustment Knob | Limits maximum detection distance (e.g., 7 m) | Set to 80% of room’s largest dimension to avoid overshoot |
| Time-Delay Control | How long the sensor remains active after trigger | 5–10 seconds balances security with energy savings |
- Reduce false triggers by lowering sensitivity if small pets or airflow trigger the sensor.
- Optimize coverage by increasing range only in large rooms or outdoor zones, but avoid pointing into open fields where wind may cause alerts.
- Test after each tweak—repeat the walk-test to validate your new settings.
Using Heat-Map Tools & Apps
Heat-map overlays visually represent how often motion occurs in each area, revealing coverage gaps and high-traffic zones. Here are popular options:
| Tool/App | Platform | Features | Use Case |
|---|---|---|---|
| CCTV Camera World Heat-Map | Web | Color-coded frequency overlay on recorded footage | Identify hot/cold zones over 24-hour periods |
| Verkada Command | Cloud Dashboard | Heatmaps + bounding boxes for people/vehicle density | Optimize camera angles in retail or entryways |
| GenSecurity Analytics | On-Prem or Cloud | Real-time activity heat maps with alert thresholds | Fine-tune sensor range in warehouses or garages |
| Mobile Walk-Test Apps | iOS/Android | AR overlays to mark live detection as you walk | Quick field adjustments without system shutdown |
- Deploy cameras with heat-map features in critical rooms first to visualize motion patterns over several days.
- Overlay sensor zones in your security app to confirm that motion-sensor coverage aligns with where heat-map activity is highest.
- Iterate placement based on heat-map insights—move or add sensors where activity is missed.
By rigorously following these walk-test procedures, sensitivity calibrations, and heat-map analyses, you’ll transform your DIY motion sensor installation into a finely tuned, professional-grade security system.
Integrating with Smart Home Systems
Smart home integration transforms standalone motion sensors into a cohesive security and automation network. By zoning and grouping sensors into logical areas—such as “entry,” “downstairs,” or “garage”—you streamline your automation rules and ensure only relevant devices react to motion events.
Modern platforms like Home Assistant support binary sensor groups, letting multiple motion detectors act as one entity for lighting and alert automations, while Hue’s “Device groups” feature brings together several Philips sensors under a single group for synchronized triggers.
When grouped effectively, you avoid rule conflicts and reduce the number of automations you must manage.
Automation scenarios then leverage these zones to trigger lights, activate cameras, or send alerts based on motion: for example, hallway motion can turn on LED strips at night, while perimeter sensors can switch on floodlights and start recording on security cameras.
More advanced scripts—such as Google Home’s “Turn on cameras when leaving home” routine—use presence and motion events in tandem to arm cameras only when you’re away, minimizing false recordings.
By combining multiple sensors in a zone, you can also create directional sequences, such as illuminating only the pathway toward the bathroom in the middle of the night.
Zoning & Grouping Sensors
Creating logical sensor zones simplifies automation and enhances reliability. Common strategies include:
- Binary Sensor Groups (Home Assistant): Under Settings > Devices & Services > Helpers, create a “Binary Sensor Group” to unite multiple motion sensors into one virtual device. This reduces duplicate automations and ensures any sensor in the group can trigger actions.
- Hue Device Groups: In the Hue mobile app’s “Device groups” menu, select multiple motion sensors and assign them to a single group—ideal for grouping upstairs or downstairs sensors, so all lights in that zone respond simultaneously.
- SmartThings Zones: Use SmartThings’ Zone Manager to include contact sensors and motion sensors in a single zone; any activity in that zone triggers your pre-set automations without writing complex rules for each device.
- Protocol-Based Grouping: Ensure all sensors in a zone use the same protocol (Z-Wave, Zigbee, or Wi-Fi) for consistent response times and mesh reliability.
| Platform/Method | How to Group | Benefit |
|---|---|---|
| Home Assistant | Helpers → Create Helper → Binary Sensor Group | Single entity for multiple sensors, fewer automations |
| Philips Hue App | Settings → Device groups → Add motion sensors | Synchronized lighting, easy zone control |
| SmartThings Zone Manager | Create Zone → Add motion & contact sensors | Unified zone triggers, simplified rule management |
| Protocol Consistency (Z-Wave/Zigbee) | Select same protocol devices for zone | Reliable mesh network, reduced latency in trigger execution |
Automation Scenarios
Once zones are established, craft automations that respond intelligently to motion events:
| Scenario | Trigger | Action |
|---|---|---|
| Night Hallway Lighting | Motion in “Hallway” zone | Turn on hallway LED strip at 10% brightness for 2 minutes |
| Away Mode Camera Activation | HomePresence = AWAY | Power on all indoor cameras; send push notification |
| Perimeter Alert | Motion in “Outdoor” zone | Switch on floodlights; start recording on front-door cam |
| Bathroom Pathway Guidance | Motion in “Bedroom” zone | Illuminate pathway lights to bathroom at 5% brightness |
| Security Alarm Sequence | Motion + Door Contact breach | Sound siren; flash smart bulbs red; send SMS alert |
- Chaining Actions: Use platform-specific scripting to sequence actions—e.g., when driveway motion is detected, first turn on porch lights, then wait 2 seconds before activating the camera recording to capture the full event.
- Conditional Logic: Combine motion with time, presence, or sensor state: only trigger lights if it’s after sunset and someone is home, or only sound an alarm if the security system is armed.
- Energy Efficiency: Set motion-triggered lighting to auto-off after a timeout (e.g., 1–2 minutes) and integrate with smart plugs to cut power to idle appliances, maximizing savings without sacrificing security.
By zoning sensors and designing context-aware automations, you build a home security system that’s both powerful and intuitive, blending seamless protection with smart convenience.
Conclusion
By mounting your motion sensors between 6–8 feet high, placing them in room corners that face entry points, and focusing on high-traffic zones like hallways and doorways, you’ll achieve maximum coverage with fewer devices and far fewer blind spots or false alarms.
These simple yet powerful placement strategies streamline your security setup and boost smart-lighting efficiency by only activating lights where—and when—they’re needed.
Ready to take the next step? Download our free, printable placement checklist to map your home’s ideal sensor locations and transform your DIY security into a professional-grade system today.
FAQs
What’s the best height for mounting motion sensors?
Ideally mount sensors on walls 6–8 feet high to balance coverage and avoid pet triggers.
Why are corners better than wall-center installs?
Corners facing entryways expand the sensor’s 120°–180° field of view and funnel intruders through monitored zones.
How do I eliminate blind spots?
Design 5 ft overlap zones between adjacent sensors so their ranges intersect and cover gaps.
What causes most false alarms?
Common culprits include HVAC vents, direct sunlight, and small pets—keeping sensors away from these reduces spurious triggers.
How much energy can motion-activated lighting save?
Studies show 30–50 % reductions in lighting energy use when paired with occupancy sensors
Main Tips
- Always perform a walk-test after installation to map coverage.
- Angle sensors downward 5°–10° from the recommended height for best detection.
- Use dual-tech sensors in high-traffic or pet-heavy areas to reduce false alarms.
- Space outdoor sensors 8–10 ft apart at 8–10 ft height for perimeter coverage.
- Group sensors by zone in your smart home hub to simplify automations.


