
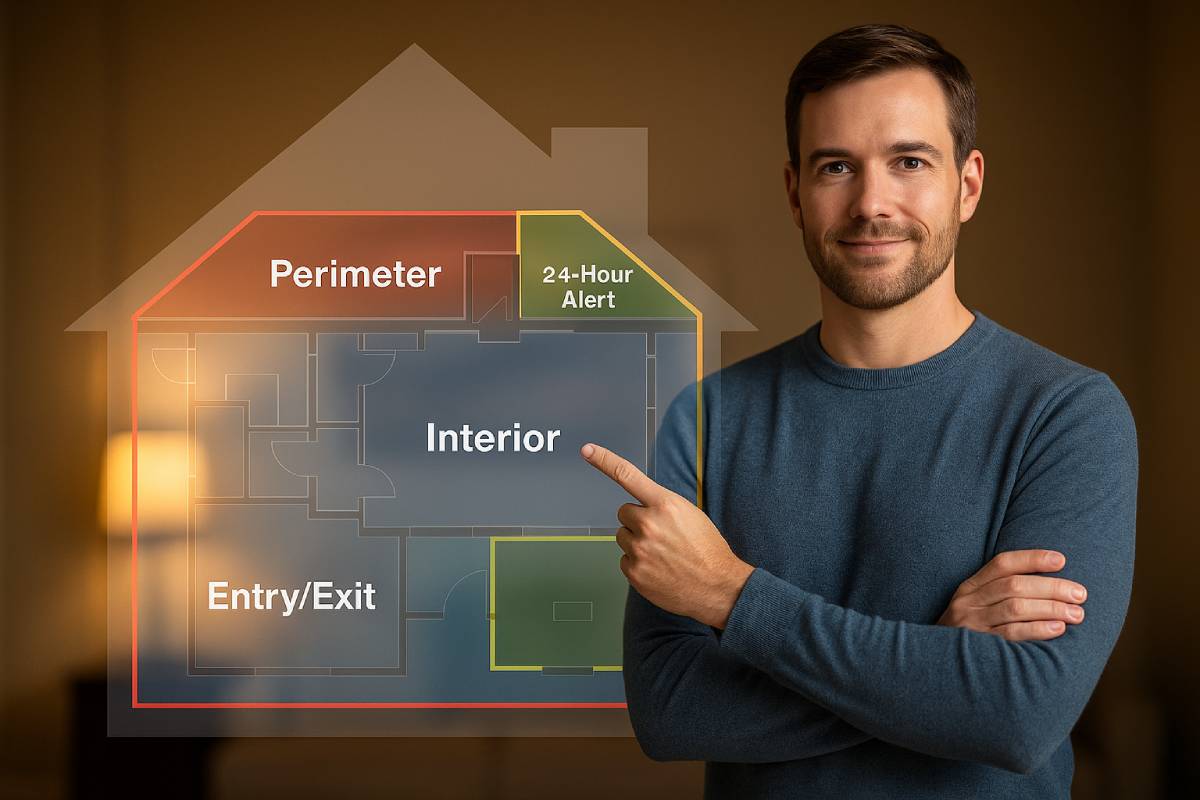
Security zones segment your home into distinct monitored areas—perimeter, entry/exit, interior, and motion-detection zones—to pinpoint where alerts originate and reduce false alarms.
Implementing zones in your DIY home security system, whether using door/window contacts or PIR sensors, empowers you to tailor detection sensitivity and response protocols across different areas of your property.
This article outlines a step-by-step process—assessing vulnerable points, mapping zones on a floor plan, selecting the right sensors, configuring zone settings, and integrating with smart home hubs—so you’ll gain the knowledge and tools to build a robust, zone-based security network that fits your needs.
Understanding Security Zones
In this section, we define security zones as distinct monitored areas on your alarm panel and explain how zoning helps isolate and target specific threats across your property.
We also list the four primary zone types—perimeter, entry/exit, interior, and alert zones—along with their key functions and common sensor types.

Definition
A home security zone is a specific area of the house as displayed on your alarm system’s control panel, grouping together sensors dedicated to monitoring that sector and enabling targeted threat response.
Common Zone Types
| Zone Type | Definition | Common Sensors |
|---|---|---|
| Perimeter | Monitors all entry points—doors, windows, and glass-break detectors—triggering an immediate alarm if breached while armed. | Glass-break sensors, door/window contacts |
| Entry/Exit | Provides entry and exit delay timers for main access routes, allowing authorized users time to arm/disarm before alarm activation. | Door contacts, motion detectors |
| Interior | Activates only in away-mode to detect movement inside the premises without affecting occupants during stay-mode. | PIR motion sensors, interior door contacts |
| Alert (24-Hour) | Always active regardless of system state, reporting critical events such as fire, carbon monoxide, or panic alarm to ensure immediate response. | Smoke detectors, CO detectors, panic buttons |
By understanding these core zone types, DIY installers can ensure comprehensive coverage tailored to each risk area around their home.
Planning Your Security Zones
Here’s how to plan your security zones step-by-step—starting with a thorough assessment of vulnerabilities and ending with a clear, to-scale zone map you can use for sensor placement.

A comprehensive security assessment begins with a perimeter walk-around—inspecting doors, windows, fencing, and landscaping—to spot weak points before an intruder does.
Next, evaluate interior blind spots (hallways, corners) and entry routes, identifying every door, window, vent, and garage access point for potential exploitation. Use a structured checklist—covering lighting levels, lock integrity, and neighborhood risk factors—to ensure nothing’s overlooked.
Finally, rank each vulnerability by ease of access and potential impact to define logical zone boundaries (perimeter vs. interior vs. 24-hour alert zones).
When your assessment is complete, transfer findings onto a scaled floor plan or simple sketch. Divide the property into discrete zones—labeling each and marking recommended sensor locations (door/window contacts, PIR motion detectors, glass-break sensors, smoke/CO alarms)—so installation is precise and coverage gaps are eliminated.
Below is a sample zone-mapping template you can adapt:
| Zone Name | Area Covered | Recommended Sensor Type | Quantity | Notes |
|---|---|---|---|---|
| Zone 1: Perimeter | Front & back doors | Door/window contacts | 4 | Mount 6 in above floor |
| Zone 2: Windows | Ground-floor windows | Glass-break detectors | 3 | Position within 3 ft of glass |
| Zone 3: Interior | Hallways & living spaces | PIR motion sensors | 2 | Avoid direct sunlight |
| Zone 4: 24-Hour Alert | Smoke & CO detector coverage | Smoke & CO detectors | 5 | Always powered, no bypass |
Sample zone map template for sensor placement.
To finalize your plan:
- Overlay & Walk-Test
Physically lay sensor components over your printed map, then arm and trigger each zone to confirm full coverage and tweak placement as needed. - Refine Boundaries
If two adjacent sensors overlap excessively or leave gaps, adjust your zone lines and sensor count to strike the right balance between security and cost. - Document & Save
Keep both digital and printed copies of your zone map for installer reference and future system upgrades.
Equipment Selection for Each Zone
Implementing the right mix of sensors for each security zone ensures precise threat detection, minimizes false alarms, and tailors protection to your home’s unique layout. For perimeter areas, compact door/window contacts like the YoLink Smart Home Kit or Aqara sensors offer reliable open/close detection with easy wireless installation.

In interior zones, Passive Infrared (PIR) motion detectors such as PowerG’s PG9914 or Vivint’s standard PIR units deliver accurate movement sensing while filtering out pets and environmental noise.
Glass-break sensors—ideally acoustic models placed within 20 ft of vulnerable windows—round out alert zones by detecting shattering glass patterns before an actual intrusion occurs.
Finally, multi-sensor intrusion panels (e.g., DSC PowerSeries with RF receivers or 2GIG GC3e) consolidate door/window, motion, glass-break, and environmental inputs into a single control interface, enabling smarter automation, partitioning, and advanced alarm logic.
Recommended Sensor Types by Zone
| Zone Type | Recommended Sensor Type | Example Model(s) | Key Benefit |
|---|---|---|---|
| Perimeter | Door/Window Contacts | YoLink Smart Home Kit; Aqara Door & Window Sensor | Fast breach detection; low-profile design; wireless installation |
| GE Personal Security | Budget-friendly; reliable magnetic contact | ||
| Entry/Exit | Door Contacts + Delay Logic | Ecolink Z-Wave Door Sensor | Configurable entry/exit delays; integration with DIY hubs |
| Interior | PIR Motion Detectors | PowerG PG9914/PG9984P; Vivint Standard PIR | Pet-immune options; adjustable sensitivity; wide coverage |
| Bosch Blue Line PIR (wired) | Professional-grade reliability for wired systems | ||
| Alert (24 Hr) | Glass-Break Sensors | SimpliSafe Acoustic Glass-Break; Brinkshome Acoustic | Covers multiple windows per unit; always-armed fire/panic backup |
| Smoke/CO Detectors | Standard monitored smoke & CO alarms | Life-safety monitoring; no bypass; instant alerts |
Multi-Sensor Intrusion Panels
Multi-sensor intrusion panels integrate diverse detector inputs—contacts, motion, glass-break, environmental (smoke, CO)—into a unified control unit. Systems like DSC PowerSeries (with RF5132 or PowerG wireless receivers) support up to 48 zones and enable Smart Areas partitioning for tailored arming.
Similarly, the 2GIG GC3e panel features encrypted wireless sensor support, touchscreen Smart Areas, and built-in Z-Wave for home automation expansion. By centralizing sensor data:
- Simplified Management: One keypad or app shows status for all zones.
- Advanced Logic: Conditional alerts (e.g., trigger interior motion only when perimeter is breached).
- Scalability: Add new zones without rewiring, using compatible wireless sensors.
- Automation: Tie security events to lighting, locks, and notifications via Z-Wave or alarm.com integrations.
Choosing the right panel and matching sensor suite ensures your DIY system is both robust and future-proof, delivering professional-grade detection and smart-home synergy.
Installation Best Practices
Proper sensor placement and system choice are crucial for a reliable DIY home security setup. Mount motion and contact sensors at 6–8 feet high and in corners for maximum field of view, avoiding heat sources, direct sunlight, and HVAC vents to minimize false alarms.
When choosing between wired and wireless installations, wired systems offer interference-free signals and no battery upkeep but typically require professional installation (£150–£500) and wall modifications.
Wireless systems enable true DIY deployment with no drilling and easy relocation, though they demand regular battery changes (£5–£10/year per sensor) and can suffer RF interference.
Balancing these factors ensures optimal coverage, reliability, and cost-effectiveness for your custom security network.
Optimal Sensor Placement
- Mount Height & Angle: Install PIR motion detectors and glass-break sensors at 6–8 feet high, angled slightly downward to avoid pet-triggered activations and capture human movement effectively.
- Corner Positioning: Place sensors in room corners to maximize their 110–180° beam patterns and eliminate blind spots.
- Avoid Interference: Keep sensors at least 3 feet away from heat sources (radiators, vents), direct sunlight, and HVAC diffusers to prevent false alarms.
- Secure Mounting: Use screws for permanent installs or high-quality adhesive strips rated for your wall type; always test adhesion strength before finalizing placement.
- Coverage Testing: After mounting, arm each zone and walk-test to verify full coverage; adjust sensor angle or location if any area is unmonitored.
Wired vs. Wireless Installations
| Aspect | Wired | Wireless |
|---|---|---|
| Pros | • Immune to RF interference; no batteries to replace • Stable power via central adapter with battery backup | • True DIY install—no drilling through finished walls • Portable—take it with you when you move |
| Cons | • Requires professional wiring through walls—higher labor intensity • Susceptible to power outages without battery backup | • Battery maintenance (£5–£10/year per sensor) • Possible signal interference in dense RF environments |
| Installation Cost | • Professional install: £150–£500 depending on complexity • Hardware if prewired: ~£100 total | • DIY hardware only: £0–£100 for basic kit • No professional fee |
| Long-Term Cost | • No ongoing battery or subscription fees | • Battery replacements (£5–£10/year per sensor) • Optional monitoring/subscription: £5–£40/month |
| Best For | • New construction or full renovations • Permanent homes where aesthetics and reliability matter | • Renters or historic properties • Users who prioritize mobility and quick setup |
Balancing precise sensor placement with the right installation approach will maximize your DIY system’s performance and longevity, ensuring your home stays protected with minimal false alarms and manageable upkeep.
Configuring Zone Settings
Here’s a concise overview of how to tailor your zone timing and arming modes for seamless, secure access and interior protection:
Configurable entry and exit delays give you time to arm or disarm before your system fully activates, reducing false alarms from family members coming and going.
Stay and Away modes let you choose which sensors remain active—Stay bypasses interior motion so you can move freely indoors, while Away arms everything for maximum protection.
Zone bypass features allow you to temporarily deactivate specific areas (like a pet’s room or a faulty sensor) without compromising other zones.
Entry and Exit Delays
Entry and Exit Delays create grace periods at your main access points, helping prevent accidental triggers when arming or entering your home.
You can usually customize each delay from 0 up to 180 seconds in your security app or on the control panel—Ring lets you set 0–180 sec, Arlo defaults to 60 sec, and SimpliSafe’s defaults are 30 sec (entry) and 45 sec (exit).
Best practices recommend 30–60 sec for entry delays and 30–90 sec for exit delays, striking a balance between convenience and security.
| Delay Type | Purpose | Recommended Duration | Example Configuration |
|---|---|---|---|
| Entry | Time to disarm after opening an entry sensor | 30–60 sec | Ring: set up to 180 sec via app |
| Exit | Time to leave after arming before sensors activate | 30–90 sec | Arlo: default 60 sec, adjustable in Arlo Secure settings |
- Adjust via App: Open your security app, navigate to Delay Settings, and slide your preferred Entry and Exit timers.
- Program on Panel: Enter installer or master code at the keypad, select “Delay Settings,” and input desired seconds for each delay.
- Test & Tweak: Arm in Away mode, exit through your main door, and note if you have enough time—adjust if you’re rushing or waiting too long.
Stay vs. Away Modes & Zone Bypass
Stay mode arms perimeter sensors (doors, windows, glass breaks) but ignores interior motion detectors so you can move about inside without tripping alarms.
Away mode arms every zone—perimeter, interior, and alert zones—ensuring no blind spots when no one is home.
When a specific zone needs to be silenced (for guests, pets, or maintenance), the Zone Bypass feature lets you disable that zone only, leaving all others active.
| Mode / Feature | Zones Armed | Zones Bypassed | Typical Use |
|---|---|---|---|
| Arm Stay | Perimeter (doors/windows/glass breaks) | Interior motion sensors | Home at night or when occupants are inside |
| Arm Away | All zones (perimeter, interior, 24-hr alert) | None | Leaving home for extended periods |
| Zone Bypass | Selected zones only | Chosen zone(s) | Temporary deactivation (pets, renovations) |
- Activate Stay/Away: Use keypad commands (e.g.,
[code]+STAYor[code]+AWAY) or app toggles to switch modes - Bypass a Zone: Disarm system, select “Bypass Zone,” enter zone number(s), then re-arm—your system will ignore bypassed sensors until restored.
- Restore Zones: When ready, go to “Restore Zones,” select the previously bypassed areas, and they’ll resume monitoring without reprogramming.
With precise delay settings, intelligent arming modes, and selective bypass, you’ll enjoy hassle-free access and tailored protection—hallmarks of a professional-grade DIY security network.
Testing and Troubleshooting
Regular testing and proactive troubleshooting are essential to ensure your DIY home security system reliably monitors every zone and minimizes nuisance alerts. A full-system test—arming Away, sequentially tripping every sensor, and confirming signal receipt—verifies end-to-end functionality, while monthly partial or walk-tests help catch communication issues early
Identifying false-alarm sources via your control panel or app, inspecting for damage or obstructions, and performing routine maintenance—cleaning lenses, realigning magnets, adjusting PIR sensitivity for pets, and replacing batteries—can reduce over 80% of false triggers.
Testing Procedures
Systematic testing confirms that each sensor communicates correctly with your panel and monitoring station. Aim to perform these checks at least once per month.
| Test Type | Steps | Purpose |
|---|---|---|
| Full Test | 1. Call your monitoring station to enable “Test” mode. 2. Arm the system in Away mode. 3. Trip every sensor sequentially (open doors/windows, walk past motion detectors). 4. Let the alarm sound for ~1 min. 5. Disarm and reset. 6. Confirm receipt of each signal with your monitoring station. | Verifies end-to-end functionality of all devices. |
| Partial Test | 1. Arm in Away mode. 2. Trip a single sensor. 3. Confirm that the monitoring station received the signal. 4. Disarm and reset. | Checks individual device communication. |
| Monthly Self-Test | 1. Repeat a full or partial test monthly. 2. Log any failures for prompt resolution. | Routine maintenance to catch issues early. |
| Walk Test | 1. Arm in Stay or Away mode as appropriate. 2. Walk each zone’s area (front door, windows, hallways) to trigger sensors. 3. Verify each zone indicator activates on the keypad. | Ensures coverage and correct zone mapping. |
| Multimeter Check | 1. Disarm system and open the alarm panel. 2. Use a multimeter to test continuity across door/window sensor terminals. 3. Trip the sensor and verify zone violation on the panel. | Confirms wiring integrity for wired zones. |
Troubleshooting Tips
Reducing false alarms not only improves system reliability but also preserves trust with responders. Implement these expert tips to troubleshoot and fine-tune your installation.
| Common Issue | Cause | Solution |
|---|---|---|
| False triggers from pets | High PIR sensitivity or low mounting height | Lower sensor sensitivity via panel/app; mount sensors at least 6 ft high; consider pet-immune models. |
| Sensor misalignment | Door/window contact and magnet too far apart or shifted due to swelling/temperature | Realign magnet within the manufacturer’s specified gap (typically ¼–½ in); secure mounts firmly. |
| Dust & debris accumulation | Dirt on sensor lenses or inside contacts | Clean all sensors monthly with a soft, dry cloth; remove cobwebs and obstructions. |
| Low battery power | Weak RF transmission or intermittent operation | Replace batteries promptly (every 6–12 months) or when low-battery alerts appear. |
| Environmental interference | Sensors too close to HVAC vents, direct sunlight, or drafts | Reposition sensors at least 3 ft from vents and avoid direct sun; use adjustable mounts to fine-tune angles. |
- Identify the Source: Immediately check your control panel or mobile app to see which zone triggered the alarm.
- Inspect Equipment: Look for cracks, loose wiring, or physical damage that might cause erratic behavior.
- Clean & Realign: Keep sensors, lenses, and contacts free of dust or debris, and ensure magnetic contacts are flush and aligned.
- Adjust Sensitivity: In the panel settings or app, reduce PIR sensitivity by one level and test again to balance detection and false-alarm prevention.
- Maintain Regularly: Establish a maintenance schedule—clean sensors quarterly, test monthly, and replace batteries bi-annually—to sustain peak performance.
By following these systematic testing procedures and troubleshooting strategies, you’ll maintain a robust, precise, and low-false-alarm DIY security system that you can trust to protect your home.
Advanced Enhancements
Implementing advanced enhancements like smart-home hub integrations and automated alerts transforms a basic DIY security setup into an intelligent, responsive system that adapts to your lifestyle and maximizes peace of mind.
By connecting your sensors and panels to platforms like SmartThings or Home Assistant, you unlock powerful automation, scene control, and centralized monitoring—all while leveraging mobile and email notifications to stay informed of critical events in real time.
Smart-Home Hub Integrations
Connecting your DIY security gear to a smart-home hub consolidates device management and enables sophisticated automation rules. Samsung SmartThings can serve as a central hub for a wide range of Zigbee, Z-Wave, and Wi-Fi sensors, allowing you to arm/disarm, view sensor status, and create custom routines via the SmartThings mobile app.
For wired alarm panels, the Konnected interface replaces proprietary control equipment, exposing each zone’s door, window, motion, or siren device directly in SmartThings for seamless integration and notifications.
Home Assistant, an open-source smart-home platform, takes integration further by mapping SmartThings capabilities (binary sensors, locks, scenes, etc.) into its ecosystem with a native integration that can be auto-discovered or added manually under Settings > Devices & Services.
Beyond SmartThings, Home Assistant supports Alarmo or global alarm_control_panel components—enabling pre-built blueprints for alarm arming, zone mapping, and automation scripts without heavy YAML coding.
Once linked, you can define scenes (e.g., “Night Mode”: arm perimeter zones, dim lights, lock doors) and trigger them by sensor activity, voice commands, or schedules.
Automated Notifications and Alerts
Staying informed of security events is vital, and modern hubs offer multiple notification channels. In Home Assistant, the Notify integration supports sending messages via companion apps (Android/iOS), email (SMTP), SMS, or third-party services like Pushbullet and Slack.
You can configure persistent notifications for non-urgent updates (e.g., low-battery warnings) and use the Alert integration for repeating reminders—such as an open garage door—at custom intervals until acknowledged.
Mobile app notifications can be tailored with interruption levels (passive, active, time-sensitive, critical) on iOS 15+ and Android, ensuring true emergencies bypass Do Not Disturb modes.
Email alerts via SMTP or integrations like NTFY allow fallback notifications if internet or mobile service is unavailable; users in remote areas often pair email alerts with in-dashboard alerts or voice announcements via smart speakers.
| Notification Method | Platforms Supported | Key Advantage | Considerations |
|---|---|---|---|
| Mobile App | Home Assistant Companion, SmartThings | Instant push alerts with custom tones/levels | Requires internet and app permissions |
| Email (SMTP) | Any email client | Works without app; good for backups | Potential delays; risk of spam filtering |
| Persistent Alerts | Web UI dashboard | Visible until cleared; great for maintenance | Only in-dashboard—may be missed if not monitored |
| Third-Party | Pushover, Slack, Telegram | Redundant channels; teams can collaborate | May incur subscription fees or setup complexity |
By integrating your DIY security system with leading smart-home hubs and setting up multi-channel notifications, you’ll enjoy automated scene control, real-time alerts, and flexible response options—ensuring your home remains protected and you stay in the loop wherever you are.
Conclusion
Wrapping up, well-defined security zones are the cornerstone of a reliable DIY system—segmented coverage reduces false alarms and pinpoints threats so you can respond faster. Download our free, printable zone-mapping template to sketch out your perimeter, entry/exit, interior, and 24-hour alert areas before you install sensors.
When you’re ready to kit out your zones, SimpliSafe’s DIY packages arrive ready to work—no drilling or tools needed—and guide you through setup via their intuitive app. For a professional-grade experience without paying for installation, ADT Self Setup offers modular sensors and still lets you manage everything yourself.
Both systems include optional 24/7 monitoring plans, so your custom zones stay guarded around the clock.
FAQs
What are security zones and why do I need them?
Security zones divide your home into monitoring areas—perimeter, entry/exit, interior, 24-hour—so alarms pinpoint exact locations and false triggers drop dramatically.
How do I choose the right sensors for each zone?
Use magnetic door/window contacts for perimeter, PIR motion detectors for interiors, and acoustic glass-break sensors for alert zones to balance sensitivity and coverage.
Can I mix wired and wireless sensors?
Yes—wired offers reliable power and no battery upkeep while wireless enables true DIY setup, portability, and easier relocation.
How often should I test my security zones?
Perform a full-system test monthly and walk-tests weekly to catch communication issues, sensor failures, and coverage gaps early.
What’s the benefit of integrating with smart-home hubs?
Platforms like SmartThings and Home Assistant enable automated routines, scene control, and multi-channel notifications via push, email, or SMS.


