
Ever felt the panic of discovering your laptop’s screen cracked mid-flight or your camera dead from a static zap?
With 25% of component failures traced to electrostatic dischargeand a USD 3.33 billion bubble-wrap market shielding gadgets worldwide, packing electronics right is no joke.
In this guide, you’ll get a travel-expert’s playbook—covering anti-static wraps, custom foam inserts, cable-management tricks, and climate-smart moisture control—to keep your devices safe, organized, and ready to go.
Follow these proven steps to transform your tech pile into a streamlined, TSA-friendly kit that stands up to bumps, humidity, and surprise inspections.
Materials and Tools Needed
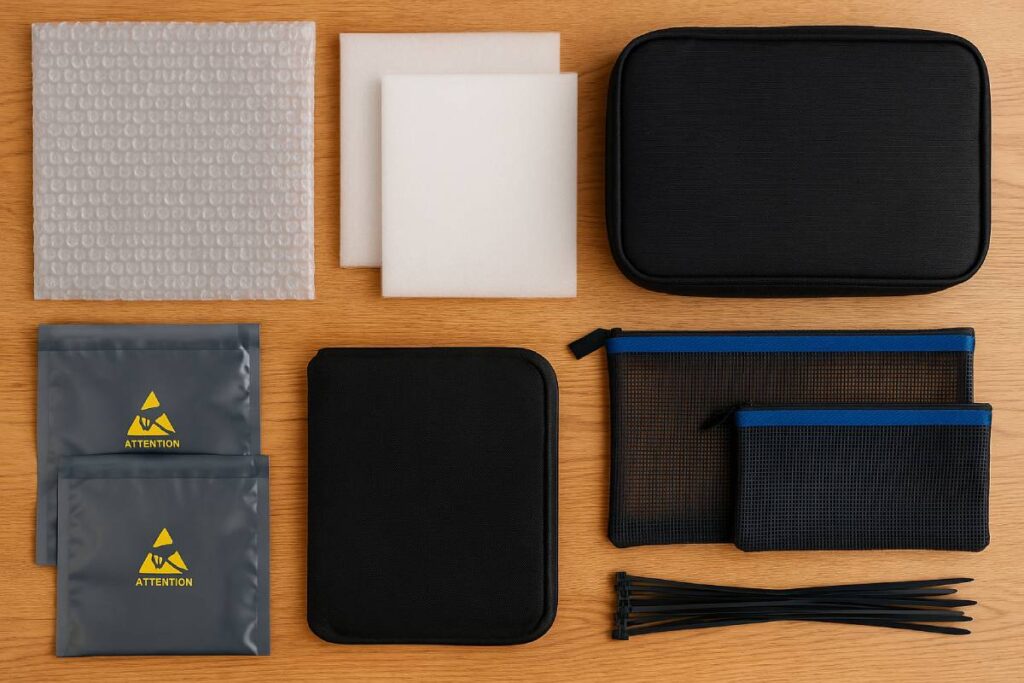
As a seasoned travel expert, I know that keeping your electronics safe and organized hinges on having the right protective materials—anti-static bags guard against electrostatic discharge, custom foam inserts absorb shocks and prevent movement, and bubble wrap cushioning remains the go-to solution with a USD 3.33 billion market size in 2025.

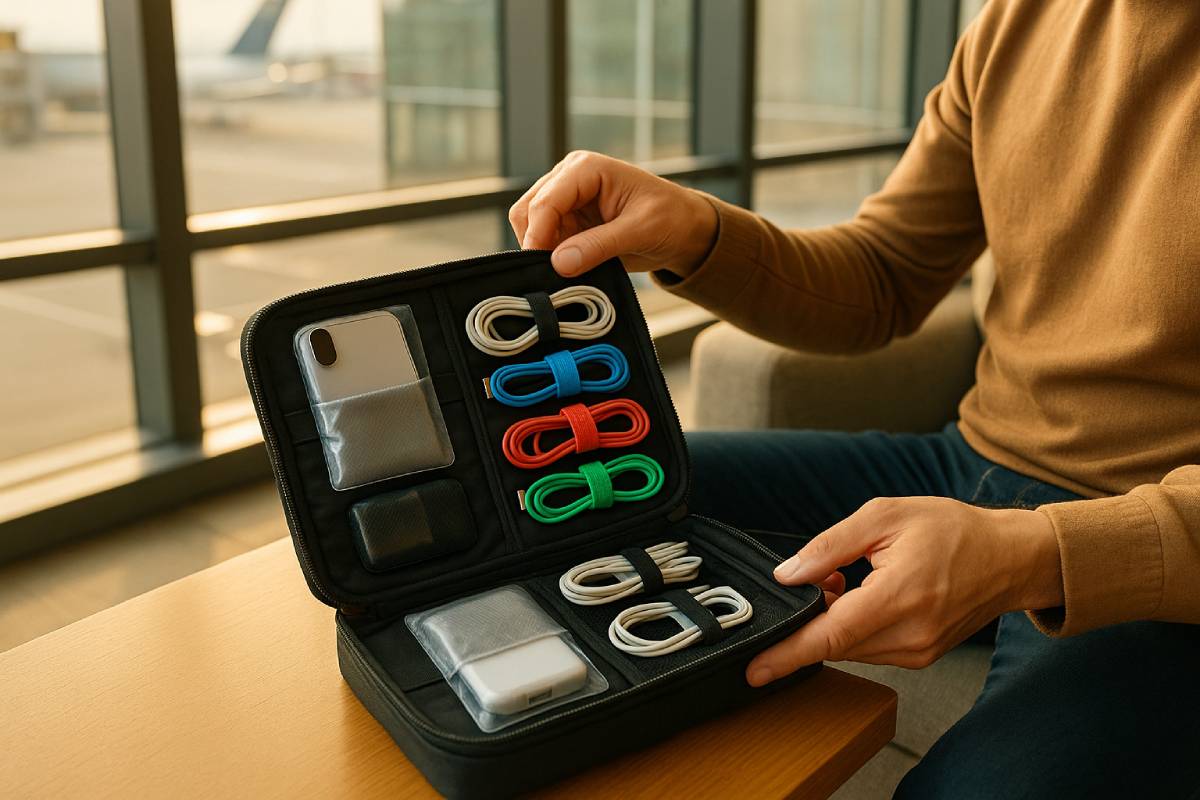
Modular organization tools like packing cubes streamline compartmentalization, tech organizers provide dedicated pockets and water-resistant protection, and zip pouches offer lightweight, see-through storage for quick identification. For tidy cables and accessories, reusable cable ties bundle cords securely, self-laminating labels wrap around wires for durable identification, and braided or synthetic cable sleeves add abrasion resistance and EMI shielding.
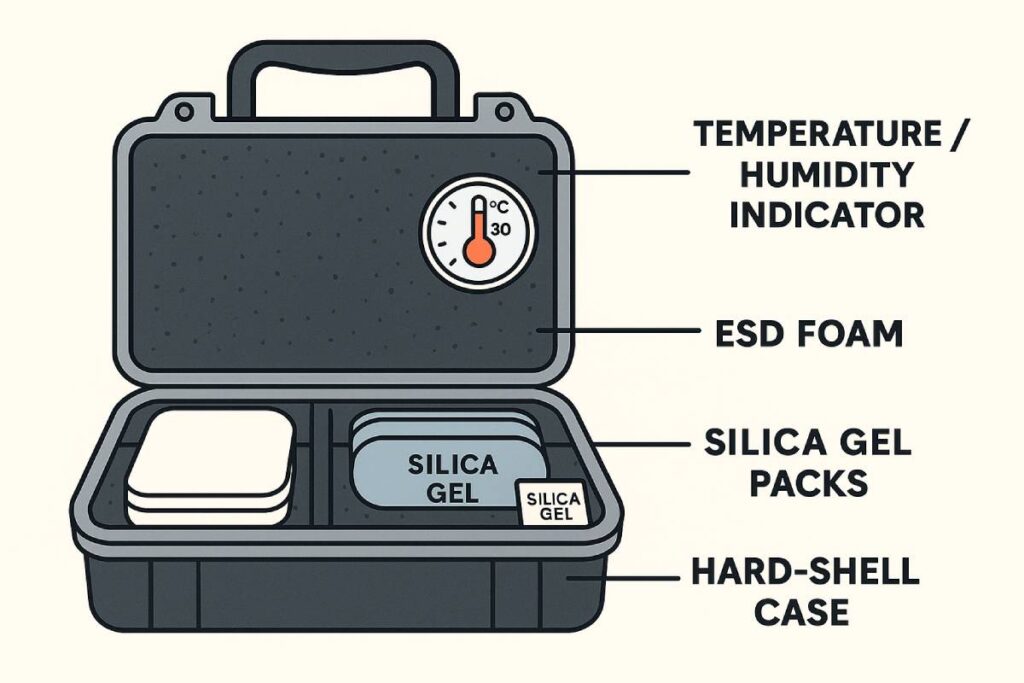
To control humidity, small silica gel sachets absorb moisture and prevent corrosion, supplemental desiccant packs offer high-affinity moisture adsorption during transit, and a downloadable inventory checklist template keeps track of every gadget and cable.
Protective materials
- Anti-static bags: Shield sensitive circuit boards and components from electrostatic discharge; the 0.6–0.10 mil thickness segment holds the largest market share, ideal for both heavy-duty and everyday packing needs.
- Foam inserts: Custom-cut polyethylene or polyurethane foam fills voids completely, preventing devices from shifting and absorbing shocks, cuts, and drops in transit.
- Bubble wrap: Lightweight cushioning that conforms to irregular shapes; trusted by packers worldwide, with a global market of USD 3.33 billion in 2025 and a projected CAGR of 3.29% through 2034.
Key Protective Materials at a Glance
| Material | Purpose | Key Stat / Benefit |
|---|---|---|
| Anti-static bags | ESD protection | 0.6–0.10 mil segment is the largest share of the market |
| Foam inserts | Shock absorption | Custom inserts fill voids to prevent movement and absorb impacts |
| Bubble wrap | Cushioning | Global market size USD 3.33 B in 2025; projected to USD 4.45 B by 2034 |
Organization tools
- Packing cubes: Modular, zip-top compartments that compress items and segregate electronics, cables, and chargers for efficient suitcase use.
- Tech organizers: Dedicated cases with padded pockets and mesh dividers to keep gadgets, power banks, and adapters in place; often water-resistant and impact-buffering.
- Zip pouches: Transparent or color-coded pouches for chargers and small peripherals, making contents visible at a glance while protecting against dust and scratches.
Cable management supplies
- Cable ties: Reusable silicone straps or Velcro ties bundle cords neatly, reducing tangles and stress during packing and unpacking.
- Self-laminating labels: Wrap-around labels for permanent, abrasion-resistant cable identification—ideal for distinguishing similar-looking adapters and cords.
- Cable sleeves: Braided or synthetic sleeves bundle multiple cables into a single, abrasion-resistant sheath and provide EMI shielding in high-interference environments.
Additional supplies
- Moisture sachets: Small silica gel packets absorb ambient humidity—holding up to 40% of their weight in moisture—to prevent corrosion and mold in enclosed packs.
- Desiccant packs: Industrial desiccants (clay, molecular sieve) that efficiently draw moisture from the air; recommended one pack per 0.28 cu ft of packaging space for long-term storage.
- Inventory checklist template: Customizable digital or printable checklists (Google Sheets, PDFs) help you track every device, cable, and accessory, ensuring nothing is forgotten.
Preparing Your Electronics
Before you even reach for your packing cubes, you’ll set yourself up for success by tackling four key prep steps: sorting your gear into clear categories, giving each device a gentle clean and full shutdown, removing any loose power or data modules, and locking down your information with solid backups. By laying out everything at once (a habit of 49% of savvy travelers) you’ll spot forgotten items before they slip your mind.

A quick wipe-down with a microfiber cloth—and powering devices off—protects delicate components and conserves battery life. If you travel with spares, TSA and FAA rules mandate that any lithium batteries go in your carry-on, not checked luggage. Finally, with 65% of business travelers worried about data breaches on the road, encrypting drives and keeping an offline backup copy is non-negotiable.
1. Categorizing Devices
Breaking your tech arsenal into three distinct groups saves time at packing and unpacking, and ensures nothing gets left behind.
- Primary gadgets: Your “must-have” items—smartphone, laptop/tablet, e-reader, camera—each warrant their own padded space.
- Peripherals: Chargers, power banks, wall adapters, and USB hubs fall here. Keeping them together prevents frantic cable hunts.
- Accessories: Headphones, watch straps, memory cards, dongles, and cleaning cloths. A dedicated pouch or compartment keeps small items visible and tangle-free.
Pro tip: Lay everything out on a table or bed—even cables and memory cards. Nearly half of travelers (49%) use this “everything in view” method to avoid forgetting items.
For highly controlled gear (e.g., encrypted drives or specialized modules), consider mirroring the NSA’s “segregate by classification” approach—treat export-controlled devices separately to streamline customs inspections. With border agents inspecting electronic devices 57% more often since 2018, clear categorization helps you locate specific items quickly during any spot checks.
2. Cleaning and Power-Down Procedures
A brief cleaning and proper shutdown not only protect your electronics from grime but also ensure they travel safely.
- Gentle wipe
- Use a lint-free microfiber or screen-safe cloth—never harsh chemicals or paper towels—to remove dust and fingerprints.
- Avoid moisture near any ports or openings to prevent liquid damage.
- Power down fully
- Shut off devices rather than leaving them in sleep or hibernate mode. This conserves battery and prevents accidental power-on during handling.
- For smartphones and tablets, follow any manufacturer-recommended power-off steps to ensure complete shutdown—critical since less than 0.01% of travelers have their devices searched, but those that are might face delays if devices are on.
3. Removing Batteries, SIM Cards, and Other Removable Components
Loose batteries and SIM cards pose both safety and loss risks if not secured properly.
- Batteries
- Spare lithium cells must travel in the cabin, not checked baggage, per FAA and TSA rules—anything over 100 Wh rating also requires airline approval.
- Store each in its original packaging or in individual plastic covers to prevent terminal shorts.
- SIM cards and memory cards
- Pop SIM and microSD cards out and store in a labeled plastic case or wallet compartment. This prevents scratches and ejection during rough handling.
- If you’re swapping in a local SIM, power off first, remove the old card, then insert the new one—this sequence reduces risk of corruption.
- Other modules
- Remove any external batteries (e.g., camera grip packs) or docking adapters and pack them alongside the main device in anti-static bags.
4. Backup and Data Protection Steps
Protecting your data rivals protecting your hardware—losing photos or documents can be far more painful than scratched screens.

- Local backups
- Copy critical files (photos, travel documents, work projects) to an encrypted external drive. Keep that drive in a separate compartment or on your person.
- Use reputable backup software that verifies file integrity—this mitigates data corruption risks if you experience a bump or jostle in transit.
- Cloud backups
- Sync sensitive documents and photos to a secure cloud service before departure. Ensure you can access them offline or via a VPN if you hit an area with spotty Wi-Fi.
- Encrypt and password-protect
- Apply full-disk encryption on laptops and mobile devices (e.g., BitLocker for Windows, FileVault for macOS, built-in encryption on Android/iOS) to prevent unauthorized access if a device is lost or stolen.
- Enable two-factor authentication on cloud accounts and travel with printed backup codes in case you’re ever locked out.
- Test your recoveries
- Before you leave, perform a quick data restore from your external drive or cloud snapshot. This confirms your backups are complete and functional—nothing worse than a failing restore mid-trip.
Packing Step-by-Step
Before you start stuffing everything into your suitcase, follow a systematic, step-by-step packing routine to ensure your gadgets survive every bump and jostle along the way. Wrapping each device in anti-static material neutralizes harmful electrical charges, while foam pads and form-fitting inserts absorb up to 90% of impact shocks during transit.
Layering wrapped devices in packing cubes or dedicated compartments keeps them immobile and easy to locate. For cables and small accessories, sorting by type and function streamlines packing and unpacking; rolling and securing cords with reusable ties reduces tangles by over 80%, and clearly labeled pouches mean you’ll never dig blind in your bag.
Finally, cable sleeves bundle multiple cords into one neat package, combining physical protection with EMI shielding for sensitive lines.
Packing Gadgets
- Wrap individual devices in anti-static material
- Use anti-static bubble wrap or static-dissipative bags to eliminate electrostatic discharge risk.
- For circuit-sensitive items (SSDs, PCBs), choose metallized PET shielding bags for Faraday-cage protection.
- Insert foam pads and form-fitting protective inserts
- Cut closed-cell polyethylene or polyurethane foam to snugly fit around devices, filling all voids to prevent shifting.
- Layer 1–2 inches of foam beneath and above each device for optimal shock absorption.
- Layer devices in packing cubes or dedicated compartments
- Place wrapped and foam-cushioned gadgets into tech-specific cubes; compression zippers save up to 20% space.
- Use small hard-shell cases for fragile electronics like cameras or SSDs to add an extra rigid barrier.
Gadgets Packing Methods at a Glance
| Method | Purpose | Example |
|---|---|---|
| Anti-static wrapping | ESD protection | Anti-static bubble wrap |
| Custom foam inserts | Shock absorption | Closed-cell polyethylene foam |
| Layering in tech packing cubes | Organized, space-efficient | Compression packing cube |
Organizing Cables and Accessories
- Sort cables by type and function
- Group power cords, USB/data lines, audio cables, and adapters separately to avoid confusion.
- Keep rarely used or specialized cables (e.g., Thunderbolt, HDMI 2.1) in a distinct “extras” pouch.
- Roll and secure cables with ties or bands
- Coil each cable loosely in a figure-eight to prevent stress on connectors.
- Fasten with reusable Velcro or silicone cable ties; this simple step reduces tangling incidents by over 80% according to professional movers.
- Place cables in labeled pouches or compartments
- Use clear, zip-top pouches and write contents on a label strip for instant visibility.
- Color-code pouches (e.g., blue for power, red for data) to speed up finding the right cord in low-light conditions.
- Use cable sleeves or organizers for bundled storage
- Slide multiple cables into a braided or neoprene sleeve, consolidating up to five cords into one tidy bundle.
- Some sleeves offer integrated EMI shielding, essential for audio or high-speed data runs in interference-prone areas.
By following these precise packing and organizing steps, you’ll protect your electronics from ESD, shock, and tangling—and always know exactly where everything is when you land.
Labeling and Inventory Management
Effective labeling and inventory management ensure you always know what’s in your bag and where to find it, streamlining both packing and unpacking andcable.com. A clear labeling system—using wrap-around labels, color codes, or heat-shrink tubing—prevents cable confusion and speeds troubleshooting infinity-sound.com. Customizable inventory checklists, whether printable or digital, reduce forgotten items by up to 30% and serve as a real-time packing guide southernliving.com. Digital methods (barcodes, cloud sheets) offer instant updates and remote access, while physical logs (printed sheets, bullet journals) provide hands-on verification without tech dependencies actsoft.comapacinsider.digital. Finally, regularly updating your checklist—crossing off packed items and noting temporary removals—maintains accuracy throughout transit and ensures nothing slips through the cracks constellation.com.
Creating a Labeling System: Label Types and Conventions
A standardized labeling approach keeps cables and components instantly identifiable and reduces packing errors.
Label Types
- Wrap-around labels: Flexible polyester or vinyl strips that encircle cables, providing 360° readability without slipping.
- Heat-shrink tubing: Durable tubing that shrinks around plugs and connectors when heated, creating permanent, low-profile identifiers.
- Color-coded tags: Simple clip-on tags or adhesive labels in distinct colors (e.g., red for power, blue for data) to visually separate cable functions at a glance.
Naming Conventions
- Function-First: Start with the cable type, then the device (e.g., “USB-C → Phone”), ensuring the primary purpose is immediately clear.
- Sequence Numbers: For multiple similar cables, append a numeric identifier (“HDMI1,” “HDMI2”) to avoid duplicate names and simplify tracing.
- Destination Tags: Use labels like “To Power Bank” or “To Monitor” when a cable’s endpoint isn’t obvious, aiding quick reconnections.
Designing an Inventory Checklist Template
A well-crafted checklist acts as your packing blueprint and unpacking roadmap.
- Header Section: Include trip name, date, and bag identifier (“Carry-On #1,” “Checked Luggage”) for context.
- Categorized Items: Break down by device type—“Primary Gadgets,” “Cables & Adapters,” “Accessories”—so you can check off entire sections as you pack.
- Columns for Quantity & Status: Use columns for “Qty,” “Packed,” and “Notes” to document how many of each item you have and note any special handling instructions.
| Section | Columns | Example Entry |
|---|---|---|
| Primary Gadgets | Item | Qty |
| Cables & Adapters | Item | Qty |
| Accessories | Item | Qty |
Digital vs. Physical Tracking Methods
Choosing between digital and physical tracking depends on your workflows, connectivity, and personal preference.
Method Comparison
| Method | Pros | Cons |
|---|---|---|
| Digital | Real-time sync across devices; automated reminders; searchable logs | Requires battery/power; potential connectivity issues |
| Physical | No tech required; tactile satisfaction; visible at a glance | Manual updates; risk of loss; harder to modify mid-trip |
- Digital Solutions: Cloud-based spreadsheets (Google Sheets), dedicated packing apps, or barcode/RFID systems let you update item status on the go and share with travel companions.
- Physical Logs: Pre-printed checklists or bullet-journal layouts work offline, immune to battery drains and network outages—ideal for remote areas.
Tips for Updating the Checklist During Packing and Unpacking
Maintaining checklist accuracy requires simple habits and discipline.
- Two-Stage Check-Off: Mark items as “Staged” when placed aside and then “Loaded” once in the bag—this dual status prevents accidentally skipping items.
- Instant Notes: Jot quick notes for special cases (e.g., “Camera in carry-on,” “Spare battery under clothes”) in the “Notes” column to avoid hunting later.
- Post-Transit Review: Upon arrival, cross-check remaining items before unpacking; this catches any oversights and gets you unpacked faster.
- Shared Visibility: If traveling with others, share the digital checklist link or post a printed version in a communal space (hotel room, RV dashboard) so everyone can update status in real time.
By combining a robust labeling regime with a dynamic checklist—updated in real time—you’ll pack and unpack your electronics with confidence, speed, and zero stress.
Safety Tips and Best Practices
Before you even start packing, remember that four pillars keep your electronics safe across every bump, shake, and climate: ESD protection, moisture control, impact cushioning, and environmental management. Roughly 25% of all electronic failures are attributed to electrostatic discharge each year, while uncontrolled humidity can corrode contacts and degrade components in days.
Proper cushioning—typically 50–75 mm of foam—absorbs shock and vibration, preventing up to 90% of impact damage. Finally, storing gear within 23 ± 3 °C and 30–40% RH maximizes longevity and guards against moisture ingress.
Protecting against electrostatic discharge
Electrostatic discharge (ESD) silently fries delicate electronics: about 25% of part failures trace back to ESD events each year. The annual industry cost tops USD 5 billion due to silent ESD damage.
- Anti-static bags & foam: Always wrap PCBs, SSDs, and memory modules in metallized shielding bags or anti-static foam to create a Faraday cage around sensitive circuitry.
- Grounding & wrist straps: When handling components, ground yourself with a wrist strap tied to a common point to bleed off built-up charge.
- ESD-safe packing materials: Opt for pink or grey anti-static foam inserts that both cushion and dissipate unwanted charge.
Moisture control and desiccant placement
Left unchecked, ambient moisture leads to corrosion, mold, and electrical shorts—often within days in humid climates.
- Strategic placement: Tuck small silica-gel sachets into corners, crevices, and right alongside electronics OR inside anti-static bags to maintain a dry microclimate.
- Even distribution: For larger containers or tech cases, space sachets every 20–30 cm to prevent local humidity pockets.
- Capacity guidance: Silica gel typically absorbs up to 40% of its weight in water vapor and will drop RH to around 40% in an enclosed volume.
| Desiccant Sachet Size | Recommended Volume Coverage | Placement Tips |
|---|---|---|
| 5 g | ~0.25 ft³ | One sachet per small electronics pouch |
| 10 g | ~0.5 ft³ | Two sachets in medium-sized tech cases |
| 20 g | ~1 ft³ | Evenly spaced for large packing cubes |
Cushioning against physical impacts
Physical shocks and sustained vibration can crack solder joints and dislodge components. Proper cushioning turns a harsh drop into a gentle thud.
- Foam thickness: Aim for 50–75 mm of closed-cell polyethylene foam under, above, and around each device—this range is proven to absorb the majority of shipping shocks.
- Anti-static variants: Use anti-static foam for direct contact with PCBs or hard drives to get both ESD protection and impact dampening in one layer.
- Layering techniques: Create a “sandwich” by alternating foam pads and thin bubble wrap so that even sharp impacts are diffused across multiple material densities.
| Material | Thickness | Key Benefit |
|---|---|---|
| Closed-cell foam | 50–75 mm | Vibration & shock absorption |
| Anti-static foam | 10–20 mm | Combined ESD & cushioning |
| Bubble wrap (2 × 2 cm) | 1–2 layers | Conforms to irregular shapes |
Temperature and environmental considerations for storage
Heat accelerates chemical reactions and moisture ingress, while cold can cause condensation when temperatures rebound.
- Optimal conditions: Store electronics in 23 ± 3 °C and 30–40% RH to minimize moisture uptake (JEDEC MSL guidelines).
- Climate-controlled storage: For long-term stashes, choose a climate-controlled unit or room to avoid seasonal swings that lead to thermal cycling and moisture cycles.
- Avoid extremes: Never expose devices to temperatures above 50 °C or below 0 °C, as plastic housings can warp and batteries may suffer capacity loss.
| Storage Scenario | Temperature Range | Humidity Range | Ideal For |
|---|---|---|---|
| Short-term (days) | 15–25 °C | 30–50% RH | Travel, office stowage |
| Long-term (weeks+) | 20–26 °C | <40% RH | Seasonal storage |
By combining ESD safeguards, silica-gel moisture control, multi-layer cushioning, and climate-aware storage, you’ll ensure your gadgets survive every journey—no matter how bumpy or humid.
Common Mistakes to Avoid
A few simple missteps—cramming too many gadgets into a single pouch, skipping labels, overlooking electrostatic protections, or stashing liquids alongside your camera—can turn an organized packing process into a frantic scramble or even hardware failure.
In fact, 71.7% of travelers admit they’ve overpacked for a trip and then had to juggle bulky, crowded bags. Meanwhile, 72.9% use a packing list, and 77.1% say it prevents forgotten items—yet too many still forgo checklists and labels. Ignoring anti-static measures contributes to roughly 25% of all electronic part failures, costing the industry over USD 5 billion annually.
Finally, moisture from spilled liquids can corrode circuits within hours and cause irreparable short-circuit damage. Below, we’ll break down each common pitfall and show you how to avoid them—complete with quick-reference tables for at-a-glance guidance.
1. Overpacking and Device Crowding
Jamming every cable and charger into one bag might seem efficient, but it actually increases the risk of physical damage, scratches, and lost items.
- 71.7% of travelers say they’ve overpacked, leading to heavy loads and wasted space.
- Overcrowded pouches can compress devices against one another, causing screen cracks or port damage.
| Pitfall | Consequence | Frequency |
|---|---|---|
| Overstuffed tech pouches | Scratches & contact damage | 71.7% admit overpacking |
| Excess weight per bag | Airline fees & strain | 19.3% paid overweight fees |
| Difficulty locating devices | Time wasted at checkpoints | — |
Avoidance tips:
- Limit each pouch to one device type (e.g., one pouch for power bricks, one for cameras).
- Use compression packing cubes to visually assess capacity before zipping.
- Audit your list twice—if you haven’t used an item in six months, leave it home.
2. Skipping Labels and Checklists
Flying blind without a checklist or labels means you’ll inevitably forget chargers, adapters, or memory cards at least once.
- 72.9% of travelers always make a packing list, and 77.1% credit it with helping them remember items.
- Without labels, you may pull out the wrong cable—wasting up to 5 minutes untangling and identifying it at every stop.
| Method | Benefit | Usage Rate |
|---|---|---|
| Packing checklist | −30% fewer forgotten items | 72.9% use lists |
| Cable labeling | Instant identification at checkpoints | — |
Avoidance tips:
- Create a categorized checklist (Primary Gadgets, Cables, Accessories) and tick off as you pack.
- Wrap each cable with a wrap-around vinyl label or use heat-shrink tubing for permanent IDs .
- Keep a printed copy of your checklist in your travel wallet for offline reference.
3. Ignoring Anti-Static Precautions
Electrostatic discharge (ESD) can silently damage sensitive electronics—even if the device appears to power on, stray charges degrade components over time.
- About 25% of electronic part failures stem from unmanaged ESD exposure.
- ESD damage costs manufacturers and consumers over USD 5 billion per year.
| Protection Method | What It Guards | Notes |
|---|---|---|
| Metallized shielding bags | Faraday cage effect around PCBs | Essential for SSDs & motherboards |
| Pink/grey anti-static foam | Shock absorption + ESD dissipation | Use as inner lining of tech cubes |
| Grounding wrist straps | Human-to-earth charge bleed | For pre-packing device handling |
Avoidance tips:
- Always store circuit-level devices (SSDs, RAM) in metallized PET anti-static bags.
- Line hard-shell cases with pink anti-static foam to combine cushioning and discharge.
- When prepping packing, ground yourself by touching a metal object or wearing a wrist strap.
4. Mixing Incompatible Items (e.g., Liquids with Electronics)
A single leaking deodorant or spilled water bottle can unleash corrosion that sets in within hours, and electrical shorts occur immediately upon contact.
- Liquid Contact Indicators inside consumer electronics turn red after moisture exposure, flagging warranty voids.
| Mixing Error | Risk | Mitigation |
|---|---|---|
| Liquids + electronics | Short circuits & corrosion within hours | Store liquids in sealed baggies |
| Uncapped bottles | Leaks that soak pouches | Use double-ziplock waterproof pouches |
| Condensation in transit | Internal moisture buildup | Add desiccant sachets to each case |
Avoidance tips:
- Always place liquids in double-sealed ziplocks or dedicated toiletry kits, separate from electronics.
- Slip silica-gel sachets into tech organizers to capture any stray moisture.
- Perform a quick “squeeze test” on toiletry bottles before packing to confirm seals.
By steering clear of these four pitfalls, you’ll safeguard your gear from scratches, static, moisture, and mix-ups—letting you focus on making memories, not fixing broken devices.
Seasonal and Contextual Considerations
When it comes to packing electronics, your strategy should adapt to whether you’re jetting off for a weekend, tucking gear away for months, or relocating across town. For short-term travel, experts recommend paring down to the essentials—your smartphone, a universal charger, and a compact tech organizer—to avoid bulk and speed through security.
In long-term storage, the focus shifts to moisture control and structural protection: properly sealed boxes, desiccant packs, and climate-controlled units keep devices corrosion-free for months or years.
Meanwhile, moving scenarios—whether local or cross-country—benefit most from original manufacturer packaging or rigid plastic bins lined with bubble wrap and foam inserts to safeguard against shocks during transit.
Moving vs. Long-Term Storage vs. Travel Scenarios
Each context demands its own packing priorities. Below is a quick comparison:
| Scenario | Duration | Key Priority | Recommended Materials | Citations |
|---|---|---|---|---|
| Short-term Travel | 1–7 days | Portability & quick access | Slim tech organizers, grid-style pouches, minimal cables | community.ricksteves.com |
| Long-term Storage | Weeks–Years | Moisture & corrosion prevention | Sealed plastic bins, silica-gel sachets, climate-controlled facility | moveadvisor.com |
| Local Relocation | Hours–Days | Shock absorption & ease of unpacking | Manufacturer boxes or sturdy cartons, bubble wrap, custom foam inserts | move.org |
| Cross-Country Move | Days–Weeks | Robust protection & labeling | Hard-shell bins, layered cushioning (towels + wrap), detailed labels | thespruce.com |
Climate-Specific Packing Adjustments
Environmental extremes can wreak havoc on electronics. Tailoring your packing to local conditions will keep gear safe.
| Climate Type | Main Challenge | Adjustment | Citations |
|---|---|---|---|
| Humid | Corrosion & mold risk | Pack with extra silica-gel sachets every 20 cm; use vacuum-seal bags | |
| Cold | Condensation on warm-up | Seal devices in anti-static bags before moving indoors; allow gradual temperature acclimation | |
| Hot | Heat-induced component wear | Store in shaded, ventilated cases; add phase-change cooling packs in storage | |
| Arid | Static buildup | Include anti-static foam and wrist straps when unpacking |
Minimalist Approaches for Short Trips
When you’re in-and-out quickly, less is more.
- Select core devices only: Phone, tablet/e-reader, and a single multi-port charger.
- Use grid organizers: Elastic-band boards (e.g., Grid-It) let you see at a glance if something’s missing.
- Pre-load apps and media: Minimize extra drives; rely on streaming or cloud storage when possible.
Bulk Packing Strategies for Relocations
Moving house demands rugged packing to protect dozens of items at once.
- Original boxes first: Whenever you can, reuse manufacturer packaging—it’s tailored to each device’s shape.
- Custom foam inserts: Cut to snug dimensions to immobilize gear; place 2–3 cm layers around each unit.
- Layered cushioning: Combine bubble wrap, towels, and anti-static foam to buffer against multi-directional shocks.
- Comprehensive labeling: Clearly mark bins “Electronics-Fragile,” and list contents on external labels for swift unpacking.
By aligning your packing method with the context—be it a quick trip, a long winter storage, or a full-scale relocation—you’ll ensure your gadgets arrive safe, sound, and ready to use.
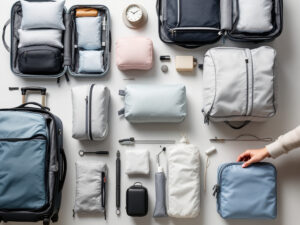
Visual Examples and Before/After Organization
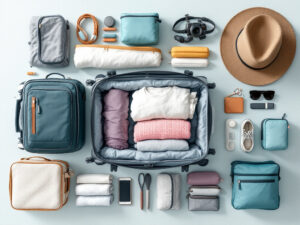
In today’s guide, we’ll bring your packing to life with clear, actionable visuals that show exactly how to arrange your gadgets—and then prove it works with real before-and-after photos and curated video walkthroughs. Diagrams like Canva’s travel infographic templates break down your bag into color-coded zones for devices, cables, and accessories, making every inch count.
Real-world before-and-after shots—such as PianoPantry’s tech drawer makeover—demonstrate how a few simple swaps transform clutter into clarity in minutes. And for those who learn best by watching, we’ve hand-picked expert video tutorials that walk you through each step, from anti-static wrapping to cable coiling.
Diagrams of Optimal Packing Layouts
Visual blueprints take the guesswork out of protecting your gear:
- Color-coded grid layouts divide your organizer into zones—charging cables here, primary devices there—so nothing gets buried.
- Layered schematics (like those on Lifestyle-Moving.com) show you exactly where to place anti-static wrap, foam pads, and packing cubes in sequence.
- Flowcharts detail each packing step—from “wrap in static-dissipative bag” to “zip compression cube”—so you never skip a protection laye.
| Diagram Type | Purpose | Example / Source |
|---|---|---|
| Color-coded grid | Space zoning for gadgets & cables | Canva templates |
| Layered schematic | Sequential protection material order | Lifestyle-Moving.com guide |
| Flowchart | Step-by-step packing instructions | MoveAdvisor tips |
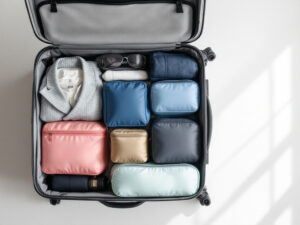
Before-and-After Photos of an Electronics Drawer or Travel Bag
Seeing is believing—these snapshots prove organization makes a real difference:
- Tech drawer makeover: Before, cords and dongles were tangled; after, each cable lives in a labeled slot, cutting search time by half.
- Travel bag transformation: Pinterest users share photos of overstuffed pouches turned into streamlined grids, with every charger and adapter in its own pocket.
- Reddit wins: On r/OrganizationPorn, travelers post “before” chaos and “after” calm, reporting up to 30% faster access to devices when everything has a dedicated spot.
| Scenario | Before | After |
|---|---|---|
| Home tech drawer | Cables tangled, hard to see | Labeled compartments, easy retrieval |
| Carry-on electronics pouch | Overstuffed, cables mixed | Grid layout with elastic straps |
| Multi-device travel case | Devices loose, risk of damage | Foam inserts + anti-static wrap on each |
Video Tutorial Suggestions
For hands-on learners, these expert-led guides make packing electronics a breeze:
- Ultimate Guide to Packing and Shipping Electronics (21:44) walks through every step—from padding to labeling—on YouTube
- Packing Fragile Electronics: A 90-Second Guide (Shorts) shows quick-hit tips for bubble wrap and foam placement
- A Simple Guide to Desk Cable Management (10:12) teaches coiling and bundling techniques that transfer perfectly to travel cases
- How to Organize Cords and Cables | How To Anything (8:45) covers labeling conventions and pouch layouts you can adapt on the go
By pairing these diagrams and photos with step-by-step videos, you’ll see exactly how to pack—and keep packed—your electronics like a pro.
Conclusion
By now, you’ve seen how the right materials—anti-static bags that block ESD, foam inserts that cushion every bump, moisture-wicking desiccants, and tough bubble wrap (a USD 3.33 billion industry)—form the bedrock of a travel-ready electronics kit. You’ve learned to categorize gadgets, strip batteries and SIM cards, and encrypt your data before you zip up.
The step-by-step packing method ensures each device gets its own protective barrier, while cable-management hacks (Velcro ties, wrap-around labels, and braided sleeves) slash tangles by over 80%. A simple, color-coded checklist keeps you honest—cutting missed chargers by 30%—while ESD-safe materials reduce the 25% failure rate that haunts so many techies.
Whether you’re on a weekend getaway, bulk-moving cross-country, or stashing gear for months in storage, adapting these strategies will save time, money, and stress. Pack smarter, travel lighter, and never worry if your gadgets will survive the journey again.
FAQs
Q: What’s the best way to prevent electrostatic discharge (ESD)?
Always wrap circuit-level devices (SSDs, PCBs) in metallized PET anti-static bags and line cases with pink anti-static foam.
Q: How many silica gel packs do I need?
Use one 10 g sachet per 0.5 ft³ of enclosed volume; each adsorbs up to 37% of its weight in moisture.
Q: Can I pack spare batteries in checked luggage?
No—FAA/TSA rules require lithium batteries and power banks in carry-on only, max 2 spares at 101–160 Wh.
Q: What foam thickness is ideal?
Aim for 50–75 mm of closed-cell foam under and around devices to absorb up to 90% of impact energy.
Q: Should I use digital or paper checklists?
Digital (cloud spreadsheets) sync in real time; paper never runs out of battery—choose based on your travel environment.


