

Revive your generator with our expert guide on fixing a recoil starter! Ever found yourself frustrated by a generator that just won’t start?
This article hooks you in with practical, step-by-step tips and clear explanations on how to troubleshoot and repair the essential recoil starter.
Whether you’re a DIY enthusiast or a homeowner looking to save money, our guide breaks down every component—from the spring to the engagement dogs—with easy-to-follow advice.
Embrace the satisfaction of restoring your generator’s power while learning valuable maintenance skills that can save you time and costly service calls.
Understanding the Recoil Starter
Importance of the Recoil Starter
A recoil starter comes in handy for firing up small engines, like those in generators, without needing any electrical ignition. Imagine your generator’s usefulness tanking simply because the recoil starter’s out. That little gizmo makes sure your generator roars to life and is ready to dish out power when you’re in a bind.

Check out our more in-depth tips on generator troubleshooting if you’re curious for more insights.
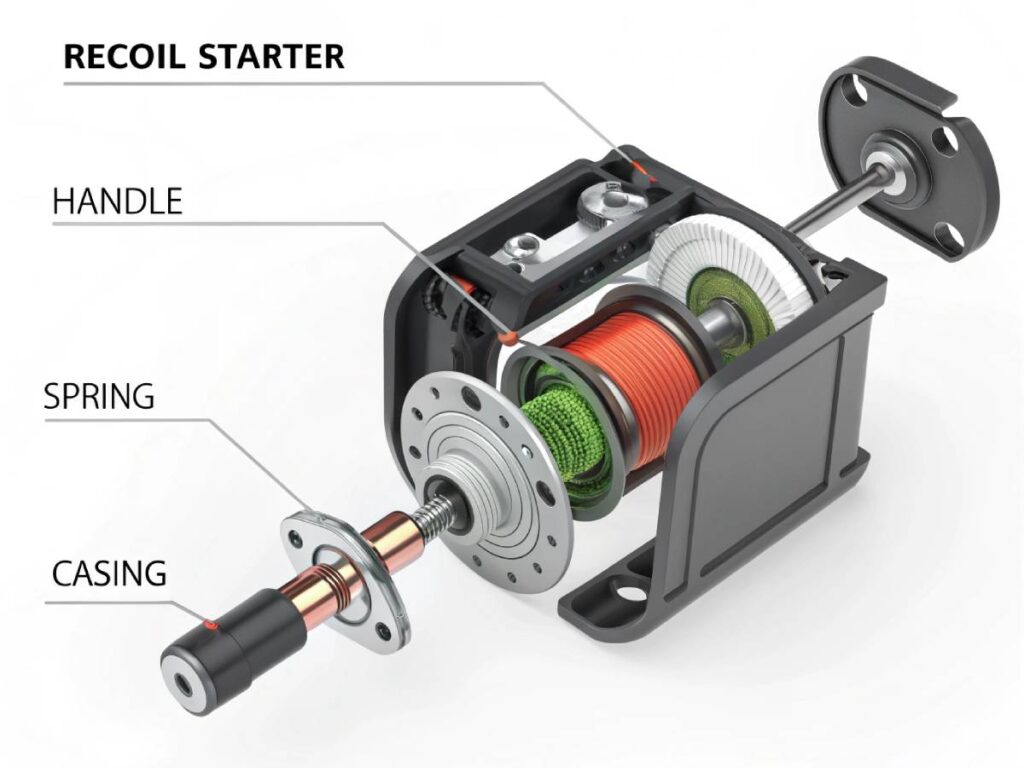
Components of a Recoil Starter
Getting the hang of what makes a recoil starter tick helps when it’s time to tinker or troubleshoot. Its main bits include:
- Starter Housing – Keeps the inner workings safe and sound.
- Recoil Spring – Brings the rope back after you’ve given it a yank.
- Starter Rope – The trusty line you pull to kick things off.
- Pulley – Shows the rope who’s boss, teaming up with the spring.
- Engagement Dogs/Pawls – Catch onto the flywheel to get the engine cranking.
- Flywheel – Hooks up with the engine to spin it up when needed.
Knowing these parts turns you into a savvy DIYer or homeowner who can tackle any hitches. Understanding these bits also sets you up for figuring out why your recoil starter might not be behaving. Check out more on this and other snags in our generator won’t start section.

| Component | Function |
|---|---|
| Starter Housing | Keeps parts safe |
| Recoil Spring | Pulls the rope back |
| Starter Rope | Gets the engine going |
| Pulley | Directs the rope |
| Engagement Dogs | Latch onto the flywheel |
| Flywheel | Spins the engine |
Grasping these parts not only helps in sorting out your recoil starter but also ups your game in generator maintenance and repair. This understanding lays down a solid path for fixing and spotting any gremlins in your generator’s recoil starter.
If you’re hunting for tool advice or need help with fixes, check out the scoop in our article on generator repair tools.
Signs of Recoil Starter Issues
Common Problems with Recoil Starters
Recoil starters keep your generator humming along. Being clued-in to these frequent hitches helps you nip ’em in the bud. Here’s a rundown of what could go wrong:
- Broken Recoil Spring: The spring snaps or loses its mojo, leaving the rope to droop like an old sock.
- Frayed or Snapped Starter Rope: Use it enough, and the rope can get fuzzy—or worse, snap on you.
- Damaged Pulley: The pulley might crack or bend as if it’s had a bad day, messing with that rope pull.
- Stuck Recoil Mechanism: Dust, grime, or rust can leave the mechanism sticking like a door with a rusty hinge.
- Worn Starter Dogs/Pawls: These little guys wear out, stopping them from grabbing onto the flywheel.
| Problem | Description |
|---|---|
| Broken Recoil Spring | Loses tension or breaks, rope won’t retract right |
| Frayed/Snapped Rope | Rope shows wear-and-tear or snaps completely |
| Damaged Pulley | Cracks or warps, messes with rope retraction |
| Stuck Mechanism | Dust, grime, or rust cause sticking or sluggishness |
| Worn Starter Dogs/Pawls | Wear down, can’t catch the flywheel like they should |
How to Identify a Faulty Recoil Starter
Spotting a bum recoil starter takes a keen eye and ear. Notice something iffy? Here’s what to watch out for:
- Difficulty Pulling the Starter Rope: If pulling feels like a workout, the spring or pulley could be acting up.
- Starter Rope Doesn’t Retract: When the rope refuses to retreat nicely, it’s likely a spring or pulley snag.
- Unusual Noises: Strange sounds like grinding or squealing? It might be internal bits giving up the ghost.
- Starter Rope Slips: The rope slipping without a hint of engine start means those dogs or pawls are tired.
- Visible Damage: Take a peek for cracks in the housing, a snapped rope, or a twisted pulley.
| Indicator | Possible Cause |
|---|---|
| Difficulty Pulling Starter Rope | Issues with recoil spring or pulley |
| Starter Rope Doesn’t Retract | Likely the spring or pulley needs attention |
| Unusual Noises | Internal parts could be worn or on their last legs |
| Starter Rope Slips | Those dogs or pawls are worn out |
| Visible Damage | Cracks, broken rope, or a pulley gone haywire |
Need more help? Check out our generator troubleshooting guide. If your machine is playing hard-to-get, take a gander at our generator won’t start guide. Knowing these signs means you can bring your generator back to life yourself. Dive into our articles on generator repair tools and keeping that carburetor squeaky clean too.
Preparing for Repair
Before getting your hands dirty with a recoil starter fix, a bit of prep work can make things way smoother. It’s not just about grabbing tools – you gotta play it safe too.

Safety Precautions
Safety’s no joke when tinkering with any generator bits, including the recoil starter. Here’s what you need to keep in mind:
- Turn Off the Generator: Make sure the generator’s off and unplugged from any power.
- Cool Down Period: If the generator was working recently, let it chill out to avoid getting burnt on hot pieces.
- Wear Protective Gear: Grab your gloves and goggles to keep those sharp edges and flying bits at bay.
- Work in a Well-Ventilated Area: Make sure you’re in a space with fresh air to avoid breathing in icky stuff.
- Disconnect the Spark Plug: Unhook the spark plug to avoid any surprise starts during the repair. Check out our guide on replace generator spark plug for more info.
Sticking to these steps helps dodge nasty accidents and paves the way for a smooth repair journey.
Tools Required for Fixing the Recoil Starter
Got the right gear on hand? Your recoil starter fix could be a walk in the park. Here’s a quick list you’ll need:
| Tool | What it’s for |
|---|---|
| Screwdrivers | Popping off screws from the generator setup |
| Socket Wrench Set | Untightening and retightening nuts and bolts |
| Pliers | Juggling and tweaking tiny pieces |
| Lubricant Spray | Making the movable parts of the recoil starter slick |
| Cleaning Brush | Brushing off the grime and gunk from parts |
| Safety Gloves | Keeping your hands safe |
| Protective Eyewear | Guarding your eyes from stray bits and pieces |
Plus, a tidy, flat spot to work on keeps all your parts in order. Dive into our article on generator repair tools for more insights.
Doing your homework with the right gear and safety steps smooths out the process of sorting out a generator’s recoil starter. For the skinny on solving other generator troubles, check out our generator troubleshooting guide.
Step-by-Step Repair Guide
Removing the Recoil Starter Assembly
Kicking off this generator repair means getting that recoil starter assembly out. Safety first, of course—don’t be the person who gets surprised by a rogue startup! For the tools, check out our handy generator repair tools article.
- Spark Plug Shuffle: Disconnect it. This is your shield against unexpected power-ups.
- Unleash the Housing: Grab your screwdriver and get those screws out. Easy does it.
- Bye-Bye Assembly: Lift the recoil starter gently off its perch.
Inspecting the Recoil Starter Parts
With the assembly out, it’s time to play detective. Look for anything that’s seen better days.
- Rope Reality Check: Is that rope looking rough or starting to tear?
- Pulley Patrol: Keep an eye out for any cracks or signs of misery.
- Spring Scan: Is your spring still springy, or is it rusty and busted?
Here’s a quick checklist to keep you on track:
| Part | What to Look For |
|---|---|
| Starter Rope | Fraying, Breaks |
| Pulley | Cracks, Wear |
| Recoil Spring | Not broken, Rust-free |
Cleaning and Lubricating the Recoil Starter Components
Wanna avoid future headaches? A little TLC goes a long way. Follow these simple steps to keep things running like a dream.
- Scrub-a-Dub-Dub: Get rid of dirt and grime with a brush or a blast of air.
- Lube Love: A little machine oil on those pulleys and springs goes a mile.
For more on keeping everything tip-top, swing by our generator maintenance and repair guide.
- Smooth Moves: Lubricate to ensure everything clicks and clacks just right.
- Pulley Preservation: Keep it slick to stave off rust and wear.
Keeping up with this maintenance schedule will make your generator happy and you even happier. For more handy hints, check out our stuff on DIY generator repair.
Troubleshooting Tips
Addressing Common Recoil Starter Problems
If your recoil starter’s giving you grief, join the club. Here’s how to handle the usual culprits without losing your cool.
- Rope Won’t Retract
- Cause: Could be that pesky recoil spring, either busted or misaligned.
- Solution: Peek at the spring. If it’s gone kaput, swap it out. If it’s just wobbly, give it a good nudge and lock it in place. Simple enough, right?
- Rope Slips or Doesn’t Engage
- Cause: Engagement bits may be grimy or worn-out.
- Solution: Give those pawls and gears a good cleaning or a complete makeover if necessary.
- Rope Breaks or Wears Out Quickly
- Cause: The rope might be making its acquaintance with a rough spot or just not the right rope for the job.
- Solution: Have a look at the rope’s path and replace the old rope with one that’s meant to last.
- Hard to Pull
- Cause: The engine could be feeling a bit stuck, maybe something is jamming it up.
- Solution: Hunt down anything blocking the flywheel or starter, and make sure all those engine bits are movin’ and groovin’.
For more on this, check out our generator troubleshooting guide which spills all the beans on generator repair hacks.
Ensuring Proper Reassembly
Once you sort out these common recoil starter issues, it’s time to put everything back together to guarantee your generator is on its best behavior:
- Recoil Starter Housing
- Pop the housing back onto its rightful place on the engine, making sure it sits nice and straight.
- Tighten everything down evenly to keep things aligned perfectly.
- Recoil Spring and Rope
- Give the recoil spring a proper wind and put it back home.
- Guide the rope through with gusto, making sure it slides smooth as butter.
- Engagement Mechanism
- Hook up the pawls and check they’re playing nice, engaging smoothly as you pull the rope.
- Test a couple of pulls, just to make sure everything’s playing fair.
- Lubrication and Final Checks
- Spritz a bit of oil on the moving parts for smooth sailing.
- Tighten any loose ends and eyeball the setup for alignment before calling it done.
Need more tools to handle this fix? Our generator repair tools guide has all the deets.
| Problem | Cause | Solution |
|---|---|---|
| Rope won’t retract | Broken or misaligned spring | Inspect and replace/reposition |
| Rope slips | Worn engagement mechanism | Clean or swap out parts |
| Rope breaks | Sharp edge/rubbing | Check out the path and replace the rope |
| Hard to pull | Engine is stuck | Look for and clear out any blockages |
Work through these steps, and your recoil starter should be humming along once more. For extra assistance on DIY repairs, browse our diy generator repair insights.
Testing the Recoil Starter
Checking if your generator’s recoil starter is working after a fix—is like testing the waters before jumping in. This part’s gonna show you how to pop that recoil starter assembly back together and give it a test whirl to see if it’s alive and kicking.
Reinstalling the Recoil Starter Assembly
Before you throw everything back together—give your parts a once-over in case anything’s missing. Here’s the lowdown on putting the recoil starter together correctly:
- Get the Recoil Starter Cover Lined Up: Place that recoil starter cover snug over the flywheel. Nail those mounting holes just right.
- Anchor the Recoil Assembly: Slide in and tighten those screws or bolts holding the starter. Use whatever tool, like a wrench or screwdriver, fits the fastener groove.
- Hook Up Cables and Wires Again: Reconnect any rogue cables or wires with a solid click.
- Ensure the Spark Plug’s Snug: Make sure the spark plug wire’s clipped on tight. For more about dealing with spark plugs, head on over to replace generator spark plug.
Trial Run and Testing the Recoil Starter Operation
With the starter assembly back on board, it’s go time. Here’s how to make sure the generator’s ready to roll:
- Get the Fuel System Set: If your generator’s got one, use the priming bulb to get the gas gut-ready. If you hit any snags, check out our generator fuel system troubleshooting article.
- Flip the Switch: Make sure the generator’s switched to “On.”
- Yank the Starter Rope: Grab that recoil starter handle and pull like you mean it—steady and true.
- Watch for Smooth Sailing: Keep an eye out to see if the starter hooks the flywheel and gets the engine turning smoothly. No go? Get over to generator wont start for more fixing tips.
| Observation | Expected Outcome | Possible Issue |
|---|---|---|
| Starter Rope Pulls Smoothly | Engine Starts | All Good |
| Starter Rope’s Stubborn | No Engine Action | Get Back to Reinstall |
| Weird Noises | Odd Moves | Peek at the Inside Parts |
- Listen When Engine’s Idling: Once it’s humming, chill and listen for any funny noises that could mean more fixin’s needed.
- Check the Juice Output: See if the generator’s power output matches the need. If something’s off, hit up generator power output problems for solutions.
Follow all of these steps without a hitch, and your recoil starter should be good to go. Still got troubles? Check out our generator troubleshooting guide or call in the experts with professional generator repair assistance if the issue’s still hanging around.
Seek Professional Help
When DIY Fixes Are Not Enough
Fixing the generator by oneself can save a pretty penny, right? But hey, not everyone’s a miracle worker. Sometimes, generators throw curveballs that even the handiest folks can’t handle. So, when should you toss in the towel and call in the pros?
Here’s a list of head-scratchers where you might need a professional lifeline:
- Persistent Issues: You’ve tried everything from the step-by-step repair guide, yet the recoil starter’s acting like a diva. It might be a sign there’s more going on under the hood.
- Complex Internal Damage: If opening it up reveals a scene from a destruction derby, with parts dangling and worn out, it’s time to let an expert have a look.
- Electrical Problems: Toucing wires give you the heebie-jeebies? Our generator electrical troubleshooting guide is a safe starting point—but if it’s a Gordian knot of problems, let a pro untangle it for you.
- Safety Concerns: Doing something you’re not certain of? Probably better to get someone who won’t end up with a face full of oops.
- Lack of Proper Tools: If you think you can MacGyver it with just a paperclip and bubble gum, check our generator repair tools guide first. You might need more than that.
Knowing When to Contact a Professional Service
Deciding to call in the cavalry can be the difference between a working generator and a paperweight. Watch for these signs that it’s time to dial up a service tech:
- Repeated Failures: If it seems like the starter’s been on the fritz more times than a lightbulb during a bad storm, maybe it’s a sneaky problem only a pro can pinpoint.
- Non-Starting Generator: After trying your best, if the generator’s throwing a tantrum and refusing to get going, it’s time for the experts.
- Noise and Vibration Issues: If your generator sounds like a rock concert or gets jittery, check our generator noise troubleshooting, but maybe let a pro plug their ears and take a look.
- Unusual Wear and Tear: Parts looking more battered than a crumpled paper? A pro will let you know if it’s surface-level or a symptom of something bigger.
- Warranty Concerns: Got a warranty? Don’t tempt fate with a DIY adventure—read the fine print and consider calling the hotline to preserve that precious coverage.
| Scenario | Professional Help Needed |
|---|---|
| Persistent Issues | Yep |
| Complex Internal Damage | Oh, yeah |
| Electrical Problems | You bet |
| Safety Concerns | Definitely |
| Lack of Proper Tools | For sure |
| Repeated Failures | Certainly |
| Non-Starting Generator | Absolutely |
| Noise and Vibration Issues | No doubt |
| Unusual Wear and Tear | Indeed |
| Warranty Concerns | Sure thing |
For a more robust game plan on keeping that generator purring, swing by our generator troubleshooting guide and other helpful reads like generator fuel system troubleshooting or the lowdown on how to replace your generator’s spark plug.
Conclusion
In summary, reviving your generator starts with a deep understanding of the recoil starter’s mechanics and recognizing the common issues that can hinder its performance. Our guide has taken you through the entire process—from inspecting and identifying faults such as broken springs and frayed ropes to implementing safety measures and utilizing the right tools for an effective repair.
The detailed step-by-step instructions ensure that even a novice can feel confident troubleshooting and restoring the starter’s functionality. Moreover, the troubleshooting section provides quick fixes and advises on professional assistance when necessary.
By following these expert tips, not only do you prolong the life of your generator, but you also gain invaluable DIY repair skills. Ultimately, embracing regular maintenance and proper repair techniques can save you time, money, and ensure that your generator is always ready to deliver power when you need it most.
Final Thoughts
Your generator is a lifeline during power outages and critical times, and a well-maintained recoil starter is key to its reliability. By understanding each component, preparing adequately, and following our detailed repair steps, you empower yourself to overcome common issues without immediately resorting to costly professional repairs.
The troubleshooting tips provided help pinpoint problems quickly, ensuring that you can restore functionality and save valuable time. Remember, regular maintenance not only extends the life of your equipment but also sharpens your DIY skills.
Whether you’re a seasoned repair expert or just beginning your home maintenance journey, these actionable tips and resources will keep your generator in top shape and ready to deliver when it matters most.
Main Tips Around the Article
- Always ensure the generator is turned off and unplugged before starting repairs.
- Wear appropriate safety gear to prevent injuries.
- Clean and lubricate components regularly to avoid future malfunctions.
- Follow the step-by-step guide meticulously for best results.
- When in doubt, consult professional resources or call an expert.
FAQs
What is a recoil starter and why is it important?
A recoil starter is a mechanical device essential for igniting small engines, ensuring your generator starts reliably without electrical ignition.
How do I identify common issues in a recoil starter?
Look for signs such as difficulty pulling the rope, unusual noises, visible damage, and non-retraction of the rope, indicating problems with springs, pulleys, or engagement dogs.
What tools are needed for repairing a recoil starter?
Essential tools include screwdrivers, socket wrench sets, pliers, lubricant spray, cleaning brushes, and safety gear like gloves and protective eyewear.
When should I call a professional for my generator repair?
If troubleshooting fails, or if you face persistent issues and complex internal damage, it’s advisable to contact a professional technician.
Recommended Products and Accessories
- Heavy-Duty Screwdriver Set: Ideal for disassembling the recoil starter housing.
- Socket Wrench Set: Perfect for tightening bolts and nuts during reassembly.
- High-Quality Pliers: Essential for handling small, delicate parts.
- Lubricant Spray (Silicone-based): Keeps springs and pulleys moving smoothly.
- Protective Safety Gear: Durable gloves and safety glasses for a secure repair process.
- Cleaning Brush Set: Effective for removing dirt and grime from components.
- Replacement Recoil Spring and Starter Rope Kit: High-quality parts designed for longevity.
- Digital Inspection Camera: Helps closely inspect internal components for damage.


