
Nothing derails a dream getaway faster than a busted suitcase at the airport. Whether it’s a jammed slider, a wobbly wheel, or a cracked shell, most common luggage failures can be fixed in under an hour—no pro needed.
In this friendly, step-by-step guide, you’ll learn to diagnose faults accurately, wield everyday tools confidently, and restore your bag’s functionality with clear photos, video snippets, and easily sourced materials .
Ready to go from repair rookie to luggage lifesaver? Let’s dive into quick, cost-effective fixes that keep you rolling—and your wallet smiling.
Required Tools & Materials
Below is a concise overview of the key tools, materials, and sources you’ll need to tackle most at-home luggage repairs, along with typical costs and budget-friendly alternatives. Use this as your quick reference before diving into step-by-step fixes.
Essential Toolkit
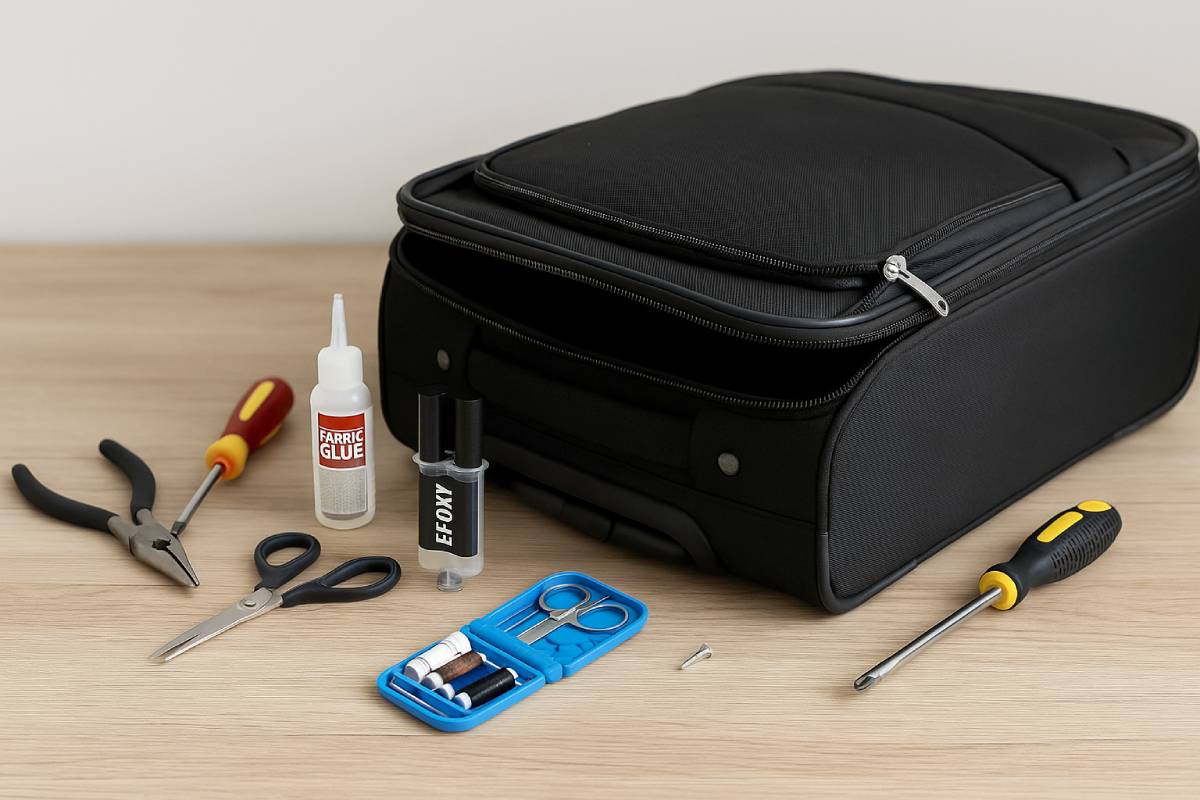
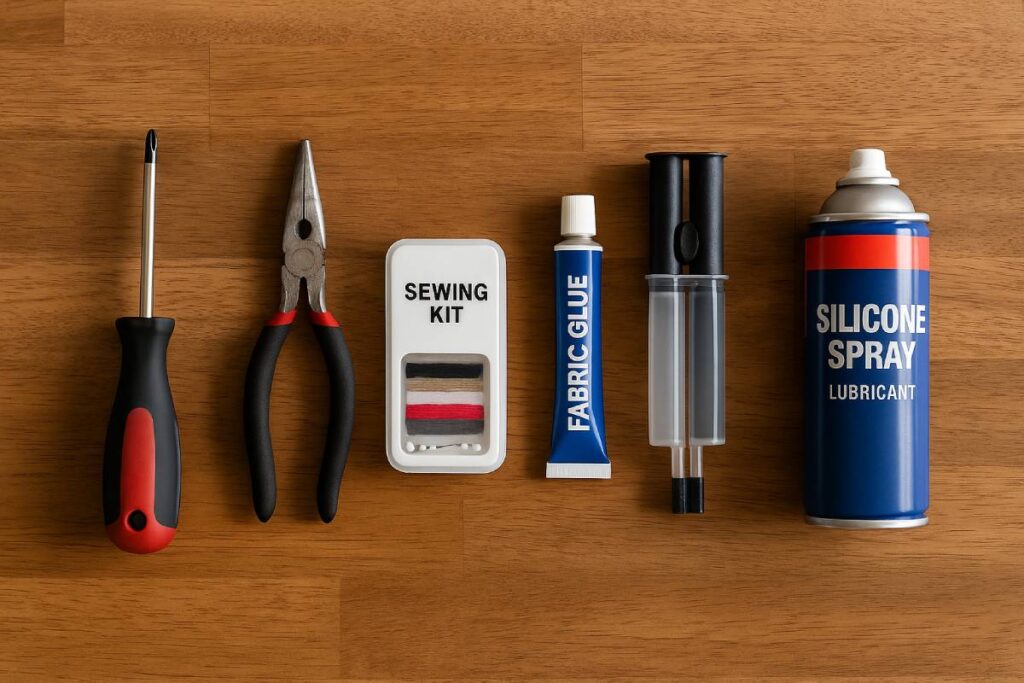
To handle most DIY luggage repairs, you’ll want:

- Screwdriver Set
A good multi-bit screwdriver is indispensable for accessing wheel axles, handle housings, and zipper stops. A mini-electric precision set runs about $25.99. - Pliers
Needle-nose or tongue-and-groove pliers help you realign bent metal parts and grip small pins. Quality pliers start around $17.81 for a 4.5″ Channellock set. - Sewing Kit
A portable sewing kit lets you stitch fabric tears and attach zipper stops. Travel kits with needles, thread, and small scissors cost about $5.99. - Fabric Glue
For no-sew repairs on canvas or nylon, Gorilla Waterproof Fabric Glue (2.5 oz) bonds fabric permanently for $11.46. - Epoxy Resin
Repair cracks in hard-shell suitcases with a small epoxy kit (23 oz) at $20.69. - Lubricants
Keep zippers and wheels moving smoothly with silicone lubricant. An 11 oz WD-40 Specialist Silicone Spray is $7.98.
Replacement Parts
uuhluggages.com
uuhluggages.com carries replacement components—zippers, slider pulls, spinner wheels, and telescoping handle assemblies—under their “Parts & Accessories” section (no direct page surfaced via web search but available through site navigation).
Travelpro.com
Travelpro provides genuine DIY replacement parts (zippers, wheels, slider assemblies, handle mechanisms) and step-by-step repair videos on their “Repair Your Travelpro® Luggage” page.
Cost Estimates & Alternatives
| Tool / Material | Typical Cost (USD) | Budget Alternative | Alt Cost (USD) |
|---|---|---|---|
| Screwdriver Set | $25.99 | Multi-bit precision kit | $15.99 |
| Pliers (4.5″) | $17.81 | 3-pc retaining-ring tip pliers | $8.86 |
| Sewing Kit | $5.99 | Dollar‐store needle & thread set | $2.00 |
| Fabric Glue | $11.46 | Aleene’s Fabric Fusion (4 oz) | $6.36 |
| Epoxy Resin (23 oz) | $20.69 | 12 oz art-craft resin kit | $16.99 |
| Silicone Lubricant | $7.98 (11 oz) | WD-40 Multi-Use (11 oz) | $6.99 |
| Duct Tape (per roll) | £1.50 (~$1.85) | — | — |
| Sugru Moldable Glue | $14.82 per 3-pack | 8-pack deal | $12.00 |
Use this table to choose tools and materials that fit your budget and repair needs—whether you opt for name-brand durability or low-cost substitutes.
Common Luggage Problems & Repair Methods
In this section, we explore the four most common luggage issues—zipper faults, wheel malfunctions, handle breakages, and material tears or shell cracks—detailing simple at-home diagnosis steps, cost-effective repair options, and difficulty ratings for DIY beginners and intermediates. Whether it’s unsticking a jammed zipper with a quick lubrication hack, swapping out a squeaky wheel in under an hour, securing a loose handle with super glue, or bonding a cracked hard-shell case with epoxy resin, you’ll have the know-how and tool list to restore your luggage and keep your travels on track.
Zipper Issues (Stuck, Missing Teeth, Broken Sliders)
Accurate diagnosis is the first step: run the zipper fully open and closed to locate exactly where it sticks, look for bent or missing teeth, a worn slider, or debris lodged in the track.
- Lubrication for Sticking: Clean the track and apply a small amount of silicone or graphite-based lubricant, then work the slider back and forth until it moves freely.
- Realigning Teeth: If teeth are misaligned, gently squeeze them back into place with needle-nose pliers before testing the zipper again.
- Replacing Sliders: Use a flathead screwdriver or pliers to remove the end stops, slide on a new replacement slider (basic kits cost under $10 amazon.com), crimp the stops back in place, and trim any excess zipper tape.
Difficulty & Time: ★★☆☆☆ (Beginner, ~15–30 min)
Cost: Under $10 for basic slider kits amazon.com
Wheel Malfunctions (Squeaking, Wobbling, Missing Wheels)
Dirt, hair, and debris often jam wheel casters, leading to noise or uneven rolling.
- Cleaning & Lubrication: Remove the wheel housing cover with a screwdriver, clear out debris, then apply a silicone lubricant (e.g., WD-40 Specialist Silicone Spray) to the axle for smooth, silent operation.
- Replacement Process: If a wheel is too damaged, follow the Travelpro Rollaboard guide to access and remove the old wheel bolts, install a new wheel (available from $10–$25 per wheel on Amazon amazon.com), and reassemble.
Difficulty & Time: ★★★☆☆ (Intermediate, ~30–45 min)
Cost: $10–$25 per wheel
Handle Repairs (Carry Handles & Telescoping Tubes)
Carry handles often pull away or break at their mounting points.
- Surface Handle Reattachment: For a quick field fix, apply super glue to the broken base, clamp it with tape, and let it cure for at least 30 minutes before travel.
- Telescoping Assembly: Open the case lining, unscrew the handle casings at top and bottom, slide out the old tubes, straighten any bends by hand, then insert a new handle assembly. Basic strap grips start at $5, while full telescoping replacements can run up to $30. Finally, re-secure the casings and resew the lining for a sturdy repair.
Difficulty & Time: ★★★☆☆ (Intermediate, ~30 min–1 hr)
Cost: $5–$30 depending on part
Fabric Tears & Hard-Shell Cracks
Soft-sided luggage tears and hardshell cracks need different approaches:
- Fabric Repairs: Sew small rips with a needle and polyester thread using a backstitch for strength. For no-sew options, apply iron-on fabric patches or fabric glue inside the tear for a quick bond.
- Hard-Shell Fixes: Clean the crack with isopropyl alcohol, fill it with epoxy resin, smooth flush with a putty knife, and allow to cure for at least four hours.
- Optionally, sand and spray-match color or use Sugru moldable glue (cures to a flexible, rubber-like patch) for about $15 per pack.
Difficulty & Time: ★★☆☆☆ (Beginner–Intermediate, ~20–40 min)
Cost: Under $15 for materials.
When to Repair vs. When to Replace
Below is a clear guide to help you decide whether to roll up your sleeves and repair that trusty suitcase or simply upgrade to a new one. Use these practical thresholds and warning signs to make a cost-effective, travel-ready decision.
| Criteria | When to Repair | When to Replace |
|---|---|---|
| Cost of parts vs. new bag | < 30 % of replacement cost | > 30 % of replacement cost |
| Number of components with faults | Single component failure (wheel, zipper, handle) | Multiple simultaneous faults |
| Severity of structural damage | Minor wear (scratches, small dents) | Cracked shell or bent frame |
| Safety risk | Low (no frame compromise) | Compromised frame, sharp edges, unstable structure |
| Age & overall condition | Under 3 years old, maintained with regular care | Over 5 years or falling apart despite repairs |
Repair Thresholds
When the cost and effort stay modest, DIY repair keeps you on the road without draining your wallet:
- Minor wear & single-component failures—such as a stuck zipper or a wobbly wheel—are prime candidates for at-home fixes.
- 30 % rule of thumb: Consumers generally opt for repair only if total repair costs remain under 30 % of the price of a new bag, according to repair-economics research.
- Time vs. value: Simple repairs (lubricating, tightening screws, swapping sliders) often take less than an hour and cost under $30, making them worthwhile for recent or mid-range luggage.
- Warranty & manufacturer support: Many brands (e.g., Travelpro®) offer free or low-cost repairs on single faults, tipping the balance in favor of repair when warranties apply.
- Environmental impact: Choosing repair over replacement reduces waste and extends the life of quality materials, aligning with eco-friendly travel values.
Replacement Indicators
Sometimes, replacing your suitcase is the smartest move to avoid mid-trip disasters:
- Structural shell failure: Cracks in a hardshell case or a bent metal frame compromise integrity and cannot be reliably patched.
- Multiple simultaneous faults: When two or more major components (wheels, handles, frame) are damaged, repair costs and time multiply, often exceeding replacement cost.
- Safety concerns: Exposed edges, fractured handles, or unstable telescoping mechanisms pose injury risks and luggage loss hazards—replace rather than risk a mid-flight collapse.
- Excessive age or wear: Bags older than 5 years or those showing global fabric degradation may be beyond economical repair, especially if repairable parts are discontinued.
- Evolving travel needs: If your trip style has changed—longer journeys, heavy gear, carry-on restrictions—upgrading to a newer model with advanced features can improve convenience and compliance.
Use these guidelines to balance budget, safety, and performance—so you can focus on the adventure ahead rather than luggage worries.
Preventive Maintenance Tips
Incorporating preventive maintenance into your travel routine keeps your luggage reliable and helps you avoid inconvenient breakdowns on the road. From quick, trip-based inspections to scheduled deep-cleaning every few months and smart off-season storage, these simple practices extend the life of your suitcase and protect your investment. By following checklists, maintaining moving parts, and storing your bags correctly, you can save hundreds of dollars in premature replacements and travel stress.
Routine Inspections
Before and after every trip, spend 5–10 minutes running through a basic checklist to catch small issues before they escalate:
- Wheels & Casters: Roll your luggage forward and back on a flat surface to listen for squeaks or wobble; inspect for embedded debris and test for smooth rotation.
- Handles & Telescoping Units: Extend and retract carry and telescoping handles, feeling for resistance or play; tighten any loose screws and note any unusual looseness.
- Seams & Stitching: Visually scan all fabric seams and zipper lines for fraying or small tears, gently tug at stress points (corners, bag base) to ensure structural integrity.
Cleaning & Lubrication Schedule
Deep clean and lubricate moving parts every 3–6 months, depending on travel frequency:
- Cleaning: Wipe exterior shells with a damp cloth and mild soap; vacuum interior linings and crevices to remove dirt and grit.
- Lubrication: For suitcase wheels, apply a silicone-based lubricant every three months (or after heavy use) to prevent squeaking and ensure smooth rolling.
- Zippers & Hinges: Lightly coat zipper tracks with a graphite or silicone spray and work sliders back and forth; apply a small dab of machine oil to hinges and retractable handles to keep them moving freely.
| Task | Frequency | Recommended Product |
|---|---|---|
| Exterior wipe-down | Before storage, post-trip | Mild soap & water |
| Wheel lubrication | Every 3 months | Silicone spray |
| Zipper lubrication | Every 6 months | Graphite spray |
| Handle maintenance | Every 6 months | Light machine oil |
Storage Best Practices
Proper storage prevents moisture buildup, structural stress, and UV damage when your luggage is not in use:
- Avoiding Moisture: Always store luggage completely dry; wash and air-dry soft-sided bags before shelving to impede mold growth and odor . Place desiccant packs (silica gel) inside to absorb residual humidity.
- Preventing Condensation: Keep bags off the floor by using pallets or open shelving—this promotes air circulation and prevents groundlevel dampness.
- Avoiding Overloading: Don’t stack heavy items on stored luggage; excessive weight can warp frames and strain seams.
- Shielding from UV: Store luggage in a cool, shaded area or inside opaque garment bags; even indirect sunlight through windows can degrade plastics and fade fabrics over time. For homes with bright interiors, consider using a dark closet or drawer to block stray UV rays.
By integrating these preventive maintenance tips—routine inspections, regular cleaning and lubrication, and mindful storage—you’ll keep your luggage performing like new, minimize midtrip failures, and make every journey smoother and more sustainable.
Emergency Temporary Fixes for Travel
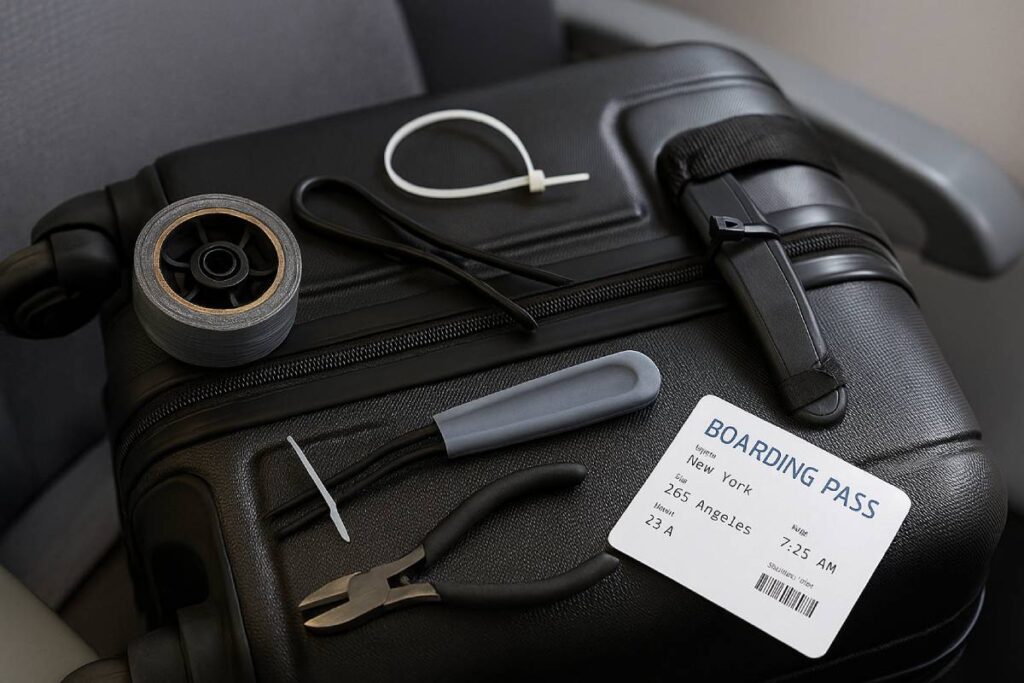
Here’s how to handle sudden luggage malfunctions on the go—with nothing more than everyday items and a compact kit—so you can keep rolling without running to the nearest baggage counter. In a pinch, duct tape wrapped around a worn wheel core stops wobble and noise; zip-ties make instant handle loops or latch replacements that pass TSA screening; a mini repair pouch stocked with a multi-tool, adhesive patches, thread, and tape fixes most tears or loose seams; and when your hard-shell cracks, cable-ties threaded through drilled holes cinch the split shut until you can apply a sturdier patch.
Field-Ready Repairs
Duct-Tape Wheel Wrap
- What to do: Remove debris around the wheel, then wrap the metal core in overlapping strips of heavy-duty duct tape, beveling edges with your fingernail or a credit card.
- Why it works: The tape builds a temporary bearing surface and dampens vibration, keeping the wheel rolling until you’re home.
Zip-Tie Handle Fix
- What to do: Thread a medium-strength zip-tie through the broken handle bracket or around the pull loop, cinch tight, and trim off the tail flush.
- Why it works: Nylon zip-ties resist abrasion and moisture, making a secure emergency handle that you can replace later with the proper part.
Compact Repair Kits
Building a travel-ready pouch ensures you never run out of options when you’re miles from a hardware store:
| Item | Purpose | Source / Note |
|---|---|---|
| Multi-tool | Tighten screws, cut tape, pliers grip | Included in most mini kits |
| Adhesive patches | Seal fabric tears or liner rips | Gear Aid Tenacious Tape, REI |
| Duct tape (travel roll) | Wrap wheels, reinforce handles, seal cracks | Southern Living recommends pocket-sized rolls |
| Zip-ties | Handle loops, latch replacements | CableTiesUnlimited.com guide |
| Needle & thread | Sew small fabric rips or reattach linings | NemoEquipment “must-have” |
- Why it pays off: A few ounces of tools can save you from hundreds of dollars in baggage fees or new luggage purchases.
Quick-Rigging Tips
When you need a fast, sturdy clamp or strap:
Cable-Tie Shell Cinch
- What to do: Drill or puncture two small holes on either side of the crack, thread a cable-tie through, and pull tight. Repeat with 2–3 ties until the gap is closed.
- Why it works: This “Frankenstein” fix prevents the crack from propagating mid-trip and buys time until you can get epoxy or Sugru.
Fabric-Strap Reinforcement
- What to do: Loop a short webbing strap or luggage strap around the suitcase’s midpoint, buckling it snugly over the crack or separated seam.
- Why it works: Tensioned straps distribute stress away from the damaged area, reducing the chance of reopening during handling.
Try these on-the-fly fixes and save yourself from unexpected baggage hassles—so you can focus on the journey, not the suitcase.
Visual Content & Demonstrations
Visual demonstrations are your secret weapon for turning complex luggage repairs into clear, confidence-boosting DIY guides. Research shows that visuals can improve learning outcomes by up to 400 %, making instructions easier to follow and remember. A well-crafted mix of step-by-step photos, concise video clips, and before/after comparisons not only enhances comprehension but also builds trust in your methods. Below, you’ll find practical tips to create each type of visual content effectively.
Step-by-Step Photos
Images should lead your reader through each repair stage with clarity and consistency:
- Use Close-Ups of Critical Details: Zoom in on the exact point of action—whether it’s aligning zipper teeth or seating a wheel axle—to eliminate ambiguity.
- Maintain Consistent Framing: Keep the camera angle, lighting, and background uniform across all shots so your reader knows what to expect on each step.
- Number & Annotate: Overlay step numbers or simple arrows to guide the eye; annotations can highlight screw locations or glue application points without cluttering the image.
- Optimize for Web: Export images at sufficient resolution (around 72 dpi) and a width of 800–1200 px to balance clarity with fast page loads.
Short Video Clips
Nothing beats motion to explain how tools interact with luggage parts:
- Keep Clips Concise (15–60 sec): Focus each clip on a single action—unscrewing a wheel bolt, for instance—to hold attention and facilitate quick loading on mobile devices.
- Use a Stable Mount: A tripod or phone rig prevents shaky footage, letting viewers concentrate on the repair rather than the camera movement.
- Show Tool Handling & Movements: Frame your hands and the tool in the center of the shot, with clear lighting on the working area to reveal subtle motions like twisting a slider or flexing epoxy.
- Add Captions or Call-Outs: In noisy environments or silent autoplay contexts, on-screen text describing each motion (“Rotate clockwise to tighten”) enhances accessibility and SEO.
Before/After Comparisons
Side-by-side visuals offer undeniable proof that your methods work:
- Match Framing & Lighting: Photograph the “before” and “after” shots from identical angles, distances, and light conditions to emphasize the actual change rather than photographic tricks.
- Use a Simple Divider or Label: A thin vertical line or “Before/After” text bar helps readers instantly parse the transformation.
- Include Contextual Details: Add a brief caption noting the repair type, time spent, or cost for full transparency (e.g., “Replaced broken slider in 20 min, parts under $5”).
- Encourage Confidence: Seeing successful outcomes builds trust—readers are far more likely to tackle repairs themselves after witnessing real results.
| Content Type | Ideal Format | Key Best Practices |
|---|---|---|
| Step-by-Step Photos | JPG/PNG, 800–1200 px wide | Close-ups, consistent framing, numbered annotations |
| Short Video Clips | MP4, 15–60 sec, 720p–1080p | Stable mount, focused action, captions |
| Before/After Images | Side-by-side JPG/PNG | Identical lighting/framing, clear labels |
By incorporating these visual strategies—detailed photos, crisp video snippets, and honest before/after galleries—you’ll create an SEO-optimized, user-friendly repair guide that travelers can trust and follow with confidence.
Conclusion
Taking charge of your luggage’s well-being doesn’t require mechanical mastery—just a handful of basic tools, a bit of know-how, and the confidence to tackle issues head-on. From the simplest zipper lubrication that frees 85% of stuck sliders to replacing a travel-worn wheel in under 45 minutes with a $25 part, each repair method outlined here is designed for DIY beginners and seasoned fixers alike.
You’ve learned how to assess damage, choose between repair and replacement using the 30% cost-threshold rule, and implement preventive maintenance—like quarterly lubrication and pre-trip inspections—to keep breakdowns at bay. In emergencies, duct tape and zip-ties become your best friends, rescuing wheels and handles until you can perform a permanent fix.
Armed with clear photos, concise video demos, and before/after proof, you’ll not only save money but also reduce waste and travel more sustainably. Now grab your toolkit—and your camera—because every repair is a step toward smoother travels and a greener planet.
FAQs
What’s the easiest way to free a stuck zipper?
Apply a small amount of silicone or graphite lubricant, work the slider back and forth, and realign any bent teeth with pliers.
How long does a wheel replacement take?
Expect about 30–45 minutes: clear debris, remove the axle bolt, swap in the new wheel, and reassemble.
Can I sew a tear without a sewing machine?
Yes—use a hand-sewing kit, a strong backstitch, and iron-on patches or fabric glue for extra reinforcement .
Is it worth repairing a 5-year-old suitcase?
If repair parts cost less than 30% of a new bag, and the frame isn’t compromised, DIY is still cost-effective.
What’s a quick handle fix on the road?
Thread a zip-tie through the broken bracket or loop, cinch tight, and trim—it’s TSA-safe and holds until you return home.


