
There’s nothing quite like the joy of having a pet. Whether it’s the wagging tail of a dog greeting you at the door or the gentle purr of a cat snuggled in your lap, pets bring immense happiness and companionship to our lives.
As pet owners, we often find ourselves wanting to spoil our furry friends as a way of showing our love and appreciation. One delightful way to do this is by making homemade treats that your pet will crave.
Homemade treats offer numerous benefits beyond just spoiling your pet. They allow you to have complete control over the ingredients, ensuring that your pet gets nutritious snacks without any harmful additives or preservatives.
Additionally, homemade treats can be customized to suit your pet’s specific dietary needs and preferences, making them an ideal choice for pets with allergies or sensitivities.
In this article, we’ll explore the many reasons to make homemade treats for your pets and provide some simple, tasty recipes that are easy to prepare at home. Whether you have a dog or a cat, we’ve got you covered with treats that are sure to make your pet’s tail wag or purr with delight. Let’s dive into the world of homemade pet treats and start spoiling our furry companions in the best way possible!

Why Make Homemade Pet Treats?
Making homemade pet treats is a wonderful way to show love and care for your furry friends. Here are several compelling reasons why you should consider whipping up some delicious treats at home:
Health Benefits
One of the most significant advantages of making homemade pet treats is the ability to control the ingredients that go into them. Many store-bought treats contain preservatives, artificial colors, flavors, and fillers that may not be beneficial for your pet’s health.
By making treats at home, you can choose high-quality, natural ingredients, ensuring that your pet gets a nutritious snack. This is especially important for pets with food allergies or sensitivities, as you can avoid ingredients that could trigger adverse reactions.

Customization
Homemade treats offer the flexibility to tailor snacks to your pet’s specific dietary needs and preferences. Whether your dog loves peanut butter or your cat prefers a taste of tuna, you can customize recipes to suit their tastes. Additionally, if your pet requires a special diet, you can adjust the ingredients to meet those needs, ensuring they enjoy tasty treats without compromising their health.
Cost-Effectiveness
While premium store-bought treats can be expensive, making treats at home can be a more cost-effective option. The ingredients for homemade treats are often items you already have in your kitchen or can purchase inexpensively in bulk.
This not only helps save money but also allows you to provide high-quality treats without breaking the bank. Plus, making treats in larger batches means you’ll have plenty of snacks on hand for whenever your pet deserves a little extra love.
Bonding Experience
Preparing homemade treats is not only beneficial for your pet’s health and your wallet, but it can also be a fun and rewarding experience for you both. Engaging in the process of making treats allows you to bond with your pet in a unique way.
Pets often enjoy being around while their owners cook, and you can even involve them in the process by letting them sniff ingredients or sit close by as you prepare their snacks. This shared activity strengthens the bond between you and your pet, creating happy memories and reinforcing the special connection you share.
In summary, making homemade pet treats offers numerous benefits, from promoting better health and providing cost savings to creating opportunities for bonding. It’s a simple yet effective way to spoil your pet while ensuring they receive the best care possible.

Safety First: What to Know Before You Start
Before diving into making homemade treats for your pets, it’s important to keep safety in mind. While creating your own treats allows for great customization, it also comes with the responsibility of ensuring that all ingredients are safe and suitable for your furry friends. Here’s what you need to know before you start:
Safe Ingredients for Pets
When making homemade treats, choose ingredients that are safe and healthy for pets. Here’s a list of common safe ingredients for both dogs and cats:
- Lean Meats: Chicken, turkey, and lean cuts of beef or pork are excellent protein sources for pets.
- Fish: Salmon and tuna are great options, especially for cats, as they are rich in omega-3 fatty acids.
- Fruits: Apples (without seeds), blueberries, bananas, and strawberries are safe and provide vitamins and antioxidants.
- Vegetables: Carrots, sweet potatoes, peas, green beans, and pumpkin are all safe and packed with nutrients.
- Grains: Whole grains like oats, brown rice, and quinoa can be good sources of fiber and energy.
- Dairy: Plain yogurt and small amounts of cheese can be good treats, but always check for lactose intolerance first.
- Peanut Butter: This is a favorite among many dogs, but make sure it is free from xylitol, an artificial sweetener that is toxic to pets.
Ingredients to Avoid
Certain foods and ingredients can be harmful or even deadly to pets. It’s crucial to know what to avoid when making homemade treats:
- Chocolate: Contains theobromine, which is toxic to dogs and cats.
- Grapes and Raisins: Can cause kidney failure in both dogs and cats.
- Onions and Garlic: These can damage red blood cells and lead to anemia in pets.
- Xylitol: A sugar substitute found in some peanut butter, candies, and baked goods, it is extremely toxic to pets and can cause a rapid insulin release leading to hypoglycemia (low blood sugar).
- Alcohol: Even small amounts can cause intoxication, digestive upset, and central nervous system issues.
- Macadamia Nuts: These nuts are toxic to dogs and can cause weakness, vomiting, and hyperthermia.
- Caffeine: Found in coffee, tea, and some sodas, caffeine can be dangerous and even fatal to pets.
- Raw Dough with Yeast: Can expand in the stomach and cause bloating and digestive issues.
Consult Your Vet
Before introducing any new treats into your pet’s diet, especially if they have allergies or health conditions, it’s important to consult your veterinarian. A vet can provide guidance on what ingredients are safe and suitable for your pet based on their specific needs. They can also advise on the appropriate portion sizes and frequency of treats to ensure they complement your pet’s overall diet and health plan.
By taking these precautions and being mindful of the ingredients you use, you can ensure that your homemade treats are not only delicious but also safe and healthy for your beloved pets.
Simple Homemade Treat Recipes for Dogs

Making treats at home for your dog can be a fun and rewarding experience. Here are three simple recipes that your dog will love:
1. Peanut Butter Pumpkin Biscuits
These biscuits are not only delicious but also packed with nutrients. Pumpkin is great for digestion, and peanut butter adds a protein-rich flavor that most dogs adore.
Ingredients:
- 2 1/2 cups whole wheat flour (or oat flour for a grain-free option)
- 1/2 cup canned pumpkin (unsweetened)
- 1/2 cup peanut butter (ensure it’s xylitol-free)
- 2 large eggs
- 1/4 cup water (as needed for consistency)
Instructions:
- Preheat your oven to 350°F (175°C). Line a baking sheet with parchment paper.
- Mix Ingredients: In a large bowl, combine the flour, canned pumpkin, peanut butter, and eggs. Stir until a dough forms. If the dough is too dry, add water a tablespoon at a time until it reaches a workable consistency.
- Roll and Cut: Lightly flour a clean surface and roll out the dough to about 1/4-inch thickness. Use cookie cutters to cut out shapes and place them on the prepared baking sheet.
- Bake: Bake the biscuits in the preheated oven for 20-25 minutes or until golden brown and firm.
- Cool and Store: Let the biscuits cool completely before giving them to your dog. Store them in an airtight container for up to two weeks.
2. Sweet Potato Chews
Sweet potato chews are a simple, healthy snack that provides a chewy texture dogs love. They are also rich in vitamins and fiber.
Ingredients:
- 1 large sweet potato
Instructions:
- Preheat your oven to 250°F (120°C). Line a baking sheet with parchment paper.
- Prepare the Sweet Potato: Wash and peel the sweet potato. Slice it into thin strips, about 1/4-inch thick.
- Bake: Arrange the sweet potato slices in a single layer on the prepared baking sheet. Bake for about 2-3 hours, turning the slices halfway through. The chews should be dried out and have a chewy texture.
- Cool and Store: Let the sweet potato chews cool completely before serving them to your dog. Store in an airtight container in the refrigerator for up to three weeks.
3. Frozen Yogurt Bites
These frozen yogurt bites are a refreshing treat, perfect for cooling down on a hot day. They are easy to make and can be customized with your dog’s favorite flavors.
Ingredients:
- 1 cup plain Greek yogurt (ensure it has no added sugars or artificial sweeteners)
- 1/2 cup fresh or frozen blueberries
- 1 tablespoon honey (optional)
Instructions:
- Blend Ingredients: In a blender or food processor, combine the Greek yogurt, blueberries, and honey (if using). Blend until smooth.
- Fill Molds: Pour the yogurt mixture into silicone molds or ice cube trays, filling each section about three-quarters full.
- Freeze: Place the molds in the freezer for at least 2 hours or until the bites are fully frozen.
- Serve and Store: Pop the frozen yogurt bites out of the molds and serve as a cool treat. Store the remaining bites in a ziplock bag or airtight container in the freezer for up to three months.
Simple Homemade Treat Recipes for Cats
Treat your feline friend to some delicious and healthy homemade snacks. Here are three simple recipes that are sure to be a hit with your cat:
1. Tuna Catnip Bites
Cats love the taste of tuna and the stimulating effect of catnip. These tuna catnip bites are easy to make and will surely be a favorite!
Ingredients:
- 1 can of tuna in water, drained
- 1 cup oat flour (or grind oats in a blender to make your own)
- 1 tablespoon dried catnip
- 1 egg
Instructions:
- Preheat your oven to 350°F (175°C). Line a baking sheet with parchment paper.
- Mix Ingredients: In a medium bowl, combine the drained tuna, oat flour, dried catnip, and egg. Mix well until the ingredients form a dough.
- Shape the Treats: Roll the dough into small balls, about the size of a marble, and place them on the prepared baking sheet. Flatten each ball slightly with your fingers or a fork.
- Bake: Bake the treats in the preheated oven for 10-12 minutes, or until they are firm and golden brown.
- Cool and Store: Let the tuna catnip bites cool completely before serving them to your cat. Store in an airtight container in the refrigerator for up to one week.
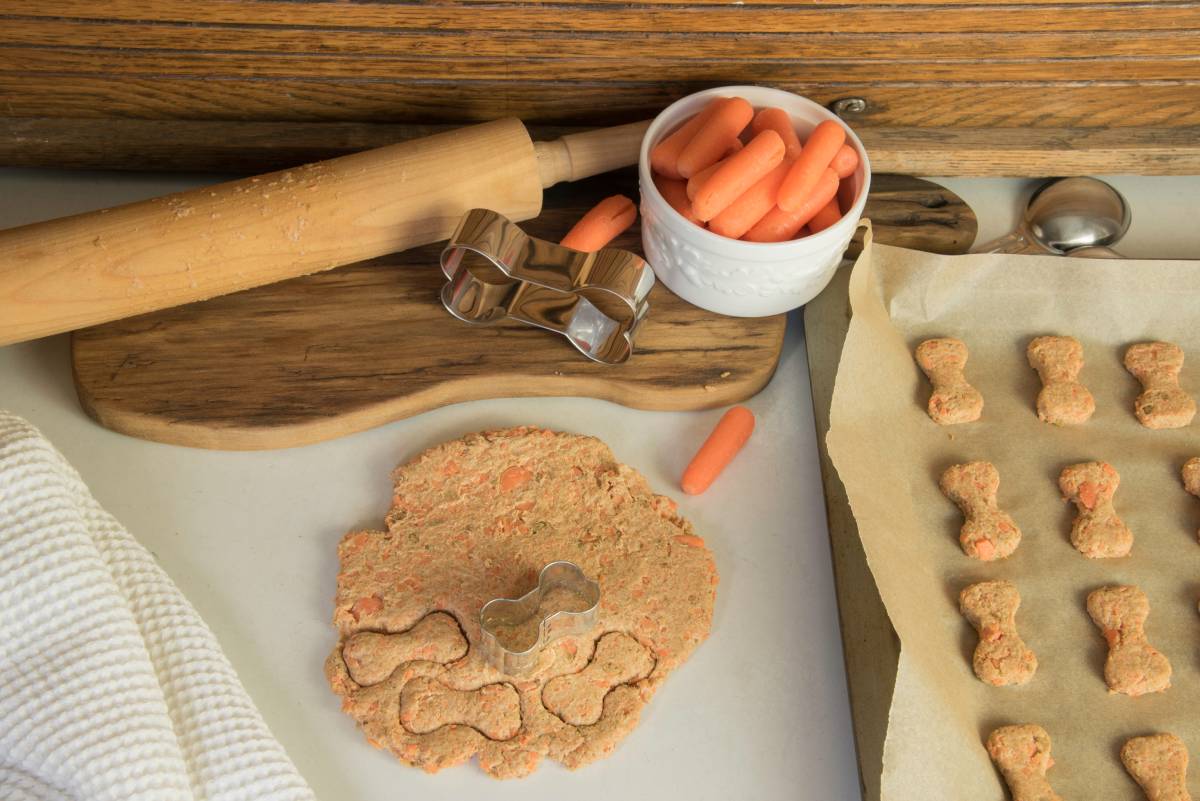
2. Chicken and Carrot Crunchies
These chicken and carrot crunchies are a crunchy, nutritious option that combines lean protein with healthy vegetables.
Ingredients:
- 1/2 cup cooked chicken breast, shredded
- 1/2 cup finely grated carrots
- 1/2 cup oat flour (or grind oats in a blender to make your own)
- 1 tablespoon olive oil
- 1 egg
Instructions:
- Preheat your oven to 350°F (175°C). Line a baking sheet with parchment paper.
- Mix Ingredients: In a large bowl, combine the shredded chicken, grated carrots, oat flour, olive oil, and egg. Mix until a dough forms.
- Shape the Treats: Scoop out small portions of dough and roll them into balls or press them into small, flat shapes on the prepared baking sheet.
- Bake: Bake in the preheated oven for 15-20 minutes, or until the treats are firm and lightly golden.
- Cool and Store: Allow the chicken and carrot crunchies to cool completely before giving them to your cat. Store in an airtight container in the refrigerator for up to one week.
3. Salmon Treats
These salmon treats are easy to make and packed with flavor, providing a tasty, protein-rich snack that your cat will love.
Ingredients:
- 1/2 cup canned salmon, drained
- 1 egg
- 1 tablespoon parsley, finely chopped (optional)
- 1 cup oat flour (or grind oats in a blender to make your own)
Instructions:
- Preheat your oven to 350°F (175°C). Line a baking sheet with parchment paper.
- Mix Ingredients: In a medium bowl, mash the drained salmon with a fork until it is well-flaked. Add the egg, parsley (if using), and oat flour, mixing until a dough forms.
- Shape the Treats: Roll the dough into small balls or press them into flat shapes and place them on the prepared baking sheet.
- Bake: Bake in the preheated oven for 10-12 minutes, or until the treats are firm and slightly browned.
- Cool and Store: Let the salmon treats cool completely before serving them to your cat. Store in an airtight container in the refrigerator for up to one week.
Tips for Storing Homemade Pet Treats
Proper storage is key to maintaining the freshness and safety of homemade pet treats. Here are some essential tips on how to store your treats to ensure they stay fresh and safe for your pets to enjoy.
Proper Storage Techniques
- Refrigeration:
- Many homemade pet treats are made with fresh ingredients and do not contain preservatives like store-bought options. To extend the shelf life of these treats, it’s often best to store them in an airtight container in the refrigerator. This is particularly important for treats made with meat, dairy, or moist ingredients like pumpkin or yogurt.
- Keep the treats in a sealed container to prevent them from absorbing any odors from other foods in the refrigerator.
- Freezing:
- For treats that you want to store for longer periods, freezing is an excellent option. Freeze treats in a single layer on a baking sheet first, then transfer them to a ziplock bag or airtight container once they are frozen solid. This prevents them from sticking together.
- Be sure to label the container with the type of treat and the date they were made so you can keep track of their age.
- Room Temperature:
- Some treats, such as biscuits or dehydrated chews, can be stored at room temperature in an airtight container. However, they should be kept in a cool, dry place, away from direct sunlight and heat, which can cause them to spoil faster.
- Make sure the container is sealed well to keep out moisture and pests.
Shelf Life
- Refrigerated Treats: Homemade treats stored in the refrigerator typically last for about 1 to 2 weeks. This is a good option for treats that will be consumed within a short period.
- Frozen Treats: When stored properly in the freezer, most homemade treats can last for up to 3 months. Freezing preserves the treats’ freshness and nutritional quality, making it a great option for bulk batches.
- Room Temperature Treats: Treats stored at room temperature generally last for about 1 to 2 weeks, depending on the ingredients used and the level of moisture in the treats. The drier the treat, the longer it will last.
Signs of Spoilage
It’s important to regularly check your homemade treats for signs of spoilage to ensure they are still safe for your pets to eat:
- Mold: Visible mold is a clear sign that the treats have spoiled and should be discarded immediately.
- Off Smell: If the treats develop a sour or rancid odor, it’s best to throw them away. Fresh treats should smell like their ingredients (e.g., peanut butter, chicken).
- Change in Texture or Color: Any unexpected changes in texture (like becoming mushy or sticky) or discoloration (such as spots or fading) can indicate spoilage.
- Moisture Buildup: If moisture accumulates inside the storage container, this can create an environment for bacteria or mold growth. Discard any treats that appear damp or sticky.
By following these storage tips and regularly checking for signs of spoilage, you can keep your homemade pet treats fresh, tasty, and safe for your furry friends to enjoy.
Get Creative: Customizing Treats for Your Pet
Making homemade pet treats allows you to customize recipes to suit your pet’s unique tastes and dietary needs. Here are some ideas for how you can get creative with your pet treats to make them even more special.
Flavor Variations
Every pet has their own preferences, and one of the great things about making treats at home is that you can adjust the flavors to match what your pet loves most. Here are some suggestions for altering recipes based on your pet’s preferences:
- For Dogs:
- Meaty Delights: Add finely chopped cooked bacon or shredded chicken to biscuit recipes for a protein-packed flavor boost.
- Cheesy Treats: Many dogs love cheese. Try adding grated cheddar, parmesan, or mozzarella to your dough for a savory treat.
- Fruity Fun: Incorporate pureed fruits like apples, bananas, or blueberries into the dough for a touch of sweetness. Remember to avoid grapes, as they are toxic to dogs.
- For Cats:
- Fishy Favorites: Mix in canned sardines or a small amount of tuna juice to a treat recipe for an irresistible fishy flavor.
- Meat Mix-Ins: Cats often love treats made with liver or chicken. Adding small amounts of cooked liver, chicken, or turkey can make treats more enticing.
- Herbal Enhancements: A pinch of catnip or silvervine can add an aromatic appeal that cats find hard to resist.
Nutritional Boosts
In addition to making treats delicious, you can enhance their nutritional value by adding supplements or healthy ingredients:
- For Joint Health: Add a bit of glucosamine or turmeric to treats for pets with arthritis or joint issues. Always consult your vet for the correct dosage.
- Omega-3 Fatty Acids: Flaxseed oil or fish oil can be added to treats to support skin and coat health.
- Fiber Boost: Pumpkin or sweet potato not only adds flavor but also provides a healthy dose of fiber, which can aid digestion.
- Probiotics: A small amount of plain, unsweetened yogurt can provide probiotics that promote healthy digestion.
- Vitamins and Minerals: You can add pet-safe supplements like calcium powder or brewer’s yeast to the mix to ensure your pet is getting essential nutrients.
Fun Shapes and Sizes
Making treats in different shapes and sizes can add a fun element to treat time and make them more appealing to your pets:
- Using Cookie Cutters: Create treats in fun shapes like bones, fish, hearts, or paws using cookie cutters. This not only adds visual interest but can also be a delightful way to celebrate holidays or special occasions.
- Silicone Molds: Use silicone molds designed for baking or ice cubes to make treats in a variety of shapes and sizes. This is particularly great for frozen treats or for baking bite-sized snacks.
- Custom Sizes: Tailor the size of your treats to your pet’s needs. For smaller pets or those who are on a diet, make smaller treats to ensure portion control. Larger dogs or cats might enjoy bigger, heartier snacks.
- Interactive Treats: Shape treats in a way that makes them interactive, like rolling balls for cats to bat around or creating puzzle shapes for dogs to work on getting out of a treat dispenser.
By experimenting with different flavors, nutritional boosts, and fun shapes, you can create homemade treats that are perfectly suited to your pet’s tastes and dietary needs. Have fun in the kitchen and enjoy the satisfaction of seeing your furry friend delight in your creations!
Conclusion
Making homemade treats for your pets is a wonderful way to show them how much you care. By taking control of the ingredients, you can ensure that your furry friends enjoy snacks that are both delicious and nutritious. Homemade treats offer numerous benefits, including better health for your pets, cost savings for you, and the opportunity to bond through the cooking process.
We encourage you to get creative with your recipes, experiment with different flavors, and try out new shapes and sizes. Making pet treats at home is a fun, rewarding activity that your pets will love. Don’t be afraid to tailor the recipes to suit your pet’s preferences and dietary needs—you know your pet best!
We’d love to hear about your experiences making homemade pet treats. Feel free to share your favorite recipes or any tips and tricks you’ve discovered in the comments below!
If you enjoyed this article, make sure to subscribe to our blog for more pet-related content, including tips, tricks, and recipes to keep your furry friends happy and healthy.
As a thank you for your interest, we’re offering a free downloadable PDF with all the recipes mentioned in this article. Click the link below to download and start making your homemade treats today!
Don’t forget to follow us on our social media channels for daily updates, fun pet care tips, and more delicious recipes. Join our community of pet lovers and share the joy of spoiling your pets with homemade goodness!


