
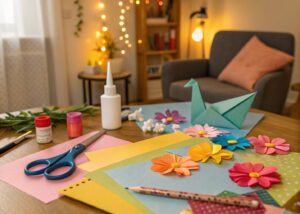
Paper mache, a versatile and timeless craft, involves creating three-dimensional objects by layering paper soaked in a paste over a mold or framework. This simple yet effective technique has been used across cultures for centuries to produce everything from masks and sculptures to decorative bowls and piñatas. The fundamental idea is to transform ordinary paper into something extraordinary, offering endless possibilities for creativity and artistry.
One of the greatest appeals of paper mache is its accessibility—it’s an easy and cost-effective craft that anyone can enjoy. Whether you’re a child experimenting with art for the first time, a senior looking for a relaxing hobby, or an experienced artist pushing the boundaries of your creativity, paper mache has something to offer. The materials are readily available and non-toxic, making it a safe and enjoyable activity for kids and adults alike.
Moreover, it encourages recycling and repurposing of old newspapers and other paper products, promoting eco-friendly habits. So, gather your family and friends, grab some newspaper and paste, and dive into the wonderfully imaginative world of paper mache!
In this guide, you’ll learn everything you need to know to get started with paper mache. We’ll cover the essential materials you’ll need, the basic techniques for preparing and applying paper and adhesive, and a step-by-step project to create a simple bowl. Additionally, we’ll troubleshoot common issues, introduce advanced techniques, and inspire you with unique project ideas. By the end of this guide, you’ll be well-equipped to embark on your paper mache journey and create your own stunning works of art.
Materials Needed
Basic Materials
- Newspaper: Ideal for layering and creating the structure of your project.
- Flour: Used to make a simple, non-toxic paste.
- Water: Combined with flour to create the paste.
- Mixing Bowl: For preparing your paste.
- Paintbrushes: Useful for both applying the paste and painting your finished creation.
- Scissors: For cutting the newspaper into strips.
- Balloons/Cardboard: Used as base structures for various projects.
- Paints: Acrylic paints are typically recommended for a vibrant finish.
Optional Materials
- White Glue: An alternative paste option that can offer a stronger hold.
- Liquid Starch: Another paste alternative for a smoother finish.
- Food Coloring: To tint your paste and add some color directly to your project.
- Varnish: Provides a glossy finish and additional durability to your creation.
- Embossing Tools: For adding texture and intricate details to your paper mache.
- Molds: Useful for creating more complex shapes and designs.
Where to Purchase Materials
Most of the materials needed for paper mache can be easily sourced from your local supermarket, craft store, or even online marketplaces.

Newspapers can often be found for free or purchased at convenience stores. Flour and water are common household items found in grocery stores. Craft stores carry a wide range of paints, brushes, and other decorative supplies.
For specific tools and molds, online platforms like Amazon or specialized craft shops offer a vast selection to choose from. Be sure to check for eco-friendly options to help support sustainability in your crafting!
Step-by-Step Tutorial
Preparing the Paper Mache Paste
Simple Flour and Water Recipe
Creating your own paper mache paste is easy and cost-effective. Here’s a simple recipe:

- Ingredients:
- 1 cup of flour
- 2 cups of water
- Instructions:
- In a mixing bowl, combine the flour and water.
- Stir the mixture thoroughly until it forms a smooth, batter-like consistency. Ensure there are no lumps.
- If the paste is too thick, add more water a little at a time until you reach the desired consistency.
- Your paste is now ready to use! Store any leftover paste in a sealed container in the refrigerator for up to a week.
Alternative Pastes
If you’re looking for different paste options, here are a couple of alternatives:
Glue-Based Paste:
- Ingredients:
- 1 part white glue (such as Elmer’s glue)
- 1 part water
- Instructions:
- Mix the glue and water in a bowl until well combined.
- This glue-based paste tends to be stronger and provides a smoother finish.
Liquid Starch Paste:
- Ingredients:
- Liquid starch (available at most craft and grocery stores)
- Instructions:
- Use liquid starch directly from the bottle without any dilution.
- This paste is ideal for a smooth application and dries clear, making it perfect for projects where appearance is key.
By experimenting with these different paste recipes, you’ll be able to find the one that best suits your project needs and desired finish!
Creating the Base Structure
Using balloons, cardboard, or other household items as a base is a great way to start your paper mache project. This foundational step is crucial in determining the shape and sturdiness of your final creation.

Balloons
- Usage: Balloons are perfect for round or oval shapes, such as for making masks, piñatas, or simple bowls.
- Tips for Sturdiness:
- Inflate the balloon to your desired size and secure the end with a tight knot.
- Apply a layer of petroleum jelly over the balloon to prevent the paper mache from sticking too much. This will make it easier to remove the balloon later.
- Start layering your paper strips dipped in paste over the balloon, ensuring each strip overlaps for added strength. Allow each layer to dry completely before adding the next.
Cardboard
- Usage: Cardboard is ideal for creating flat surfaces, geometric shapes, or structured designs like boxes, frames, or complex sculptures.
- Tips for Sturdiness:
- Cut out the desired shapes using scissors or a utility knife. Use thick cardboard for a more solid base.
- Tape the pieces together using masking tape to form your structure.
- Reinforce the joints with additional tape or small strips of paper mache to ensure everything holds together well.
- Cover the entire structure with at least 2-3 layers of paper mache for a robust build.
Other Household Items
- Usage: Household items such as plastic bottles, tin cans, and even old toys can serve as unique bases for creative projects.
- Tips for Sturdiness:
- Ensure the item is clean and dry before starting.
- Roughen smooth surfaces with sandpaper to help the paper mache adhere better.
- Secure any movable parts or varying shapes with masking tape.
- Apply 2-3 layers of paper strips dipped in paste, allowing each layer to dry fully before adding another.
By using these everyday items as the foundation for your paper mache projects, you open up a world of possibilities. Remember, the key to a sturdy and diverse shape is patience and allowing each layer to dry properly before proceeding. Happy crafting!
Applying the Paper Mache
Techniques for Layering the Strips of Paper
Layering the strips of paper with your paper mache paste is a fundamental step that ensures the strength and durability of your final creation. Here are some techniques to get you started:
- Prepare Your Work Area:
- Lay down newspapers or a plastic sheet to protect your workspace.
- Make sure all your materials, such as your base structure and paste, are within reach.
- Dipping the Strips:
- Take one strip of newspaper at a time and dip it into your paper mache paste.
- Remove any excess paste by running the strip between your fingers or over the edge of the bowl.
- Applying the Strips:
- Place the strip onto your base structure, smoothing it down with your fingers to remove bubbles and wrinkles.
- Ensure each strip overlaps the previous one slightly for added strength.
- Continue applying strips until the entire surface is covered.
- Building Up Layers:
- Allow the first layer to dry completely before adding the next one. This can take anywhere from a few hours to overnight, depending on the thickness of your paste and the humidity of your environment.
- Add at least 2-3 layers for a sturdy build, waiting for each layer to dry completely before proceeding to the next.
Drying Times
Proper drying between layers is crucial to avoid issues like mold or structural weaknesses:
- Initial Drying:
- Place your project in a well-ventilated area. A fan can help speed up the drying process.
- Intermittent Drying:
- Between layers, ensure the piece is fully dry. Feel for any damp spots and leave it longer if needed.
- Final Drying:
- After the final layer is applied, allow the project to dry for at least 24 hours. It should feel completely dry and firm to the touch.
Troubleshooting Common Issues
Even with careful application, you might encounter some challenges. Here’s how to handle common problems:
- Wrinkling:
- If wrinkles appear, smooth them out with your fingers while the strip is still wet. If they persist, lightly sand them down when dry and cover them with an additional strip.
- Bubbles:
- To avoid bubbles, press down firmly on each strip and smooth from the center outwards. Popping any noticeable bubbles with a pin and smoothing the area can help.
- Mold:
- Slow drying can lead to mold. Ensure good air circulation and avoid overly thick paste layers. If mold appears, remove the affected area, allow thorough drying, and reapply new strips.
- Weak Structure:
- If your project feels flimsy, add additional layers. Focus on reinforcing joints and high-stress areas.
By mastering these techniques and being mindful of drying times, you can achieve professional-looking paper mache projects that stand the test of time. Happy crafting!
Painting and Decorating Primer Tips
Once your paper mache creation is completely dry and sturdy, it’s time to move on to the exciting stage of painting and decorating! Here are some essential primer tips to ensure a smooth painting surface:
Preparing the Surface
- Sanding: Lightly sand the surface with fine-grit sandpaper to remove any rough spots or bumps. This helps achieve a smooth and even base for your paint.
- Cleaning: Wipe down the surface with a dry cloth to remove any dust or debris left from sanding.
- Priming: Apply a coat of gesso or white acrylic paint as a primer. This seals the paper mache and provides a uniform surface for your paint to adhere to.
Suggested Paints and Finishes
Choosing the right type of paint can make a considerable difference in the final look of your project:
- Acrylic Paints: These are versatile, fast-drying, and come in a wide range of colors. They’re suitable for almost any paper mache project.
- Spray Paints: Ideal for achieving a smooth and even finish quickly. Great for larger projects or when you want a solid, uniform color.
- Tempera Paints: These work well for projects that are not exposed to water, as they are water-soluble. They are perfect for kids’ crafts and educational projects.
- Sealant Finishes: Once the paint has dried, use a clear acrylic spray or a brush-on varnish to protect your artwork. This adds durability and gives your project a polished look.
Creative Ideas for Decorating Your Project
Unleash your imagination and try some of these creative decorating techniques:
- Decoupage: Use patterned paper or fabric scraps to add texture and design to your paper mache. Adhere with decoupage glue and seal with a top coat of varnish.
- Stenciling: Create intricate patterns or designs with stencils. Use a sponge or brush to apply paint over the stencil for clean, sharp lines.
- Glitter and Gems: Add some sparkle by applying glitter or adhesive gems to your project. A touch of glitter glue or a scattering of gems can make your creation stand out.
- Mixed Media: Incorporate other materials like feathers, beads, or ribbons. These can be glued onto the surface to create a multi-dimensional effect.
- Aging Techniques: For a vintage look, try distressing the edges with sandpaper or using a dark glaze to give an antique finish.
With these painting and decorating tips, your paper mache projects will not only be sturdy but also beautifully finished and uniquely yours. Enjoy the creative process and let your project shine!
Advanced Techniques
Adding Texture and Embellishments
Elevate your paper mache projects by incorporating various textures and embellishments. Here are a few methods to add rich details to your creations:
- Textured Paste: Mix your paper mache paste with fine sand, sawdust, or small beads to create a textured paste. Apply this mixture with a palette knife or brush to achieve unique surface textures.
- Embossing: Use embossing tools or other pointed objects to create raised patterns while your paper mache is still damp. These impressions will add a three-dimensional quality to your project.
- Fabric and Lace: Embed fabric pieces or lace into the final layer of your paper mache to add delicate patterns and textures. Ensure that these materials are thoroughly soaked in paste for better adhesion.
Using Molds for Intricate Designs
For more intricate designs and uniform shapes, consider using molds:
- Silicone Molds: These flexible and non-stick molds are excellent for detailed paper mache work. Simply line the mold with your paper mache layers, allow it to dry, and carefully remove the form.
- Homemade Molds: Create your own molds using household items like bowls, trays, or custom-built shapes using materials like clay or plaster. Line these molds with a thin layer of petroleum jelly or plastic wrap to prevent sticking.
- Layering in Molds: For a sturdy mold-based project, apply multiple layers of paper mache, allowing each to dry completely before adding the next. This will ensure your design retains its shape and strength.
Sculpting with Paper Mache Clay
Paper mache clay is a versatile material that allows for detailed sculpting:
- Making Paper Mache Clay: Combine shredded paper, white glue, flour, and water until you achieve a dough-like consistency. The exact proportions may vary depending on your project, so experiment until you get a workable mixture.
- Sculpting Techniques: Use traditional sculpting tools, such as carving knives, spatulas, and shaping tools, to mold and detail your clay. This material can be shaped similarly to traditional clay, but it will air dry rather than needing to be fired.
- Layering and Detailing: Begin by forming the primary shapes and structures, then add finer details as the clay begins to dry. Build up your layers gradually to avoid cracks and ensure a strong final piece.
By mastering these advanced techniques, you can take your paper mache projects to the next level, creating works that are both artistically impressive and structurally sound. Happy crafting!
Project Ideas and Inspiration
Easy Projects for Beginners
If you’re new to paper mache, start with these simple and fun projects:
- Masks: Create whimsical or spooky masks by forming paper mache over a balloon or a pre-made mask shape. Once dry, paint and decorate with feathers, glitter, or sequins.
- Bowls: Craft decorative bowls by applying paper mache layers over a bowl wrapped in plastic. After drying, paint and seal for a charming piece that can hold small items.
- Children’s Crafts: Engage kids with easy projects like paper mache animals or letters. These can be painted and embellished with a variety of craft materials.
Intermediate and Advanced Projects
Ready for more intricate work? Try these projects that challenge your creativity and skills:
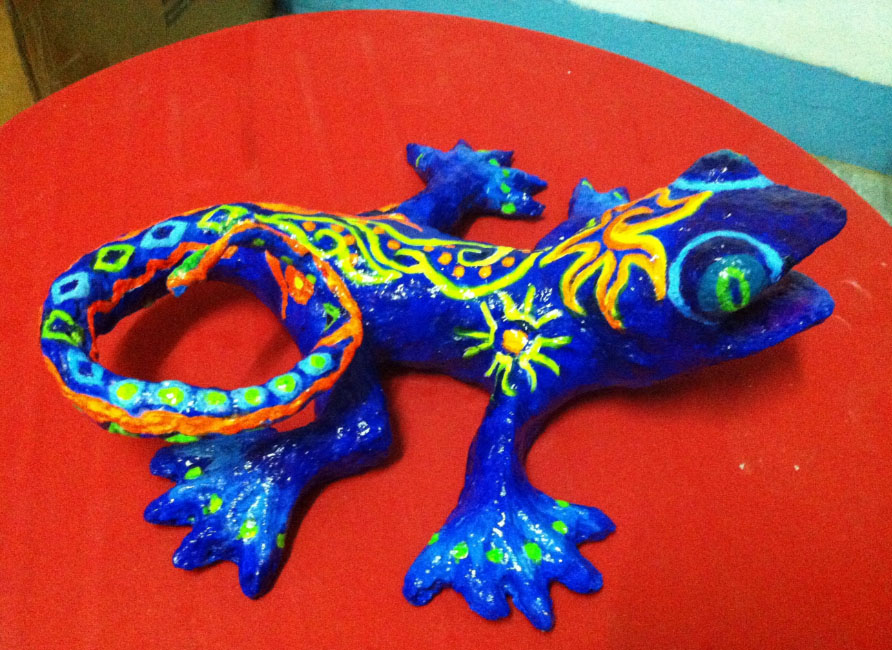
- Sculptures: Use paper mache clay for detailed sculptures like figurines, animals, or abstract shapes. Pay attention to the finer details for a truly impressive result.
- Piñatas: Design vibrant piñatas for parties or celebrations. Shape the core using cardboard and balloons, then cover it with colorful tissue paper after adding layers of paper mache.
- Functional Pieces: Create functional art like lamp bases or decorative boxes. These projects require precision and careful layering but offer a unique, handmade touch to your home decor.
Seasonal and Holiday-Themed Ideas
Capture the spirit of the season with these festive paper mache projects:
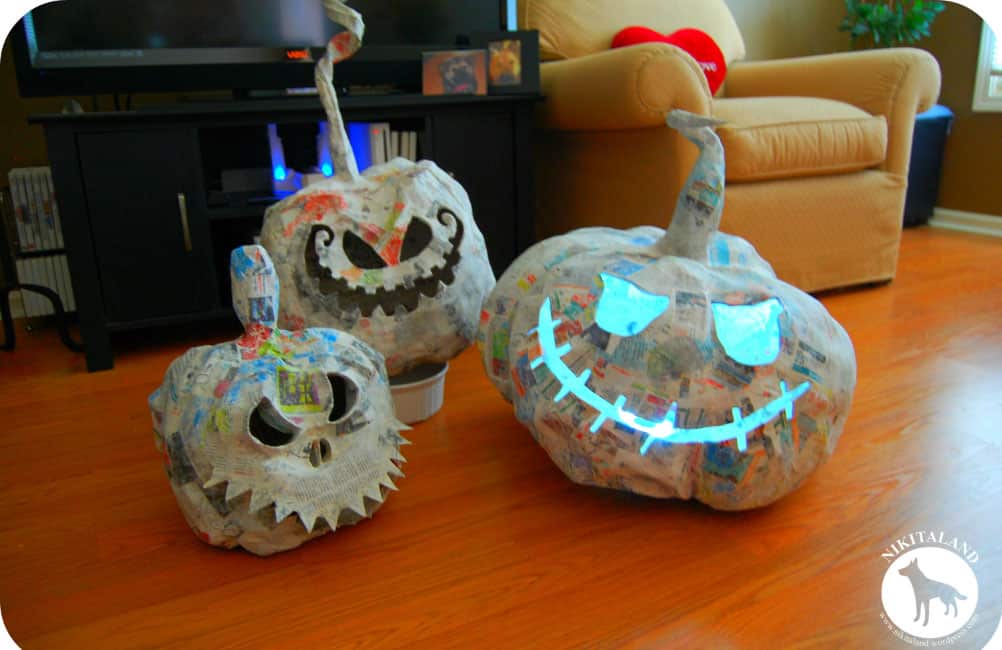
- Halloween Decorations: Craft spooky items like pumpkins, ghosts, or bats to decorate your home for Halloween. Add LED lights to make them glow.
- Christmas Ornaments: Create personalized Christmas tree ornaments such as stars, bells, or snowflakes. Paint them with festive colors and add some glitter for extra sparkle.
- Easter Eggs: Make beautifully painted Easter eggs by covering plastic eggs with paper mache layers. Once dry, paint them with intricate designs or pastel colors for a delightful Easter display.
- Autumn Leaves: Craft a collection of decorative autumn leaves using paper mache layered over leaf-shaped templates. Paint them in fall colors to create a seasonal garland or centerpiece.
By exploring these project ideas, you can find inspiration to suit any skill level or occasion. Happy crafting!
Step-by-Step Project: Making a Simple Bowl
1. Gather Materials
Before you begin, make sure you have all the materials ready:
- Balloon or Bowl Mold: This will serve as the base shape for your bowl.
- Newspaper or Tissue Paper Strips: Pre-cut into 1 to 2-inch wide strips.
- Adhesive: White glue mixed with water (1:1 ratio) or homemade flour paste (1 part flour to 2 parts water).
- Paint and Brushes: For decorating once your bowl is complete.
- Optional Decorations: Glitter, sequins, or any other embellishments you’d like to use.
2. Create the Base
To create the bowl’s shape, blow up a balloon to your desired bowl size. Alternatively, you can use an existing bowl as a mold. If using a balloon, tie it securely and place it in a stable container to keep it from rolling around. If using a bowl, cover it with plastic wrap to make removing the dried paper mache easier.
3. Apply Paper Mache Layers
- Coat the Strips: Dip your newspaper or tissue paper strips into the adhesive mixture, ensuring they are fully coated.
- Remove Excess: Gently run each strip between your fingers to remove excess adhesive.
- Layer the Strips: Lay the strips across the balloon or bowl mold, smoothing out wrinkles and air bubbles as you go. Make sure to slightly overlap each strip to ensure full coverage.
- Build Layers: Continue applying paper strips until you’ve created three to four layers. This will give your bowl strength and stability.
- Smooth Edges: Pay extra attention to the edges to make them as smooth as possible. You can fold excess paper over the edge of the balloon or mold, or trim it later once it’s dry.
4. Let It Dry
Allow the paper mache to dry completely between layers. This can take anywhere from a few hours to overnight, depending on the layer thickness and humidity. Placing your project in a warm, dry area or using a fan can help speed up the drying process. For best results, give the final layer at least 24 hours to dry thoroughly.
5. Decorate
Once your paper mache bowl is completely dry, carefully pop the balloon or remove the bowl mold. Now comes the fun part: decorating your creation!
- Paint: Use acrylic paint to add color and designs to your bowl.
- Add Decorations: Attach glitter, sequins, ribbons, or other embellishments for a personalized touch.
- Seal the Surface: To protect your decoration, consider applying a coat of clear varnish or sealant.
Enjoy your beautiful, handmade paper mache bowl! It’s perfect as a decorative piece or as a functional item for holding lightweight objects.
Troubleshooting Common Issues
Common Mistakes and How to Avoid Them
Even with careful preparation, certain issues can arise during your paper mache project. Here are some solutions to common problems:
Air Bubbles
Air bubbles can form under the paper strips, which may leave unsightly bumps once dried. To avoid this:
- Smooth Strips Carefully: As you apply each paper strip, gently smooth it out with your fingers to press out any trapped air. This helps the strips adhere more closely to the mold.
- Use a Roller: You may also use a small rolling pin or a smooth cylindrical object to roll over the strips and eliminate air pockets.
- Pop and Patch: If you notice air bubbles after the layer has dried, use a pin to gently pop them, then apply a small patch of fresh paper mache to hide the hole.
Uneven Layers
Uneven layers can affect the structural integrity and appearance of your project. Here are some tips to achieve even layers:
- Consistent Strip Size: Use strips that are similar in width and length for more uniform coverage.
- Layering Technique: Apply each strip in a crisscross pattern, alternating directions with each new layer to build an even surface.
- Check Leveling: Periodically check for uneven areas by running your hands over the surface. Add additional strips to thinner areas as needed to even out the thickness.
Cracks in Dried Paper Mache
Cracks can appear if the paper mache mixture is too dry or if the project dries too quickly. To fix and prevent cracks:
- Adjust Mixture Consistency: Ensure your adhesive mixture is appropriately balanced—neither too thin nor too thick. It should be fluid enough to soak into the paper without being runny.
- Gradual Drying: Allow your project to dry at room temperature and avoid placing it in direct sunlight or near direct heat sources which can cause rapid drying and cracking.
- Repairing Cracks: If cracks do appear, moisten the area slightly and apply an additional layer of paper mache. Smooth it out carefully and let it dry thoroughly before continuing with any additional layers or decorations.
By addressing these common issues, you can ensure a smoother, more successful crafting experience and end up with beautifully finished paper mache projects.
Tips for a Professional Finish
Achieving a polished, professional look takes practice and attention to detail:
- Sanding: Once your paper mache is completely dry, use fine-grit sandpaper to smooth out any rough or uneven areas. This creates a clean canvas for painting and decorating.
- Priming: Apply a coat of white primer or gesso before painting. This prepares the surface, allowing the colors to adhere better and appear more vibrant.
- Varnishing: After decorating, seal your project with a clear varnish or acrylic sealer. This adds a protective layer, enhancing durability and giving your piece a glossy finish.
Storing and Preserving Paper Mache Creations
Proper storage and care will help your projects last for years:
- Storage Environment: Keep paper mache creations in a cool, dry place away from direct sunlight. Humidity and heat can lead to mold growth and warping.
- Handling: Handle your projects gently to avoid cracks and chips. If your piece has delicate elements, consider using display cases or stands for additional protection.
- Dusting and Cleaning: Dust your creations regularly with a soft, dry cloth. For more thorough cleaning, use a slightly damp cloth and dry immediately with a soft towel to avoid moisture damage.
By following these troubleshooting tips and best practices, you can ensure that your paper mache projects look beautiful and remain in excellent condition. Happy crafting!
Advanced Techniques
Adding Texture and Details
To take your paper mache projects to the next level, consider adding texture and intricate details. Here’s how you can achieve stunning effects:
- Ridges and Patterns: Use textured materials like lace, burlap, or patterned paper to imprint designs onto the surface. Press these materials onto the wet paper mache and gently remove them to leave behind interesting textures.
- 3D Elements: Create raised designs by layering small pieces of cardboard or thick paper onto your base structure, then covering them with additional paper mache strips. This technique is perfect for creating flowers, leaves, or embossed designs.
- Using Tools: Employ tools such as sculpting knives, combs, or even forks to etch patterns into the still-wet paper mache. Be creative with your tools to discover unique textures.
Using Different Molds and Shapes
Exploring various molds and shapes can diversify your paper mache repertoire. Here are some tips for experimenting with different forms:
- Unique Molds: In addition to balloons and bowls, try using plastic containers, vases, or even custom-built cardboard shapes as molds. Remember to cover them with plastic wrap for easy removal.
- Complex Forms: For more complicated structures, construct a base framework with wire or cardboard. Wrap it in several layers of paper mache to achieve the desired shape and stability.
- Combining Molds: Combine multiple molds to create complex shapes. For example, attach a balloon mold to a vase mold to create a paper mache sculptural piece with distinct sections.
Incorporating Mixed Media
Enhance your paper mache projects by integrating mixed media elements. Here’s how you can create more dynamic pieces:
- Materials: Mix other art materials like fabric, yarn, beads, and natural objects such as leaves or twigs into your paper mache. These materials can be embedded in the layer of glue mixture.
- Paint Effects: Experiment with various painting techniques, such as dry brushing, sponging, or splatter painting to add depth and dimension to your project. Use metallic or glitter paints for shimmering effects.
- Functional Elements: Incorporate functional components like LED lights, small mirrors, or even magnets. Embed these items securely within your paper mache layers as they’re built up.
By exploring these advanced techniques, you can push the boundaries of traditional paper mache and create rich, textured artwork that’s uniquely your own. Happy crafting!
Project Ideas and Inspiration
Easy Projects for Beginners
If you’re new to paper mache, start with these simple and fun projects:
- Masks: Create whimsical or spooky masks by forming paper mache over a balloon or a pre-made mask shape. Once dry, paint and decorate with feathers, glitter, or sequins.
- Bowls: Craft decorative bowls by applying paper mache layers over a bowl wrapped in plastic. After drying, paint and seal for a charming piece that can hold small items.
- Children’s Crafts: Engage kids with easy projects like paper mache animals or letters. These can be painted and embellished with a variety of craft materials.
Intermediate and Advanced Projects
Ready for more intricate work? Try these projects that challenge your creativity and skills:
- Sculptures: Use paper mache clay for detailed sculptures like figurines, animals, or abstract shapes. Pay attention to the finer details for a truly impressive result.
- Piñatas: Design vibrant piñatas for parties or celebrations. Shape the core using cardboard and balloons, then cover it with colorful tissue paper after adding layers of paper mache.
- Functional Pieces: Create functional art like lamp bases or decorative boxes. These projects require precision and careful layering but offer a unique, handmade touch to your home decor.
Seasonal and Holiday-Themed Ideas
Capture the spirit of the season with these festive paper mache projects:
- Halloween Decorations: Craft spooky items like pumpkins, ghosts, or bats to decorate your home for Halloween. Add LED lights to make them glow.
- Christmas Ornaments: Create personalized Christmas tree ornaments such as stars, bells, or snowflakes. Paint them with festive colors and add some glitter for extra sparkle.
- Easter Eggs: Make beautifully painted Easter eggs by covering plastic eggs with paper mache layers. Once dry, paint them with intricate designs or pastel colors for a delightful Easter display.
- Autumn Leaves: Craft a collection of decorative autumn leaves using paper mache layered over leaf-shaped templates. Paint them in fall colors to create a seasonal garland or centerpiece.
By exploring these project ideas, you can find inspiration to suit any skill level or occasion. Happy crafting!
Inspiring Project Ideas
Explore a world of creativity with these fun and unique paper mache projects. Each idea offers endless possibilities to express your artistic flair while honing your paper mache skills.
DIY Paper Mache Animal Masks
Create life-like animal masks that are perfect for costumes or wall art. Select your favorite animal, build a basic structure with cardboard, and then layer on the paper mache. Add paint and other materials to bring your animal to life.

Dive into these exciting projects and discover the endless potential of paper mache. Happy crafting!
Custom Paper Mache Bowls and VasesDesign beautiful bowls and vases that can serve as decorative or functional pieces. Choose different molds and shapes to vary your designs, and finish with vibrant paint or decoupage techniques.
Personalized Paper Mache Name PlatesAdd a personal touch to any space with customized nameplates. Create letters or shapes, cover them with paper mache, and decorate them with paint, glitter, or patterns to make them truly unique.
Intricate Paper Mache Wall ArtTransform your walls with stunning paper mache art pieces that feature textures, raised designs, and intricate patterns. Use a base mold or frame, then layer and carve the paper mache to achieve the desired effect.
Paper Mache Phone StandsCraft practical and artistic phone stands that can brighten up your workspace or bedside table. Build a basic structure, wrap it in paper mache, and personalize it with your favorite designs and colors.
Paper Mache PlantersGive your plants a stylish new home with custom paper mache planters. Start with a basic mold, apply your paper mache layers, and finish with a waterproof sealant to ensure durability.
Creative Paper Mache LampshadesLight up your space with handmade lampshades that reflect your style. Experiment with different shapes, textures, and colors to create ambient lighting that’s both functional and beautiful.
Paper Mache JewelryDesign unique, lightweight jewelry pieces using paper mache. Shape beads, pendants, or other components, and finish them with paint, varnish, or embellishments for a customized look.
Conclusion
In this guide, we’ve explored a wide range of paper mache techniques, from experimenting with different molds and shapes to incorporating mixed media elements to create dynamic and textured projects. You’ve been introduced to various inspiring project ideas, such as DIY animal masks, custom bowls and vases, personalized nameplates, intricate wall art, practical phone stands, stylish planters, creative lampshades, and unique jewelry pieces. Each project provides an opportunity to express your artistic flair and improve your paper mache skills.
We hope these insights and ideas have sparked your creativity and motivated you to start your own paper mache journey. Remember, there are no limits to what you can create with this versatile medium. So grab your supplies, unleash your imagination, and have fun crafting!
We’d love to see what you create! Share your paper mache projects and experiences with us on social media using the hashtag #PaperMacheAdventures. Happy crafting!
Frequently Asked Questions (FAQs)
What materials do I need to start paper mache?
- To begin with paper mache, you will need newspapers or other recycled paper, a glue mixture (flour and water paste or white glue mixed with water), a base structure to mold your project on, and paint or other decorations to finish your creation.
What kind of paper works best for paper mache?
- Newspapers are commonly used for paper mache due to their thinness and ability to soak up the glue mixture easily. However, you can also use recycled office paper, tissue paper, or paper towels depending on the effect you want to achieve.
How long does it take for paper mache to dry?
- Drying time varies based on the thickness of the layers and the humidity in your environment. Typically, a single layer of paper mache can take anywhere from 24 to 48 hours to dry completely. Ensure each layer is fully dry before adding the next.
Can I speed up the drying process?
- Yes, you can speed up the drying process by placing your project in a warm, dry location. Using a fan or a hair dryer on a low heat setting can also help accelerate drying time. However, avoid using high heat as it can cause the project to warp or crack.
How do I make my paper mache project strong and durable?
- Building multiple thin layers of paper mache rather than a few thick ones creates a stronger structure. Adding a final layer of tissue paper can help smooth out the surface, and sealing with varnish or a clear coat provides extra durability and longevity.
Is paper mache waterproof?
- By itself, paper mache is not waterproof. To make your paper mache projects water-resistant, apply a waterproof sealant or varnish after they are completely dry. For projects like planters, using a water-resistant base mold is also advisable.
Can I paint my paper mache project?
- Absolutely! Once your paper mache is dry, you can paint it using acrylic paints, spray paints, or any other type of paint suitable for the project’s surface. Feel free to add additional embellishments like glitter, stickers, or decoupage for extra flair.
Are there any safety precautions I should take?
- Ensure to work in a well-ventilated area, especially when using adhesives and paints. If you or someone involved in the crafting process have allergies or sensitivities to certain materials, opt for hypoallergenic glue and non-toxic paints.
What can I do with leftover paper mache materials?
- Leftover paper and glue mixture can be stored for your next project. Keep the glue mixture in an airtight container in the refrigerator to extend its shelf life, and store paper scraps in a dry place. Alternatively, consider using leftovers for smaller projects or details.
How can I share my paper mache creations?
- We’d love to see your creations! Share your projects on social media using the hashtag #PaperMacheAdventures. Engage with the crafting community for feedback, inspiration, and new ideas.


