
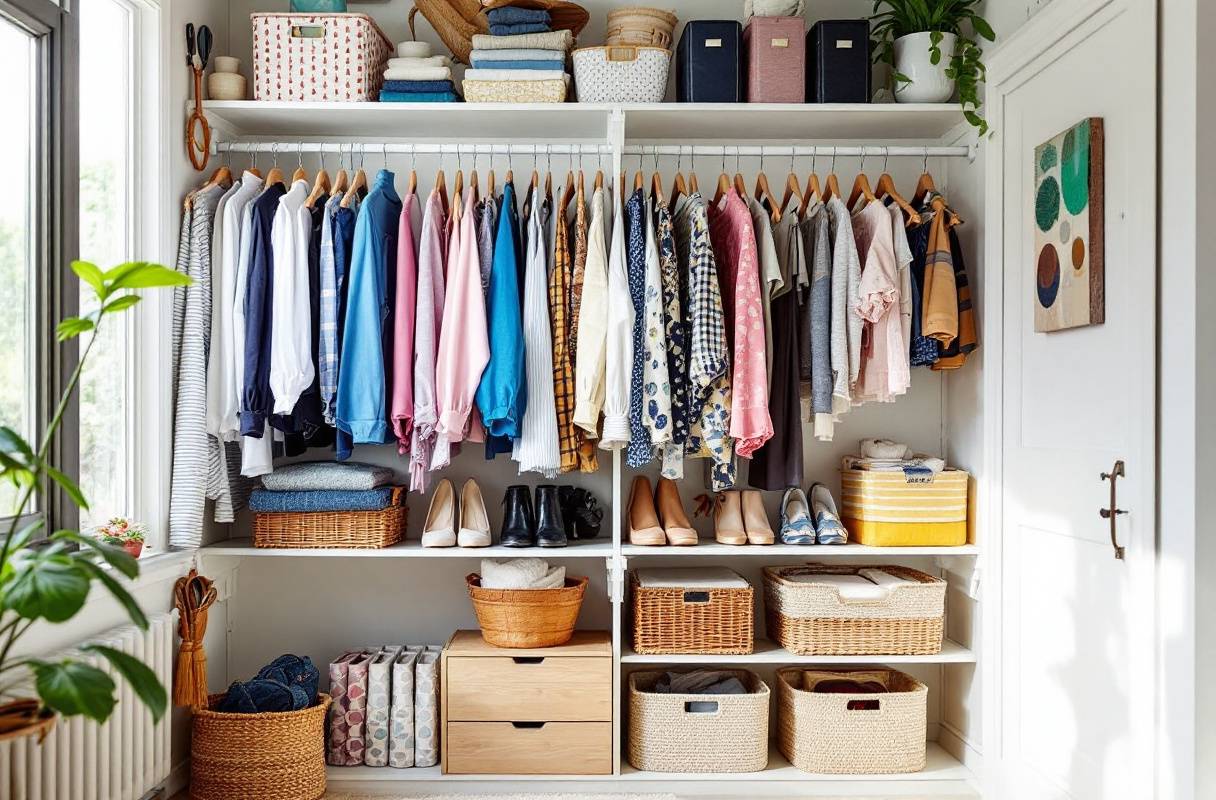
Imagine opening your closet to find every item perfectly in place, effortlessly accessible, and showcasing your personal style.
Transforming your cluttered wardrobe into an organized haven is easier than you think with simple DIY closet shelves.
Whether you’re a seasoned DIY enthusiast or a beginner looking to optimize your space, this guide provides step-by-step instructions to revamp your closet. Say goodbye to messy mornings and hello to a streamlined, stylish living space that reflects your unique taste.
Let’s dive into the art of creating customized shelves that blend functionality with flair, ensuring your closet not only looks great but works seamlessly for your everyday needs.
Planning Your DIY Closet Shelves
Building your own closet shelves isn’t just an awesome way to jazz up your space; it’s a smart one too. Get those shelves in line with your style and storage needs! Here’s the lowdown on kick-starting this project with swagger.
Measuring Your Closet Space
You can’t wing it with measurements in DIY land. Measuring your closet space right is like nailing your shoes on the right feet – pretty important. Measure the width, height, and depth of your closet. And hey, don’t forget those doors or frames that might get in the way.
| Measurement | Why It Matters |
|---|---|
| Width | Dictates how much horizontal wiggle room you have |
| Height | Decides how many shelves you can squeeze in and their spacing |
| Depth | Makes sure your shelves don’t end up playing peek-a-boo outside your closet |
Pro tip! Measure in different spots because walls like to keep you on your toes with their quirky bends and twists.
Customizing Shelf Widths
Customizing shelf widths is like making your own pizza toppings – why settle for basic when the world of possibilities is open? While your typical choices might hover around the 11.5 inches, 24 inches, or 36 inches mark (The Shady Gal Writes), go rogue! Bend those sizes to fit your closet’s unique nature.
| Shelf Width | When to Use It |
|---|---|
| 11.5 inches | Perfect for squeezing into tight spots or slicing sections vertically |
| 24 inches | Just right for in-between spaces and all-round storage |
| 36 inches | Go big or go home for larger items or wide sections |
Remember, the wood you use might play tricks. A pre-cut pine board could be a hint slimmer than advertised, so check your tape measure (Thrift Diving). Tweaking the widths lets you get some serious bang for your buck.
By nailing those measurements and tweaking your shelf widths, you’re setting yourself up for closet glory. Need more dirt on building killer wood shelves? Check out our full guide on diy wood closet shelves.
Materials and Tools Needed
Gettin’ ready to tackle those DIY closet shelves is like planning the perfect road trip: you gotta know what you need before hitting the road, or in this case, start cutting wood. A little planning goes a long way, ensuring your shelves are as sturdy as Grandma’s Sunday roast.
Choosing the Right Wood
Pickin’ the right wood is half the battle, and with options like these, you’re off to a good start. Each type’s got its perks, so let’s break it down.
| Wood Type | Benefits | Heads Up |
|---|---|---|
| MDF (Medium-Density Fiberboard) | Easy on the wallet, smooth surface, cuts like a dream | Needs a sealing primer before painting, not the best with water |
| Plywood | Tough, versatile, lasts longer | On the pricier side, edges need some love |
| Melamine | A breeze to clean, budget buddy, smooth operator | Heavy, prone to chipping if you’re not careful |
| Pine | Natural beauty, soft and simple to saw | Get a sealing primer to deal with potential knotty surprises |
Folks swear by MDF and melamine for their closet shelf projects (Jenna Kate at Home, 2thesunnyside.com), while others fall for pine’s rustic charm, just don’t forget that primer.
Essential Tools for the Job
Your toolkit’s your new best friend. Without these guys, you’re like a cowboy without a horse. Here’s what you’ll need to strut through that DIY like a pro:
- Tape Measure: Spot-on measurements make sure your shelves fit like a glove.
- Circular/Table Saw: For chopping the wood to the right pieces.
- Cordless Drill: Drillin’ holes and crankin’ screws like a boss.
- Screwdriver: Tweak and tighten those screws with finesse.
- Orbital Sander: Give those edges the smooth TLC they deserve.
- Wood Glue: Bond like superglue for lasting love with your shelves.
- Closet Rods: Gotta have somewhere to hang those fancy threads, right?
- Paint and Sealing Primer: For a killer finish and to protect pine from its whims.
Here’s a quick cheat sheet for these tools:
| Tool | Job in the Lineup |
|---|---|
| Tape Measure | Check your space |
| Circular/Table Saw | Get the wood bits (right cuts) |
| Cordless Drill | Holes and screws work |
| Screwdriver | Precision adjustments |
| Orbital Sander | Smooth operator action |
| Wood Glue | Secure those pieces pretty good |
| Closet Rods | Essential for hanging clothing |
| Paint & Sealing Primer | Add finishing pizzazz & protection |
If you’re feeling ambitious, spice things up with diy walk-in closet shelves or creative diy corner closet shelves. Wanna get hands-on know-how? Check out build your own closet shelves.
With this guide, you’re all set to create closet magic – one shelf at a time!
Building Simple DIY Closet Shelves
Want to turn your closet into a neat little paradise? Making your own no-fuss closet shelves might just be the project for you. Here’s your guide on measuring, cutting, and getting those shelf holders in place.
Cutting and Preparing Materials
First up, you’ve got to get all your materials ready. Think of your trusty tape measure as your best friend here.
- Measure the Space: Take stock of your closet’s width and height. Got any annoying doors or tiny walls in the way? Jot that down.
- Cutting the Shelves: Use a circular saw to slice up melamine boards or plywood to your preferred shelf sizes. Melamine gets a thumbs-up for being tough and easy to keep tidy.
- Cutting the Braces/Cleats: Chop up the horizontal wooden bits, aka braces, to match the width of your closet. These will keep your shelves in place and standing strong.
- Sanding Edges: Smooth out those rough edges with some sanding action for a nice touch.
| Material | Tips for Measuring |
|---|---|
| Shelves (Melamine or Plywood) | Measure width & depth, cut with circular saw |
| Braces/Cleats | Chop to match closet width, nail to those studs |
For more nitty-gritty specifics, peek at our tips for DIY walk-in closet shelves.
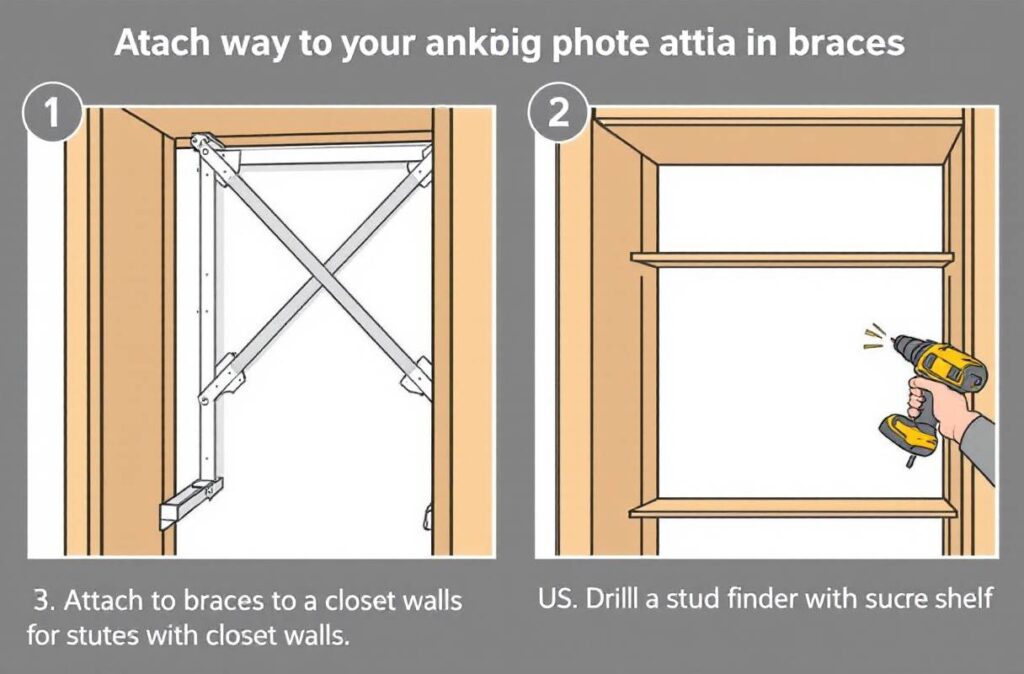
Installing Shelf Supports
Making sure those shelves don’t end up on the floor is what this part’s all about.
- Locate Studs: Get yourself a stud finder (sounds fancy but it’s simple) and mark where the studs are in your walls. They won’t let your shelves fall.
- Attach Braces/Cleats: Hammer the braces into those stud spots, ensuring they’re even and secure. They need to take a load, so don’t skimp on this step.
- Position Shelves on Braces: Put your shelves on top of the braces. Tap in nails along the sides and space ’em out every six inches down the middle for good measure. Make sure it all looks tidy and neat.
Take a peek at our nailing cheat sheet:
| Nailing Pattern | Description |
|---|---|
| Sides | 3 nails each |
| Length | Keep nails 6 inches apart |
Swing by for quirky designs like DIY corner closet shelves.
Tackle these steps, and you’ll whip up some simple yet stylish DIY closet shelves in no time. Check out more ideas to build your own closet shelves and make it just the way you like.
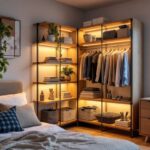
Advanced Custom Closet Solutions
Customizing your closet is not just about plonking in shelves—it’s about creating a space that works for you. Adding drawers and nifty features can make your closet a powerhouse of organization and style. Let’s check out some ways to amp up your DIY closet game.
Adding Drawers and Features
Drawers are a lifesaver for stuff you’d rather tuck away—like that mismatched sock or your superhero cape collection. Giving your closet drawers can boost its usefulness big time.
- Choosing Drawers: Think about how much room you’ve got. Little drawers are spot-on for those fiddly bits, while bigger ones can swallow up bulkier stuff.
- Installation:
Make sure your closet factory can take the extra weight.
Place drawers at a comfy height. Waist level’s a crowd-pleaser.
Here’s a quick guide to drawer sizing:
| Feature | Measurement (in inches) |
|---|---|
| Shallow Drawer Depth | 3 – 5 |
| Deep Drawer Depth | 7 – 12 |
| Drawer Width (variable) | 12 – 24 |
Enhancing Closet Functionality
Getting your closet in tiptop shape isn’t just about cramming things in. It’s about making sure you can grab and go without a scavenger hunt. Here’s how to perk up your closet’s functionality.
- Adding Hampers: Stick a hamper in there and bam—no more dirty socks playing peekaboo. They’re a gem for shared spaces or guest rooms.
- Extra Shelving: More shelves mean a place for everything. Sneak in tiny shelves for shoes or higher ones for holiday sweaters. Arrange them to nestle specific item types for fab organization.
Built-In Accessories:
- Tie and Belt Racks: Keep those accessories neat as a pin.
- Hooks and Rods: Got an empty strip of wall? Turn it into a spot for bags or hats.
A table helps sum up what goodies you can add and their perks.
| Feature | Purpose | Benefit |
|---|---|---|
| Integrated Hampers | Store dirty laundry | Keeps closet tidy |
| Customized Shelves | Fit specific item categories | Maximizes storage efficiency |
| Tie and Belt Racks | Organize small accessories | Easy access and visibility |
| Hooks and Additional Rods | Use vertical space | Boosts overall functionality |
Upgrading from just plain old shelves to a suave custom closet kicks off with a savvy plan. If you’re after more on the basics before going full tilt, peek at our guides on diy wood closet shelves, diy walk-in closet shelves, and our tips for diy corner closet shelves.
By honing in on just-right features and super-boosted functionalities, you can whip up a closet that fits you like a glove. Whether adding drawers, sneaky hampers, or custom shelves, these tricked-out features turn your closet into more than a storage nook—it becomes an organized and powerhouse part of your home sweet home.
Budget-Friendly DIY Closet Options
Build easy DIY closet shelves without making your wallet cry! With the right stuff and a bit of planning, you can whip up a functional and organized closet without spending a fortune on fancy pros.
Cost-Effective Material Choices
Picking materials means keeping your DIY closet project cheap and cheerful. Here’s what to consider:
Plywood: This stuff’s popular for a reason—it’s tough and super versatile. A custom closet from plywood doesn’t have to cost a bundle like those pricey ready-made setups. And, guess what? Most hardware stores cut it for free.
MDF (Medium-Density Fiberboard): This stuff’s a bargain. It gives a smooth surface that’s easy to paint or cover with veneer.
Pine Boards: Cheap and easy to find, pine is lightweight and ready for custom action.
Repurposed Wood: No shame in going second-hand! Reclaiming old furniture or wood lets you save cash, and it throws in some quirky style points.
| Material | Cost per Sheet (4×8) | Durability | Ease of Use |
|---|---|---|---|
| Plywood | $20 – $50 | High | Easy |
| MDF | $15 – $40 | Medium | Moderate |
| Pine Boards | $10 – $30 | Medium | Easy |
| Repurposed Wood | Varies | Varies | Moderate |
Keeping Expenses Low
Avoid breaking the bank with these smart savings tips:
Plan Thoroughly: Grab that measuring tape! Know your space before you shop. This saves cash by dodging unnecessary buys.
Use Basic Tools: Plus, you don’t need a garage full of gadgets. A screwdriver, hammer, and maybe a drill are all you need (Decor by the Seashore).
Shop Smart: Hunt for sales, hit discount stores, flash those coupons, or snag deals online.
DIY Installation: Hiring folks to install shelves ain’t cheap—do it yourself! Check out our guide on building simple DIY closet shelves if you need help.
Reuse and Recycle: Dig through your stash! That leftover wood from past projects can become new shelf supports (Home Depot).
Opt for Paint Over Veneer: Instead of splurging on fancy finishes, slap on some paint for a sleek look without breaking your budget. A whole DIY closet setup can be done with basic supplies for about $75, even with paint, you can keep it under $100 (Lovely Etc).
Focusing on good deals and clever budgeting gives you a neat and snazzy closet, without blowing the budget. For more snazzy ideas, check out our piece on diy wood closet shelves.
Tips for Executing Your Project
Turning your closet into a storage wonderland can be loads of fun and really useful. Here’s how to get the job done without turning it into a DIY disaster.
How to Do It Right
You’re about to take on the DIY closet shelves project of your dreams. Let’s nail the basics:
- Measure Like a Pro: Don’t rush—measure your closet space twice and cut once. Use a sturdy tape and mark clearly to avoid any missteps.
- Stud Finding 101: To hang shelves that will actually hold stuff without crashing down, find those pesky wall studs. A stud finder is your friend and will show you where supports should nail in.
- Pre-drill for Success: Pre-drilling is your secret weapon to prevent splitting wood. Match your drill bit to the screws for smooth sailing.
- Level Like a Boss: Wave goodbye to wobbly shelves by using a level. Straight shelves not only look better but keep things balanced and steady.
- Secure with Nails: Stick with nails for attaching shelves to supports instead of glue. Three nails per side and every six inches should do the trick.
Building Sturdy and Lasting Shelves
Want your DIY wood closet shelves to stand the test of time? Here’s how:
- Pick Your Wood Wisely: Go for strong wood like plywood or MDF. A neat choice is ¾” MDF with front trim for that polished look (Start at Home Decor).
- Reinforcement for Longer Shelves: For anything over 36 inches, add metal brackets in the corners. Your shelves will thank you with extra stability.
- Rod Placement Know-How: For rods, aim for single ones at 66 inches high. If you’re adding double rods, space them with the lower at 42 inches and upper at 84 inches for ample hanging room.
- Toolbox Essentials: You don’t need a full-blown workshop—basic tools like screwdrivers, hammers, and drills are enough. Many stores even cut wood for free, perfect for those just starting out.
Stick with these nuggets of wisdom and your DIY closet shelves will not only do their job but look smashing while doing it. For more snazzy setups, peek at our handy guide on designing shelving arrangements.
Maximizing Space and Functionality
Creating a tidy closet isn’t just about slapping up a few shelves. You gotta milk every inch of that space and keep things neatly stored.
Using Every Bit of Space
Getting the most out of your closet means being sly with space. Those custom DIY closet gadgets? They’re the secret sauce to making sure not one inch is wasted. Think of it like creating a puzzle that fits your stuff perfectly (a shoutout to 2thesunnyside.com). Here’s some handy hacks:
- Look Up: Reach for the skies! Put shelves way up high. Stash the stuff you rarely use there — think winter woolies in summer.
- Corner Tricks: Chuck in some diy corner closet shelves to fill those pesky corner gaps.
- Shape-shifting Shelves: Got adjustable shelves? Bingo! Move ’em around for different size goodies.
- Divide and Conquer: Stick in some dividers to keep chaos at bay and stuff organized.
Want to nail that layout solo? Use a story pole – it’s like playing with Lego bricks but for grown-ups (This Is Carpentry).
Getting Your Stuff in Order
Shelves up? Sweet. Now it’s time to put your stuff to bed. Here’s how you keep it tidy and easy to grab:
- Buddy System: Pair up similar things like shoes, bags, and clothes. Makes grabbing stuff a breeze.
- Tell It Like It Is: Labels are your friends. Slap some names on boxes and shelves – you’ll thank yourself later.
- Switcheroo for Seasons: Keep your shorts in winter and sweaters in summer stored away until needed.
- Odds and Ends Bins: Toss knick-knacks into bins or drawer inserts. Keeps those little accessories from growing legs.
| Organization Hack | What It Does |
|---|---|
| Buddy System | Makes things easy to find |
| Tell It Like It Is | Keeps stuff orderly |
| Switcheroo for Seasons | Moves the off-season clothes out |
| Odds and Ends Bins | Corrals small stuff like accessories |
Craving more closet genius? Peek at our guide on diy walk-in closet shelves.
Use these tips and tricks, and your closet will be a lean, mean, organizing machine! Making your own shelves? Go for it, they’ll fit just what you need, making every bit of space count.
Customizing Your Closet Layout
Everyone deserves a closet that actually works for them, right? With a bit of thought and a little elbow grease, you can transform yours into a powerhouse of practicality. Think shelves, rods, and dividers coming together in a perfect harmony of storage savviness.
Designing Shelving Arrangements
First things first, let’s tackle those shelves. We’re talking clever placement and sizes to make sure every sweater and sock has its rightful place. Closets usually fall into two camps: walk-ins and reach-ins. Each of these has its own way of working magic with a few classic shelving styles: Double Pole, Single Pole, and Linen Shelves.
- Double Pole Shelving: The go-to for doubling hang space. Picture two poles, one above the other. Top one’s at 84 inches from the ground, the lower at 42 inches. Medium-length coats and shirts finally have a home.
- Single Pole Shelving: Dresses and long coats need their breathing room, right? One pole at a solid 66 inches off the floor should do it. Got some height? You might want to nudge that pole a smidge higher so you’re not stretching and straining.
- Linen Shelves: Blankets or tees folded nice and neat? Linen shelves are the chameleons here; they adjust based on what you’re stashin’. Support them with 1×2 cleats – they’re your shelves’ best friends for stability.
| Shelving Style | Pole Height (in) | Best For |
|---|---|---|
| Double Pole | 42, 84 | Medium coats, shirts |
| Single Pole | 66 | Dresses, long coats |
| Linen Shelves | Varies | Folded clothes, towels |
Installing Rods and Dividers
Adding some rods and dividers won’t just boost your closet’s functionality, they’ll turn it into an efficient hub for all your clothing needs.
Rods Installation:
- Support those rods with trusty 1×4 cleats, ensuring they can handle the weight of your entire winter wardrobe.
- With Double Poles, keep the upper and lower rods far enough apart to avoid a clothes catastrophe.
- For Single Pole setups, leave plenty of space for your maxi dresses and trench coats to hang gracefully.
Dividers:
- Dividers to the rescue! They stop those towering stacks from becoming an avalanche.
- Cut dividers to fit different heights of stuff you’re stacking.
- A nifty idea: angled dividers with a little 1-inch toe on the floor for added balance and room.
With shelves, rods, and dividers all working together, you’ve got yourself a closet that doesn’t just hold clothes – it flaunts them. Eager to learn more tips and tricks? Check out our articles on building your wood closet shelves and mastering walk-in closet shelves. They’re packed with step-by-step how-tos and savvy tips to turn anyone into a closet wizard.
Efficient Closet Building Strategies
Making a closet that’s neat and works well doesn’t need to feel overwhelming. With some clever tricks up your sleeve, putting together easy DIY closet shelves can turn into a fun and satisfying project.
Making Installation Easy
Going the route of a custom closet can save you big bucks compared to buying a pricey ready-made one, especially if you use plywood. Here’s how you can make building your closet a breeze:
- Plan and Measure: Before you hammer the first nail, take a good look at your closet space and measure everything twice. Map out where shelves, rods, and extras will go. This will make sure you don’t end up with wonky shelves or weird gaps.
- Pre-Build Sections: Get ahead by building parts like shelves and drawers before they go into the closet. It saves you time in the long run, and you can just pop them in when they’re ready (The Shady Gal Writes).
- Install Supports: Drill those supports right into the walls along your marked lines. This gives a solid base for your shelves, keeping everything nice and straight (Decor by the Seashore).
- Use Repetitive Tasks: Sticking to a routine helps cut out unnecessary steps, making the whole process faster and more efficient (This Is Carpentry).
Getting It Just Right
For a closet that’ll not only look good but function well, nailing those exact steps is the secret sauce. Here’s how to keep everything on the right path:
- Design and Layout: Set the stage with a great plan. Know how much room you need for rods, shelves, and more to keep your approach tidy from the start (Hammer and Handsaw).
- Align Shelves: Make sure those shelves are on the level and evenly spaced. It not only looks sharp but also uses the space right. Use a level tool to keep things straight.
- Secure and Stable: Lock everything down securely. A stable setup means your closet lasts longer. Use the right hardware and follow the best installation tips to keep everything tight.
- Customization: Add extras like drawers, baskets, and dividers to make the closet truly yours. This boosts functionality and keeps stuff tidy.
| Easy Steps | Perfect Fit |
|---|---|
| Pre-build parts | Smart design and layout |
| Accurate supports | Level and tidy shelves |
| Follow a routine | Strong and stable setup |
| Plan and measure | Custom fit features |
Putting these steps into action makes the creation of DIY closet shelves smooth and gives you results to be proud of. For even more detailed how-to’s on closet building, check out our articles on DIY corner closet shelves and DIY walk-in closet shelves.
Conclusion
Revamping your closet with simple DIY shelves is a rewarding project that blends creativity with practicality. By meticulously measuring your space and customizing shelf widths, you ensure that every inch of your closet is optimized for storage and accessibility.
Selecting the right materials, whether it’s the affordability of MDF or the rustic charm of pine, sets the foundation for durable and stylish shelves. Equipped with essential tools and installation techniques, you can confidently build and secure your shelves, transforming your closet into an organized sanctuary.
Advanced customizations like adding drawers and accessories further enhance functionality, making your closet not just a storage space but a personalized haven.
Budget-friendly strategies ensure that this transformation is achievable without breaking the bank, while smart space maximization techniques guarantee that your closet serves all your storage needs efficiently.
By following these comprehensive steps and tips, you can create a closet that not only meets your organizational goals but also reflects your personal style, making every day a little easier and a lot more stylish.
Embrace the DIY journey and enjoy the satisfaction of a beautifully organized closet tailored just for you.
Resources
- The Shady Gal Writes
- Thrift Diving
- 2thesunnyside.com
- Jenna Kate at Home
- Lovely Etc
- Home Depot
- Decor by the Seashore
- This Is Carpentry
FAQs
How do I start measuring my closet for DIY shelves?
Start by measuring the width, height, and depth of your closet. Don’t forget to account for doors or frames that might interfere with shelf placement. Measure in multiple spots to accommodate any wall irregularities.
What materials are best for DIY closet shelves?
Common choices include MDF for affordability, plywood for durability, melamine for easy cleaning, and pine for a natural look. Each material has its own benefits, so choose based on your budget and style preferences.
What tools do I need to build DIY closet shelves?
Essential tools include a tape measure, circular or table saw, cordless drill, screwdriver, orbital sander, wood glue, and a level. Having these tools will help ensure your shelves are accurately cut and securely installed.
How can I customize shelf widths to fit my closet?
Customize shelf widths by adjusting standard sizes to match your closet’s unique dimensions. This flexibility allows you to maximize storage space and accommodate different types of clothing and accessories.
Are there budget-friendly options for DIY closet shelves?
Yes! Use cost-effective materials like plywood or repurposed wood, shop smart by looking for sales and discounts, and handle the installation yourself to save on costs.


