
Never Lose a Memory: The Ultimate Guide to Backing Up Your Travel Photos
Traveling is all about capturing moments, but what if you lose them? With a few simple steps, you can easily back up your photos while on the go, ensuring your precious memories are safeguarded forever. Let’s get started!
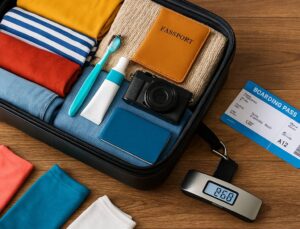
What You Need to Get Started

Essential Tips for Safeguarding Your Photos & Videos While Traveling
Step 1: Choose Your Backup Method
Cloud, External Drives, or Both? What's Best for You?Evaluate various backup options to ensure your travel photos are safe and sound. The two most popular methods are cloud storage and external drives, each with its own benefits and drawbacks.
Consider Cloud Storage:
Example: Imagine you’re in a quaint café in Paris, editing your photos on your tablet. With cloud storage, you can upload images instantly, knowing they’re secure even if your device gets damaged.
Weigh External Drives:
Example: While hiking in the mountains, you could offload your photos to a rugged external drive. It’s safe and doesn’t depend on Wi-Fi, keeping your memories intact.
Decide which method aligns with your travel style and ensure your photos remain protected wherever you wander.

Step 2: Set Up Cloud Storage
Don’t Let Wi-Fi Hold You Back: Easy Setup Anywhere!Create an account on a popular cloud platform like Google Drive or Dropbox. Follow these simple steps to ensure your photos are securely backed up, even in remote locations.
Visit the Website or Download the App: Search for Google Drive or Dropbox in your mobile device’s app store. Download the app and install it.
Sign Up for an Account: Open the app, and select “Sign Up.” Use your email address and create a strong password. For easier recovery, consider adding your phone number.
Enable Automatic Photo Uploads: In the app settings, find the option for automatic uploads. Turn it on to ensure every photo you take is instantly uploaded. This is particularly handy when exploring new places.
Organize Folders: Create folders by trip or location (e.g., “Italy 2023”) to keep your photos tidy. This makes it easy to find specific memories later.
Check Your Upload Status: Periodically verify that your files are uploading correctly, especially after long days of shooting.
Now, enjoy your travels knowing your memories are safe in the cloud!

Step 3: Organize Your Photos Before Uploading
A Tidy Photo Library Makes for Happy Memories!Sort your photos into albums or folders to simplify the backup process and enhance memory retrieval later. An organized collection saves you valuable time and adds a layer of structure to your travel experiences.
- Create Thematic Folders: Divide your photos by destinations or activities. For instance, make a folder for “Barcelona 2023” and subfolders for “Sagrada Familia” or “Food Adventures.” This way, you can easily navigate your memories.
- Utilize Tags: If your device allows tagging, use this feature for easier searches. Tags like “beach,” “city,” or “family” can help you find specific types of photos quickly.
- Delete Duplicates: Before uploading, sift through your favorites and eliminate any blurry or repetitive shots. This method not only frees up space but also ensures only the best memories are backed up.
- Add Captions: When possible, write down short captions or notes for significant events. A picture of you at sunrise in Santorini is more meaningful with a note about the moment.
By taking these simple actions, you’ll streamline the uploading process and ensure that your travel memories are organized and easily retrievable for years to come!

Step 4: Create a Backup Routine
Consistency is Key: Don’t Wait Until It’s Too Late!Establish a consistent routine for backing up your travel photos, whether daily or weekly. This habit keeps your memories secure and eases stress while you explore.
Set Reminders: Use your phone or a travel journal to set daily or weekly reminders for backups. A gentle nudge at a specific time, like after dinner or before bed, will help ensure you don’t forget.
Automate Uploads: If you’re using cloud storage, take advantage of automatic backups. This feature will continuously upload your photos whenever you’re connected to Wi-Fi, making the process seamless.
Assess Storage Regularly: Check your available storage every few days. This can prevent any surprises when you’re about to take that perfect shot. If space is low, delete unnecessary files or upgrade your storage plan.
Schedule Backup Time: Dedicate time to review and organize your photos. For example, choose Sunday evenings to upload your week’s adventures, so you can reflect on your experiences while ensuring they’re stored safely.
Consistency is key! By embedding these practices into your travel routine, you’ll never have to worry about losing a precious memory again.
Step 5: Safeguard Your External Drive
Protect Your Backup: Don’t Let Accidents Cost You!Protect your external storage device to ensure that your travel photos remain safe throughout your journey. Here are some essential tips to avoid physical damage and loss:
- Use a Durable Case: Invest in a shock-resistant and waterproof case for your external drive. This additional layer of protection can safeguard it from accidental drops or spills.
- Avoid Extreme Temperatures: Keep your external drive away from direct sunlight or extreme cold. For example, store it in a temperature-controlled bag when traveling in hot climates to prevent damage.
- Handle with Care: Always unplug the drive carefully without yanking the cable. Using the eject option on your device helps prevent data corruption.
- Keep It in a Secure Location: Designate a specific spot for your drive and ensure it’s always stored there when not in use. Traveling with it in your carry-on rather than checked luggage can further minimize the risk of loss.
- Label Your Drive: Use a label or a distinct color tag to easily identify your drive amidst other gear at busy airports or crowded hotels.
By following these best practices, you can travel confidently, knowing that your backup remains secure and intact!

Preserve Your Adventures: Final Thoughts on Photo Backup
By following these steps, you’ll ensure your travel photos are safe and sound, letting you focus on creating unforgettable memories. Try it out, and share your results with fellow travelers!


I recommend Google Photos! It’s pretty user-friendly and gives you a lot of free storage. Plus, it’s easy to share with friends and family! 😊
I use iCloud since I’m all Apple. It works seamlessly for me! Just make sure you have enough storage.
Hey Sarah! Glad you found it helpful! Google Photos is definitely a solid choice, but also check out Dropbox if you want a bit more flexibility.
I just started traveling more and this guide is a lifesaver! I didn’t even think about backing up my photos until I read this. The cloud storage part is super helpful—I’m gonna set that up tonight! Anyone have tips on which cloud service is best for photos? 🤔
Definitely keep it in a padded case and store it in your carry-on! You can also use a lock for extra security.
I use a small travel pouch for mine, makes it easier to keep it safe from bumps.
Really good info here! I never thought about safeguarding my external drive. I’m always scared of losing it or it getting damaged. Any suggestions on how to protect it while traveling?
Great tip, Jessica! Breaking it down into smaller tasks can make it more manageable.
That makes sense! Thanks! I guess I’ll have to set a reminder or something.
I feel you, Tommy! I usually just do a little at a time—like every week or so. It’s less overwhelming that way!
This is just what I needed, but honestly, where am I supposed to find the time to organize my photos? I can barely keep up with taking them! 😂
Don’t worry, we’ve all been there! Just remember to make it a habit, and you’ll be golden!
So sorry to hear that, Olivia! But you’ll be prepared next time! 👍
I wish I had this guide before my last trip. I lost so many great pics because I didn’t back them up! 😭 Definitely gonna follow these steps for my next adventure!
You can upload in batches! It’s best not to overwhelm your connection or the service. Maybe organize by trip or date.
Yeah, I usually do it by trip! Makes it way easier to find stuff later.
Loved the title! It’s catchy! 😄 But I’m a bit confused about the cloud part. Can I just upload everything at once? What if I have thousands of photos?
Awesome to hear that, Nathan! Organizing does make a huge difference. Keep up the great work!
That’s smart! I’m gonna start doing that too. I always just dump everything in one folder, which is a mess!
I’ve been using these tips for a while now, and I haven’t lost a pic since! 🙌 Organizing is key for me. I made folders for every trip, and it’s been a game changer!