
Diamond painting is a delightful fusion of cross-stitch and paint-by-numbers, captivating crafters of all ages with its vibrant results and satisfying process. This art form has surged in popularity, providing a meditative experience that encourages creativity while allowing individuals to develop their artistic skills in a fun way. Crafting a custom diamond painting not only offers a unique outlet for self-expression but also results in a cherished piece of art that can be showcased with pride.
In this guide, you can expect to dive into the essentials of diamond painting, from understanding the process to selecting the perfect design for your masterpiece. We will explore how to gather the right supplies, set up your workspace, and execute your creation step by step.
By the end, you’ll be well-equipped to embark on your own diamond painting journey, ready to share your custom artwork with family, friends, and fellow enthusiasts!
Understanding Diamond Painting
Explanation of the Diamond Painting Process
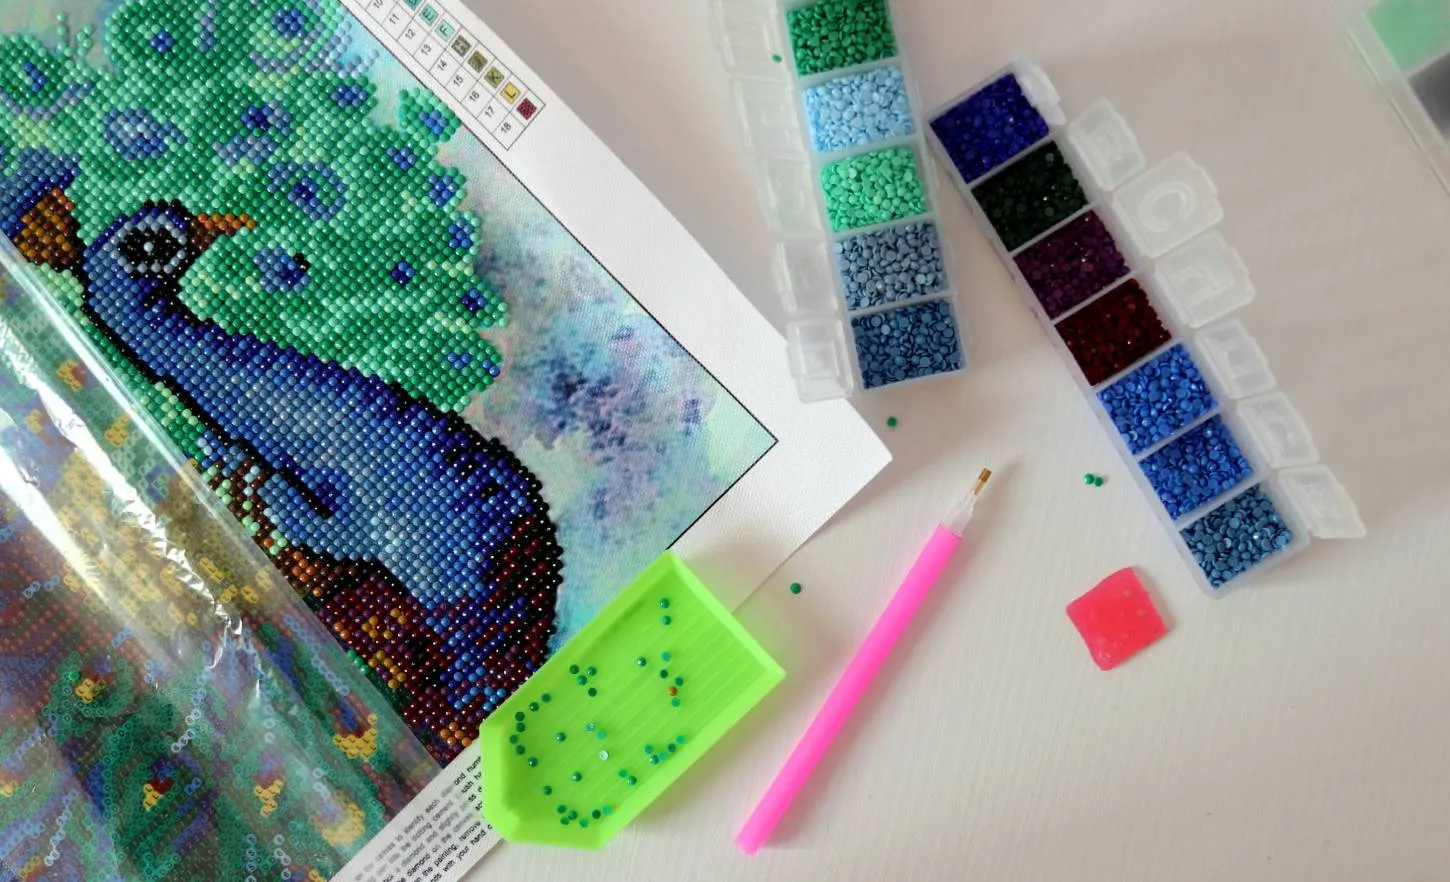
Diamond painting is a straightforward yet rewarding craft that involves placing tiny, sparkling resin rhinestones (often referred to as “diamonds”) onto an adhesive canvas to create a stunning image. The process begins with selecting your design and preparing your workspace. Once you have your materials ready, you’ll refer to the color-coded chart on your canvas to identify which drills to apply.
Using a specially designed applicator tool, you pick up the diamonds and gently press them onto the corresponding symbols on the canvas. As you fill in each area, the image gradually comes to life, showcasing a mosaic of brilliant colors.

Overview of Materials Needed
To kick off your diamond painting adventure, you’ll need a few essential materials:
- Adhesive Canvas: This is the foundation of your artwork, featuring a printed design with a sticky surface that holds the drills in place.
- Drills (Diamonds): These are the colored resin pieces that form your image, typically provided in various shades to match your design.
- Applicator Tool: A handy tool that helps you pick and place the drills precisely on the canvas.
- Wax Pad: Often included with your kit, the wax pad enhances the applicator’s grip, making it easier to pick up the diamonds.
- Tray: A container for holding and organizing your drills as you work, keeping them easily accessible.
In addition to these basics, optional tools like a light pad can enhance visibility, allowing for an even more enjoyable crafting experience. Gather these materials, and you’ll be all set to immerse yourself in the creative world of diamond painting!
Choosing Your Design
Tips for Selecting a Custom Image
When it comes to choosing a custom image for your diamond painting, the possibilities are nearly endless! Consider using personal photos, as they can evoke cherished memories, whether it’s a family portrait, a beloved pet, or a breathtaking landscape from your travels. Artwork is another great option; you might want to select pieces that resonate with your style or bring joy to your space. Remember to pick something that inspires you and that you’ll enjoy working on!

Where to Find or Create Custom Design Templates
If you’re on the lookout for custom design templates, there are several resources available. Websites like Etsy or dedicated diamond painting retailers often offer downloadable images specifically formatted for diamond painting.
Additionally, if you’re feeling creative, you can transform your favorite photo into a custom template using software or online services that convert images into pixel art. Just be sure that the template you choose aligns with your skill level and is suitable for the size of the canvas you plan to use.
Considerations for Image Quality and Size
Quality is key when selecting your image. Opt for high-resolution photos to ensure that the details shine through once completed; blurry images can lead to disappointing results. As for size, think about the final dimensions of your diamond painting. Larger designs can capture more intricate details but may require a greater time commitment.
On the other hand, smaller images can still be beautiful and are perfect for a quick project. Keep your preferences and limitations in mind, and choose an image that excites you to bring it to life with diamonds!
Gathering Your Supplies
Starting your diamond painting adventure requires a few essential supplies to ensure a smooth and enjoyable crafting experience. Here’s a handy list of what you’ll need:
- Adhesive Canvas: The canvas with a printed design that holds the drills. Make sure it’s of good quality for the best results.
- Drills (Diamonds): These colorful resin pieces come in various shades, making up the artwork. They’re typically packaged according to your chosen design.
- Applicator Tool: This tool is vital for picking up and placing the drills accurately on the canvas.
- Wax Pad: An essential accessory that makes it easier to pick up the diamonds with the applicator.
- Tray: A great way to keep your drills organized and within easy reach while you work.
Recommendations for Purchasing Supplies
You can find these supplies both online and in-store. Websites like Amazon, Etsy, and dedicated craft retailers often offer complete kits that include everything you need. For in-store options, check out local craft stores, which usually have a variety of diamond painting supplies. This way, you can see the quality of the materials before purchasing.
Optional Tools and Accessories
While the essentials are all you need to get started, there are a few optional tools and accessories that can enhance your diamond painting experience:
- Light Pad: This can greatly improve visibility, especially when working on intricate designs.
- Storage Containers: Consider getting small containers or organizers to keep your drills sorted by color, which helps save time during your project.
- Comfortable Seating: Since you’ll want to work for extended periods, having a comfy chair can make a big difference!
With the right supplies and a little preparation, you’re on the road to creating your sparkling masterpiece!
Preparing Your Workspace
Creating an organized and comfortable workspace is crucial for an enjoyable diamond painting experience. Begin by selecting a quiet area free from clutter, where you can easily access all your supplies. A clean, dedicated space not only helps you concentrate but also allows you to immerse yourself in the creative process without unnecessary interruptions.
Importance of Good Lighting and Seating
Good lighting plays a significant role in ensuring you can see your canvas and the tiny diamonds clearly. Natural light is ideal, but if that’s not an option, consider using a bright lamp or a light pad to illuminate your work area. Additionally, invest in a comfortable chair, as you’ll likely be sitting for extended periods. A supportive seat can help you maintain focus and enjoy your crafting session without discomfort.
Tips for Minimizing Distractions
To create an environment that fosters creativity, it’s essential to minimize distractions. Consider putting your phone on silent or in another room, and let others know when you’ll be busy. Playing soft background music or ambient sounds can help enhance your focus, but be cautious not to let it overpower your concentration. With a little planning, you’ll set the perfect stage for your diamond painting adventure!
Step-by-Step Creation Process
Getting started with diamond painting is an exciting journey! Here’s a detailed guide to help you along the way:
1. Grab Your Supplies and Prepare Your Canvas
Before diving in, ensure you have all your supplies at hand—your adhesive canvas, drills, applicator tool, wax pad, and tray. Once you’re set, lay out your canvas on a flat, stable surface. Gently peel back a corner of the plastic cover to reveal the sticky surface. Be careful not to remove it all at once, as this helps keep the canvas clean and dust-free.
2. Outline the Design and Identify the Color-Coded Drills
Once your canvas is ready, take a moment to familiarise yourself with the design and its symbols. Each section of your canvas will correspond to a specific color or drill type. Use the legend provided alongside your canvas to identify which colors are needed for each area. This step is crucial, as it sets you up for a smooth, efficient diamond painting experience.
3. Applying the Drills and Techniques for Efficiency
Start applying the drills by using your applicator tool dipped in the wax pad to pick up the diamonds easily. Place the drills onto the matching symbols on your canvas. For larger areas, consider working in sections; this can make the process more manageable and satisfying. A helpful tip is to use a multi-placer tool if you’re tackling a big patch of the same color, allowing you to place multiple drills at once, saving you time!
4. Troubleshooting Common Issues While Working
As you embark on your diamond painting adventure, you might encounter a few bumps along the way. If the drills aren’t sticking well, check that your canvas is clean and dust-free; a quick wipe with a damp cloth can help. If you find drills popping off, it might be due to excess wax on your applicator tool. Simply clean it with a cloth and try again. Lastly, if you ever lose track of where you are, don’t hesitate to refer back to the guide or take a step back to reassess—every artist has their moments!
With these steps in mind, you’re well on your way to creating a stunning diamond painting that reflects your creativity and brings joy to your space!
Finishing Touches
Congratulations on completing your diamond painting! Now, it’s time to think about how to protect and display your stunning work of art.
Protecting Your Artwork
To ensure your diamond painting stays vibrant and intact, consider applying a clear sealant specifically designed for diamond paintings. This will help lock in the drills and protect them from dust and fading. Always follow the instructions on the sealant for the best results, and make sure to do this in a well-ventilated area.
Options for Framing or Mounting
When it comes to displaying your masterpiece, you have a variety of options. For a polished look, you can frame your diamond painting in a shadow box or traditional frame to highlight the sparkle and color. If you prefer a more casual vibe, mounting it on a canvas board can provide a contemporary touch. Be sure to choose a frame that complements your artwork and fits the aesthetic of your space.
Sharing Your Artwork
Sharing is one of the joys of completing a piece! Consider taking high-quality photos to showcase your diamond painting online. Social media platforms or art communities are great places to share your creations, and your friends and family will love to see your work too.
If you’re comfortable, you could even host a small gathering to display your artwork in person, creating a wonderful opportunity for others to appreciate the time and effort you poured into your creation. Whatever choice you make, remember to celebrate your hard work and creativity!
Conclusion
Embarking on your diamond painting journey is not just about creating beautiful art, but also about enjoying a fulfilling and relaxing experience. Each step in the process allows you to express your creativity and immerse yourself in a world of color and light. Remember, there’s no right or wrong way to approach your craft—it’s all about what brings you joy!
As you venture into this creative space, don’t hesitate to share your experiences and custom designs with the community. We’d love to hear about your discoveries, tips, and the unique pieces you’ve brought to life. So grab your supplies, let your imagination soar, and get started on your diamond painting adventure today! Happy crafting!
FAQs About Custom Diamond Painting
1. What is custom diamond painting?
Custom diamond painting involves creating personalized artwork by applying diamonds to a canvas design of your choosing, whether it’s a photo, image, or unique artwork submitted by you.
2. How do I create my own custom diamond painting?
To create your own custom diamond painting, find a company that offers custom options, upload your desired image, select your canvas size, and then place an order. You’ll receive a kit with everything needed to complete your painting.
3. What size canvas is best for a custom diamond painting?
The best canvas size depends on the complexity of your image and your personal preference. Larger canvases often capture more detail, while smaller ones can be more manageable, especially for beginners.
4. Can I use my own images for custom diamond painting?
Absolutely! You can use your own images, but ensure the photo is high-quality and clear for the best results. Most services provide guidelines for image specifications.
5. Are there different drill styles available for custom diamond paintings?
Yes, many custom diamond painting kits offer options for round or square drills, allowing you to choose the style that best suits your aesthetic preferences.
6. How long does it take to receive my custom diamond painting kit?
Delivery times can vary depending on the service provider, but generally, you can expect to receive your kit within a few weeks. It’s best to check individual store policies for specific timelines.
7. Can I make adjustments to my image before ordering?
Most custom diamond painting services allow you to make some adjustments to your image, such as adding effects, cropping, or adjusting colors. Be sure to check with the specific provider for available options.
8. Is there a recommended age for custom diamond painting?
Custom diamond painting is suitable for ages 8 and up, although younger children may need supervision. It’s a great activity for both beginners and experienced crafters alike!
9. How do I care for my finished custom diamond painting?
To maintain your custom diamond painting, keep it out of direct sunlight to prevent fading, and consider displaying it under glass to protect it from dust and scratches. If needed, you can gently clean it with a soft cloth.
10. Can I create custom diamond paintings as gifts?
Definitely! Custom diamond paintings make thoughtful and unique gifts for friends and family, allowing you to turn cherished memories into beautiful artworks they can display proudly.


