

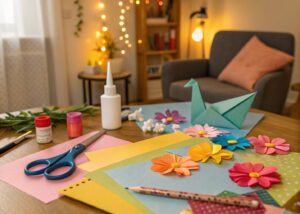
Creating a well-decorated school file is about more than just making your project look good — it’s an important part of expressing your individuality and creativity.
A visually appealing file can capture the attention of your audience and make your work stand out in a sea of standard submissions. This not only helps in gaining better grades but also provides a sense of accomplishment and pride in your work.
Remember, decorating your school file is a fantastic opportunity to showcase your artistic skills and originality. Embrace this chance to be creative, and let your imagination run wild!
Theme Selection
Choosing the right theme for your school file is crucial to making your project memorable and engaging. Start by considering topics that genuinely interest you or relate to the subject matter of your project. Think about themes that allow you to showcase your knowledge and creativity in unique ways.
How to Choose a Theme That Stands Out
- Personal Interests: Reflect on your hobbies, passions, or favorite subjects. Selecting a theme that you are enthusiastic about will keep you motivated and make your work more enjoyable.
- Research Trends: Look into current trends or popular topics that may captivate your audience. Trends in culture, technology, or global events can offer fresh and exciting theme ideas.
- Audience Appeal: Think about what would appeal to your teacher and classmates. Choosing a theme that resonates with your audience can make your project more impressive and impactful.
- Relevance to Content: Ensure that your theme aligns well with the project’s content. A cohesive theme and content integration will make your file look well-thought-out and professional.
Examples of Unique Themes
- Nature: Explore the beauty of the natural world with themes like endangered species, botanical gardens, or ocean life. Use earthy colors, natural textures, and eco-friendly materials to bring this theme to life.
- Space: Dive into the wonders of the cosmos with a space-themed project. Incorporate elements like planets, stars, and galaxies, using dark backgrounds, metallic accents, and glow-in-the-dark features.
- Historical Events: Bring history to life by focusing on significant events such as the Renaissance, World War II, or the Civil Rights Movement. Use period-specific fonts, aged paper, and historical images to add authenticity.
- Cultural Celebrations: Showcase the richness of different cultures by focusing on festivals, traditions, or cuisines. Bright colors, patterned designs, and cultural artifacts can make your file vibrant and educational.
- Fantasy Worlds: Unleash your imagination with themes from mythology, fairy tales, or popular fantasy literature. Use magical creatures, mythical symbols, and enchanting landscapes to create a captivating file.
By carefully selecting a theme that excites you and thoughtfully planning its execution, your school file project will not only stand out but also reflect your individuality and creativity.

Creative Cover Designs
Creating an eye-catching cover is a crucial step in making your school file project stand out. An impressive cover not only grabs the viewer’s attention but also sets the tone for the entire project.
Tips for Creating an Eye-catching Cover
- Bold Typography: Use large, creative fonts to make the title of your project stand out. Ensure the text is clear and easily readable.
- Color Contrast: Choose colors that contrast well with each other to make your design pop. For example, pairing dark text with a light background can make your title more legible.
- High-Quality Images: Incorporate high-resolution images or illustrations that are relevant to your theme. Blurry or pixelated images can detract from the overall quality.
- Simplicity: Sometimes, less is more. Avoid cluttering your cover with too many elements. A clean and focused design often has a stronger impact.
- Consistent Theme: Ensure the cover design aligns with the overall theme of your project. This consistency helps create a cohesive and professional look.
Materials and Techniques
- Collage: Combine different types of paper, photographs, and textures to create a vibrant and layered look. Use glue or adhesive tape to secure each piece.
- Mixed Media: Incorporate various art supplies, such as paints, markers, and fabrics, to add depth and interest. Layering different mediums can result in a rich and dynamic cover.
- 3D Elements: Use materials like foam, cardboard, or clay to add three-dimensional elements. These features can create an engaging and tactile experience for the viewer, making your cover stand out even more.
Step-by-step Guide for a Standout Cover Design
- Plan Your Design: Start with a sketch or mock-up of your cover. Decide where the title, images, and any other elements will be placed.
- Gather Materials: Collect all the necessary supplies, including paper, paints, adhesives, and decorative items relevant to your chosen technique.
- Create the Base: If using a solid color or patterned background, apply this first. Ensure it covers the entire cover evenly.
- Add Layers: Gradually build up your design by adding images, text, and decorative elements. If you are creating a collage, start with the largest pieces and fill in gaps with smaller items.
- Incorporate 3D Elements: If using materials like foam or clay, attach these last to prevent them from being squished or damaged during the earlier stages of creation.
- Final Touches: Once all elements are in place, go over your cover to ensure everything is securely attached. Add any finishing touches like glitter or gloss for extra sparkle and protection.
- Review: Step back and take a look at your cover from a distance. Make any necessary adjustments to ensure your design is balanced and visually appealing.
By following these tips and steps, you can create a cover that not only supports the theme of your project but also draws in viewers with its creativity and craftsmanship.
Artistic Page Layout Ideas
Creating engaging and organized page layouts can significantly enhance the readability and impact of your school file project. Incorporating smart design choices like borders, fonts, color schemes, and illustrations can turn a standard page into a visually appealing and informative masterpiece.

Enhancing Readability with Borders, Fonts, and Colors
- Borders: Use borders to frame your content and add structure to the page. Simple straight lines can provide a clean look, while decorative borders can add a touch of elegance or playfulness, depending on your theme. Ensure that the borders don’t overpower the main content but instead guide the reader’s eye through the information.
- Fonts: Choose fonts that are easy to read and appropriate for your theme. Combining a maximum of two to three different fonts can create a visually appealing contrast. For instance, use a bold, decorative font for headings and a simple, clean font for body text. Consistent font sizing and styling for headings, subheadings, and body text will also help maintain clarity and order.
- Color Schemes: Opt for a color palette that not only matches your theme but also enhances readability. High-contrast colors, like dark text on a light background, are generally the easiest to read. Use softer or complementary colors to highlight important information without overwhelming the senses. Consistent use of your chosen color scheme throughout the project can bring a sense of harmony and professionalism.
Incorporating Illustrations and Diagrams Effectively
- Illustrations: Integrate illustrations that are relevant to your content. Hand-drawn sketches, digital art, or clipart can break up text and provide visual interest. Position illustrations strategically near the related text to create a seamless flow of information. Ensure that the images are high quality and clearly visible.
- Diagrams: Use diagrams to explain complex information in a straightforward and visually engaging way. Charts, graphs, and flowcharts can be particularly effective for presenting data or processes. Make sure diagrams are labeled clearly and appropriately scaled so that they are easy to read and understand at a glance.
Layout Techniques
- Columns and Grids: Arrange your content in columns or grids to improve structure and readability. This method helps to organize information logically and can make your pages look neat and professional. Ensure there is adequate spacing between columns to avoid clutter.
- White Space: Don’t underestimate the power of white space. Adequate spacing around text, images, and other elements can make your layout more breathable and easier to navigate. White space helps prevent your pages from feeling overcrowded, which can overwhelm readers.
- Text Boxes and Callouts: Use text boxes and callouts to highlight key points or important information. This technique draws attention to crucial bits of text and helps break up large blocks of text, making your project more accessible and engaging.
Putting It All Together
To create an outstanding page layout:
- Start with a sketch of your page, planning where each element will go.
- Use borders and grids to give structure and order.
- Select readable fonts and stick to your color scheme.
- Integrate relevant illustrations and diagrams to supplement the text.
- Ensure there is adequate white space and use text boxes for emphasis.
By thoughtfully combining these elements, your school file project will be both visually appealing and highly informative.
Interactive Elements
Adding interactive features like flaps, pockets, and pop-ups can make your project truly stand out. These elements not only engage the reader more actively but also add an element of surprise and interest.
How to Add Interactive Features
- Flaps: Flaps are a great way to hide additional information or images that the reader can discover. To create a flap, cut a piece of paper slightly larger than the content you want to hide. Attach it with adhesive along one edge, allowing the flap to be lifted to reveal the hidden material. When positioning flaps, ensure they don’t overlap in a way that makes the page look cluttered.
- Pockets: Pockets can hold extra materials like notes, small booklets, or even pictures. To make a pocket, cut a rectangle or any shape from sturdy paper or card stock. Glue three sides onto the base page, leaving the top open for inserting items. You can also decorate the pocket to match your theme, adding both functionality and aesthetic value.
- Pop-Ups: Pop-up elements can truly bring your project to life. To create a simple pop-up, fold a piece of paper in half. On the fold, make two parallel cuts about an inch long. Fold the cut piece back to create a tab. When you open the card, the tab will stand up, and you can attach an image or text to it. More complex pop-ups can involve multiple tabs or layers, adding depth and dimension.
Examples of Interactive Elements
- Fold-Out Maps: Perfect for geography or history projects, you can create a large map that folds out from the page, providing a broader context for your content.
- Sliding Panels: Panels that slide to reveal information underneath can make learning more engaging. Use a double-layered mechanism where the top layer has cut-out sections for the sliding content to appear.
- Flip Books: Small sections of the project can be turned into flip books, illustrating processes or sequences over multiple pages.
Techniques for Ensuring Durability
- Use Strong Adhesives: Make sure to use strong adhesives like double-sided tape or glue sticks designed for crafts to ensure that interactive elements stay in place. Avoid liquid glue as it might warp the paper.
- Reinforce Edges and Hinges: Strengthen edges and hinges where the most movement occurs using clear tape or additional layers of paper. This will prevent tearing and add longevity.
- Laminating: If possible, laminate the interactive parts of your project. Lamination provides a durable, protective layer against frequent handling and wear.
- Quality Materials: Use high-quality paper and card stock for your interactive elements. These materials are less likely to tear and will hold up better over time.
By incorporating interactive elements thoughtfully and ensuring their durability, your school project will not only capture attention but also withstand the test of time.
Use of Recycled and Eco-friendly Materials
Encouraging the Use of Sustainable Materials
In today’s world, sustainability is more important than ever. Incorporating recycled and eco-friendly materials into your school projects not only helps protect the environment but also educates others about the importance of reducing waste. Opt for sustainable materials like recycled paper, cardboard, or biodegradable adhesives. These choices can significantly lower the carbon footprint of your project.
Creative Ways to Incorporate Recycled Objects into Your Project
- Paper and Cardboard: Reuse old newspapers, magazines, and cardboard boxes to create unique textures and backgrounds. These materials can be cut into shapes, layered, or even papier-mâché to add depth to your project.
- Fabric Scraps: Utilize leftover fabric pieces for textural elements such as page borders, pockets, or decorative accents. You can even collect small fabric samples from discontinued swatches at fabric stores.
- Plastic Bottles and Containers: Transform plastic bottles into functional elements like small storage pockets or even 3D models. Decorate them with paint or fabric to blend seamlessly into your project.
- Natural Elements: Incorporate items like dried leaves, pressed flowers, or small twigs. These can serve as both artistic elements and educational pieces, showcasing natural beauty while emphasizing sustainability.
Benefits of Using Eco-friendly Decorations
- Educational Value: Using eco-friendly materials introduces the concept of sustainability to your audience. It can spark discussions on environmental issues and inspire others to make green choices.
- Cost-Effective: Recycled materials are often free or very inexpensive. Utilizing these can reduce the overall cost of your project, allowing you to allocate resources to other areas.
- Unique Aesthetic: Recycled and natural materials can add a distinctive and appealing look to your project. They offer textures and colors that are difficult to replicate with new, synthetic materials.
- Environmental Impact: Choosing sustainable materials reduces waste and lowers the demand for new resources. This helps to conserve energy and resources, leading to a healthier planet.
By thoughtfully incorporating recycled and eco-friendly materials, you not only enhance the visual appeal of your project but also contribute positively to the environment and educate others about the importance of sustainability.

Incorporating Technology
Ideas for Integrating QR Codes, Augmented Reality, and Other Tech Elements
Incorporating technology into your school projects can significantly enhance their interactivity and engagement. Here are some ideas to get you started:
- QR Codes: QR codes can provide quick access to additional content such as videos, websites, or downloadable files. This can be particularly useful for adding depth to your project without overcrowding the physical space.
- Augmented Reality (AR): AR can bring a whole new dimension to your project. Use AR applications to overlay digital information, 3D models, or animations onto physical components of your project.
- Interactive Slideshows and Videos: Integrate interactive slideshows or video presentations that can be accessed via tablets or laptops. This multimedia approach can make your project more dynamic.
- Digital Timelines and Infographics: Create digital timelines or infographics that provide a clear and visually appealing way to present information.
How Technology Can Enhance the Presentation of Your Project
Technology can make your project more immersive and engaging. Interactive elements such as QR codes and AR can provide hands-on experiences that are memorable and fun. Multimedia components like videos and slideshows can convey information more dynamically and clearly, appealing to various learning styles.
Additionally, tech elements can allow for a more in-depth exploration of your topic, as they can link to external resources or provide 3D visualizations.
Step-by-Step Guide for Adding Tech Elements
- QR Codes
- Create your content: Prepare the videos, websites, or files that you want to link.
- Generate the QR code: Use a free online QR code generator.
- Print and position: Print the QR codes and adhere them to relevant sections of your project.
- Test: Ensure that the QR codes are easily scannable and lead to the correct content.
- Augmented Reality
- Choose an AR application: Select a user-friendly AR app that allows you to link AR content to physical markers.
- Create AR content: Prepare 3D models, animations, or informational overlays.
- Set markers: Choose images or markers in your project where the AR content will appear.
- Link and test: Use the AR app to link your digital content to the markers and conduct thorough testing to ensure functionality.
- Interactive Slideshows and Videos
- Prepare multimedia content: Create slideshows or videos that supplement your project’s theme.
- Host the content: Upload the content to a platform like YouTube or Google Slides.
- Provide access: Embed links or QR codes within your project to guide users to the multimedia content.
- Ensure compatibility: Make sure the multimedia content is compatible with various devices.
By following these steps, you can successfully integrate technology into your school project, making it more engaging and informative for your audience.
Conclusion
Incorporating recycled objects and technology into your school projects opens up a world of creative possibilities. From using paper, cardboard, and fabric scraps to integrating QR codes and augmented reality, the ideas discussed offer practical and innovative ways to make your project stand out.
Experimenting with these elements allows you to personalize your work, demonstrating both eco-consciousness and tech-savviness.
Remember, the key to a successful project lies in your willingness to explore and adapt these ideas to fit your unique vision. Don’t be afraid to try new techniques or blend different materials and technologies. Every project you create is an opportunity to express your creativity and make a positive impact on the environment and your audience.
So, go ahead and dive into your next project with enthusiasm and confidence. Your ingenuity and effort will not only educate and inspire others but also leave a lasting impression. Happy creating!
We would love to see your own creative ideas and finished projects! Sharing your unique approaches and innovations not only inspires others but also fosters a community of learning and creativity.
Whether you’ve used recycled materials, integrated cutting-edge technology, or both, your projects can serve as a valuable resource for everyone.
Important Resources
Here are some valuable resources to help you incorporate recycled materials and technology into your school projects:
Websites and Online Tools
Canva: A versatile design tool that allows you to create beautiful infographics, slideshows, and more. Visit Canva
Tinkercad: Perfect for creating 3D models for augmented reality elements. Visit Tinkercad
QR Code Generator: A free and easy-to-use tool for generating QR codes. Visit QR Code Generator
Videos and Online Courses
YouTube: Search for channels that specialize in recycled crafts and technology integration. Some popular channels include:
Crafty Panda: Great for DIY craft ideas and inspiration.
AR Tutorials: Step-by-step guides to mastering augmented reality.
Coursera: Offers courses on integrating technology into educational projects. Visit Coursera
Educational Apps
Blippar: An AR browser app that can be used to overlay digital graphics and information on real-world objects.
Google Expeditions: An app that integrates VR and AR for educational voyages around the world.
Using these resources, you can enhance your projects with creativity and technological flair. Dive in, explore, and transform your ideas into engaging, informative presentations.


