
Toiletries are the easiest part of a trip to overpack—and the fastest way to derail your airport flow. A smart travel toiletry system keeps your liquids TSA-ready, stops leaks, and turns your bathroom routine into a two-minute unpack.
In this guide you’ll learn how to choose the right toiletry bag, switch to travel-friendly solids, and organize everything by zones so you can grab what you need without digging.
Whether you’re a carry-on minimalist, a frequent flyer, or packing for kids, these simple steps make every departure quicker and every hotel night calmer. Plus, you’ll get a checklist for every trip.
Why organizing toiletries for travel matters
Organizing toiletries for travel saves you time at security, space in your bag, and stress in your hotel bathroom. A little planning turns a jumbled pouch into a compact setup where you can find sunscreen, medicine, or kids’ toothbrushes in seconds.
When your liquids are sorted by category, packed in the right containers, and easy to grab, you move through TSA faster and unpack in a few quick steps. Whether you fly every month, travel with kids, or prefer one-bag trips, a smart toiletry system makes every journey feel smoother.

Start with your travel toiletry goals
Before you buy more mini bottles, get clear on what you actually need your toiletry setup to do.
Ask yourself:
- Are you mostly flying with carry-on only or checking a bag
- Do you travel alone, as a couple, or with kids
- Do you want a “grab and go” kit that stays packed all the time
- Are you aiming for minimalist, lightweight packing or comfort items from home
If your bigger goal is to pack smart and organized, your toiletry kit should support that, not work against it. Once you define your priorities, every decision about bottles, bags, and products becomes easier.
Understand TSA liquid rules before you pack
If you fly with carry-on luggage, staying within TSA rules is the first step in organizing toiletries for travel. The current liquids guideline is often called the 3-1-1 rule.
In practice, that means:
- You are allowed a quart sized bag containing liquids, aerosols, gels, creams, and pastes.
- Each container inside must be 3.4 ounces or 100 milliliters or less.
- All of those containers must fit inside a single clear quart sized bag for TSA screening.
For the smoothest experience, place your liquid containers in a separate quart sized bag and keep it in an outer pocket of your carry-on so you can pull it out quickly. Liquids in containers larger than 3.4 ounces need to go in checked baggage, unless you are dealing with duty free items that meet specific packaging and screening requirements at security.
Any liquid, aerosol, gel, cream, or paste that triggers an alarm may need extra screening, so keeping things visible and easy to handle works in your favor.
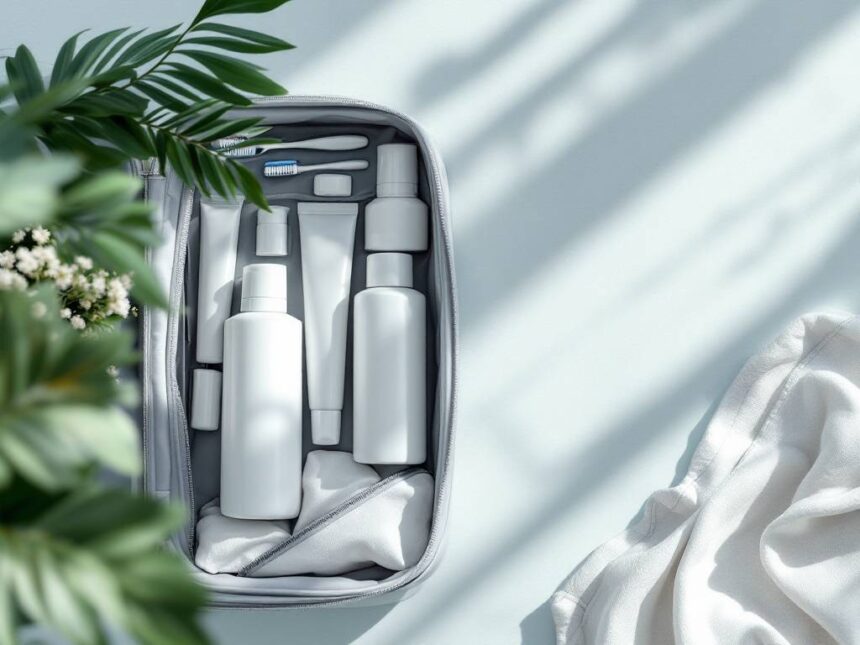
Choose the right toiletry bag setup
The bag you use shapes how easy it is to pack, unpack, and stay organized during your trip.
Decide on structure and style
Think about where and how you will use your toiletry bag.
- If you are often in small hotel bathrooms, a hanging toiletry bag with a swivel hook can save counter space.
- If you mostly stay in rentals or with family, a flat pouch may be easier to tuck into tight suitcase corners.
- If you travel with kids, low profile, plain pouches for each child keep things simple and avoid fights over shared items.
A durable, water resistant bag with multiple pockets or sections is ideal. You want enough compartments to separate categories, but not so many that you lose track of where things are. This is similar to choosing the right accessories in your suitcase, like the ideas in packing bags organization ideas.
Pick materials that work for travel
Your toiletry bag will deal with leaks, humidity, and sometimes wet items.
Waterproof or water resistant materials help protect everything else in your luggage. Tutorials such as the waterproof zipper pouch from AppleGreen Cottage show how vinyl or oilcloth can create a simple, unlined bag that resists moisture and is easy to wipe clean. Their version uses a single piece of fabric and a zipper, with only six straight stitches, so even beginner sewists can make a travel ready toiletry pouch in under 10 minutes.
You can also look at ideas that combine sturdy cotton or canvas on the outside with a wipeable nylon lining on the inside, like the Sailrite DIY toiletry bag project, which uses Cotton Duck #8 fabric with a Nylon 400D lining for a durable, easy to clean interior. This type of setup is especially helpful if you carry liquids that might spill.
If you like DIY or custom designs, you can:
- Add an inner pocket for tiny items like cotton swabs or bobby pins.
- Sew in a clear vinyl window so you can see contents at a glance.
- Create separate small pouches for kids or specific categories.
Switch to travel friendly products first
Before you even touch a bag or bottle, decide which products deserve a spot in your travel routine.
Simplify your routine
Try to streamline your daily products down to travel friendly essentials. Multi purpose items save space, time, and weight. For example, a tinted moisturizer with SPF can replace separate foundation and daytime sunscreen, and a bronzer that doubles as eyeshadow cuts down on extra palettes.
You can also lean on non liquid alternatives, especially for carry-on trips. Sunscreen sticks, face cleansing bars, and insect repellent wipes do not count toward your liquid allowance, and they are less likely to leak.
Avoid packing items that hotels commonly provide, such as body wash, body lotion, shaving cream, basic hair dryers, and sometimes nail polish remover. Leave these behind unless you are going somewhere remote or have specific preferences that matter to you.
Stock travel sizes thoughtfully
Instead of tossing random minis into your bag, think strategically.
You can:
- Buy travel sized versions of your must have products.
- Decant from full sized bottles into silicone travel bottles that compress air and help prevent leaks.
- Use small cream jars for products like facial moisturizer, sunscreen, and hair pomade.
- Take advantage of sample sizes you already have at home for short trips.
Keeping a small “travel only” basket at home for minis and sample packets makes it much easier to refill your kit quickly when you pack.
Categorize toiletries before you pack
A strong category system is the backbone of organizing toiletries for travel. It mirrors the logic behind packing category organization for clothes and gear.
Break your items into clear groups:
- Daily hygiene: toothpaste, toothbrush, floss, deodorant, face wash, body soap.
- Hair care: shampoo, conditioner, styling products, comb or brush.
- Skin care and makeup: cleanser, moisturizer, SPF, makeup basics.
- Health and meds: prescriptions, pain reliever, allergy meds, bandages.
- Extras: contacts and solution, travel towel, feminine care products, kids’ items.
Once you sort everything into categories on a table or bed, you will quickly see duplicates and non essentials. This is when you can decide what stays home, what gets combined, and what needs a dedicated spot in your kit.
Use a liquids strategy that passes security
Liquids are usually the trickiest part of organizing toiletries for travel, especially if you often fly with carry-on only.
Build a TSA ready liquids bag
Treat your quart sized liquids bag as its own mini system.
To keep it simple:
- Pull out every product that is a liquid, gel, cream, paste, or aerosol.
- Move as many as possible to solid or non liquid versions.
- Limit the remaining liquids to those you will use daily or urgently.
Common liquids that usually make the cut:
- Toothpaste or solid tooth tabs.
- Facial cleanser, if not in bar form.
- Moisturizer or facial SPF.
- Liquid makeup staples like concealer or mascara.
- Contact lens solution.
- Hand sanitizer and lip balm if they are liquid or gel based.
Place all liquid containers of 3.4 ounces or less into your quart bag. Keep that bag in an outer pocket of your carry-on or personal item, similar to how you might place quick access items using organized carry-on packing tips.
For families, consider one shared liquids bag for “everyone’s stuff” plus a second for specialized items like baby lotion, kids’ medicine, or specific sunscreen, as long as you are still within airline and security rules.
Pack non liquids separately
Toiletries that are not liquids do not need to be in your TSA bag. That includes:
- Bar soap in a dedicated bar soap case. Products like the Flatpak Soap Bar Case are designed to keep solid soap contained while still drying between uses.
- Shampoo and conditioner bars in small tins or soap cases.
- Deodorant sticks and sunscreen sticks.
- Insect repellent wipes that do not count against liquid limits.
Store these in a separate pouch or section of your toiletry bag so you can reach them easily without disturbing your liquids setup.
Create a layout inside your toiletry bag
Once your products are chosen and separated into liquids and non liquids, you can decide how to arrange everything inside your bag.
Use zones inside one main bag
Think of your toiletry bag as a small dresser with zones. You might follow a pattern like this:
- Front or top pocket: TSA liquids bag or items you need during the flight.
- Main compartment: bulkier items like deodorant, bar soap case, makeup bag, hairbrush, and travel towel.
- Interior zipper pocket: medicines, first aid items, contact lenses.
- Small mesh pocket: cotton rounds, Q tips, bobby pins, hair ties.
Mesh or clear pockets make it easy to see what you have. If your bag does not have them, you can create small sub kits inside zip top bags or very small pouches. Repurposed containers, such as a Welly bandage tin for tiny items like hydrocolloid bandages, cotton rounds, or Q tips, help keep clutter contained.
Decide what stays packed between trips
For frequent travelers, a pre packed toiletry kit eliminates last minute scrambling. Keep this kit ready with:
- Basic hygiene items you always use.
- A simple skin care routine.
- A small set of go to makeup products, if you wear makeup.
- A minimal first aid and medication pouch.
Before each trip, you just top up liquids, swap out any destination specific items like heavy sunscreen, and you are done. This mindset pairs well with packing light and organized, because you are not reinventing your setup every time.
Smart container choices that prevent leaks
The containers you choose can make the difference between a clean bag and shampoo covered clothes.
Silicone travel bottles are a solid choice because they compress air as you use product, which helps prevent bursting in flight. Look for versions with secure caps and clear labels so you are not guessing which bottle holds shampoo or body wash.
Small cream jars and contact lens cases can hold thicker products like moisturizer, balm, or even a tiny amount of foundation for short trips. Fill them only as much as you truly need, not to the brim.
Whenever possible, avoid traveling with full size products. Even if the container itself meets the size rules, you are carrying more weight and volume than necessary. For checked bags, keep larger bottles in a separate leak proof pouch so they cannot ruin your clothes if a lid opens.
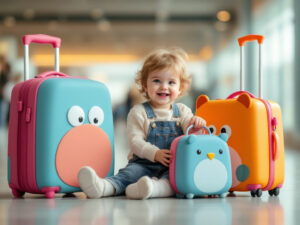
Organizing toiletries for travel with kids
Traveling with children introduces extra items and potential mess, but a simple system keeps it manageable.
Give each child a small personal kit
Instead of one giant family toiletry bag, give each child a labeled pouch that holds:
- Toothbrush and toothpaste.
- Comb or small hairbrush.
- Any child specific medications or creams.
- A small pack of wipes and tissues.
You keep the shared liquids and overflow items in the main family bag, but kids can handle their own nightly routine with their pouch. This also makes bedtime in hotels or rentals easier, especially if you are using ideas from organizing kids’ travel bags.
For very young kids, use low profile, plain waterproof pouches, similar to the child friendly design from the AppleGreen Cottage project. They slide easily into backpacks or under stroller baskets and are simple enough to manage when you are tired.
Plan for messes and surprises
Children generate more spills, stains, and unexpected needs. Add a small “problem solving” kit to your toiletry setup with:
- Thermometer and basic fever reducer.
- Cortisol cream or another itch relief option.
- Small nailbrush, nail clippers, and a nail file.
- Extra bandages and antiseptic wipes.
Stash this mini kit in an interior zip pocket so it is easy to grab but stays separate from everyday items.
Make room efficient hair and body tools
Hair tools and accessories can quickly eat up space. A few travel conscious choices can help.
Choose compact tools and cases
A compact, travel friendly hairbrush is usually enough for trips. Foldable brushes with built in mirrors or mini paddle brushes take up little room but still detangle effectively. If you use hot tools, mini straighteners or curling wands fit more easily around other items in your bag.
Pair these with:
- A microfiber or compact travel towel that dries quickly and packs down small. Many travel towels are designed to take up minimal space while drying faster than standard towels, which is helpful if you do not trust hotel linens or you will be swimming often.
- Simple hair ties, a few clips, and a small claw clip instead of a large assortment of accessories.
Keep these in their own corner or pocket so they do not tangle with liquids or skin care products.
Minimize in shower clutter
Using solid shampoo and conditioner bars dramatically reduces bottle count in your bag and shower. If you combine them with a single multi use body and face bar that your skin tolerates well, your shower routine becomes extremely streamlined.
Place each bar in a ventilated travel case so it can dry between uses. If you are tight on space, one dual compartment case can hold both shampoo and conditioner.
Toiletries for minimalist and one bag travelers
If you prefer one bag travel, your toiletry kit needs to be compact, efficient, and easy to repack quickly.
Align your toiletry strategy with minimalist packing organization and how to pack efficiently for travel by asking of each item:
- Will I use this more than once or twice
- Does something else already in my bag do the same job
- Can I buy or share this at my destination if I end up needing it
Prioritize:
- Solid versions of soap, shampoo, conditioner, and sunscreen.
- Multi use products for skin and makeup.
- A tiny but carefully chosen first aid kit.
- The smallest brush and hair tools you can comfortably use.
For trips under a week, many one bag travelers find that one lightweight hanging pouch with a few internal pockets is enough for all toiletries. Keep the liquids bag in the front pocket, and let the rest of your items live in the main compartment.
If you are optimizing how to pack a backpack efficiently, pack your toiletry bag near the top or in an outer compartment, so you can pull it out quickly at security or in a cramped hostel bathroom.
Borrow ideas from broader packing organization
Your toiletry system works best when it fits into an overall packing strategy, not as a separate puzzle.
Concepts like:
- Using categories and sub kits from packing category organization.
- Thinking in terms of “zones” as in travel packing organization tools.
- Following a repeatable routine similar to the one you might use in organized packing for vacation.
All of these make it easier to pack and unpack without forgetting basics. Toiletries should be one of the first categories you pack, after documents and medications, since they require the most rules based decisions.
A reliable toiletry kit is less about having every product you own and more about having the right few items arranged so you can grab what you need in seconds.
Quick step by step routine for packing toiletries
Use this simple process each time you prepare for a trip so nothing important falls through the cracks.
- Confirm whether you are checking a bag, carrying on only, or mixing both.
- Lay out your usual daily routine products on a surface.
- Sort them into categories: hygiene, hair, skin and makeup, health, and extras.
- Eliminate duplicates and switch to multi use and solid products where possible.
- Move allowed liquids into travel sized containers and place them in a quart sized bag.
- Pack non liquid items into your main toiletry bag, grouping by use.
- Add a small, clearly labeled meds and first aid pouch.
- Set aside kid specific pouches if you are traveling with children.
- Place your liquids bag in an outer pocket of your carry-on for TSA.
- Store your fully packed toiletry kit somewhere you can grab quickly for your next trip.
You can pair this with a broader packing checklist for organized travel so you are not reinventing your whole packing system each time.
Keep your toiletry system updated
Your ideal toiletry setup will change over time. After each trip, take two minutes to review what worked and what did not.
Ask yourself:
- Which items stayed untouched the entire time
- Did I miss anything important
- Was anything hard to find or constantly buried
- Did I have any leaks or security hassles
Remove items you never used, note products you wished you had, and adjust your layout so frequently used items are easiest to grab. That small bit of reflection, combined with the tips above, turns organizing toiletries for travel from a chore into a set of simple habits that make every trip lighter, faster, and less stressful.
FAQs
What counts as a liquid for TSA?
Liquids, aerosols, gels, creams, and pastes follow the 3-1-1 rule in carry-ons.
What is the TSA 3-1-1 rule in plain English?
Each container must be 3.4 oz/100 ml or less, and everything must fit in one clear quart-size bag.
Can I bring shampoo and sunscreen in my carry-on?
Yes—if each is 3.4 oz/100 ml or less for carry-on screening.
Is bar soap allowed in carry-on bags?
Yes.
How do I avoid leaks in my toiletry bag?
Use travel-size containers, avoid overfilling, pack liquids together in the quart bag, and keep a separate leakproof pouch for larger checked-bag bottles. (Also: choose a water-resistant toiletry bag.)
How should I organize toiletries when traveling with kids?
Give each child a small labeled pouch (toothbrush, brush, kid meds/cream). Keep shared liquids in one main TSA bag to reduce duplicates.
What should go in a travel medication/first-aid kit?
Bring essentials based on your needs and trip type; keep meds accessible in a durable, water-resistant container.


